Contents
This page explains how to install (deploy) Acall Office add-in in bulk.
If you have selected "Create reservation on Outlook calendar" as meeting reservation method, you can send appointment codes to guests from Outlook by installing Acall Office add-in.
You can make reservations on Outlook without installing the add-in, but you must install Acall Office add-in to send appointment codes to your external guests.
Office add-in can be installed by users themselves according to "Install Acall Office Add-in" or administrators can install in bulk to all users or specific users.
💡 Note
To use Acall Office add-ins, the following conditions must be met.
・Select "Create reservation on Outlook calendar" as meeting reservation method
 ・Select Meeting Room Reservation Method
・Acall and Outlook Calendar linking setting is complete.
 ・Link Acall and Outlook Calendar
 ・Connect Workers with Outlook Calendar
 ・Import Meeting Rooms and Equipment from Outlook
Note on bulk installation
Browser version and desktop app version
If the administrator installs in bulk, it will be installed in both the browser version and desktop app version of Outlook.
Up to 24 hours to reflect
After setup, it may take up to 24 hours for the add-in installation to complete.
Add-in cannot be deleted by user
Add-ins installed by individual users are installed as "My Add-ins," while add-ins installed by administrators in bulk are installed as "Admin managed" add-ins.
Add-ins added as "Admin managed" cannot be deleted by individual users.
Microsoft 365 service specification
The bulk installation method described in this page uses the standard features of Microsoft 365.
There is a possibility that it may become unavailable due to updates on Microsoft 365, or that the specifications or operating procedures may change. Please be aware of this beforehand.
If you have any questions about Microsoft 365 specifications or operating procedures, please contact Microsoft.
Please also refer to the Microsoft's article "Deploying Add-ins to Microsoft 365 Management Center".
Bulk installation of Acall Office add-in
⚠️ Note
The following steps may differ in specifications and operating procedures depending on Microsoft 365 updates.
Please contact Microsoft if you have any questions about specifications or operating procedures.
Please also refer to the Microsoft article "Deploying Add-ins in the Management Center".
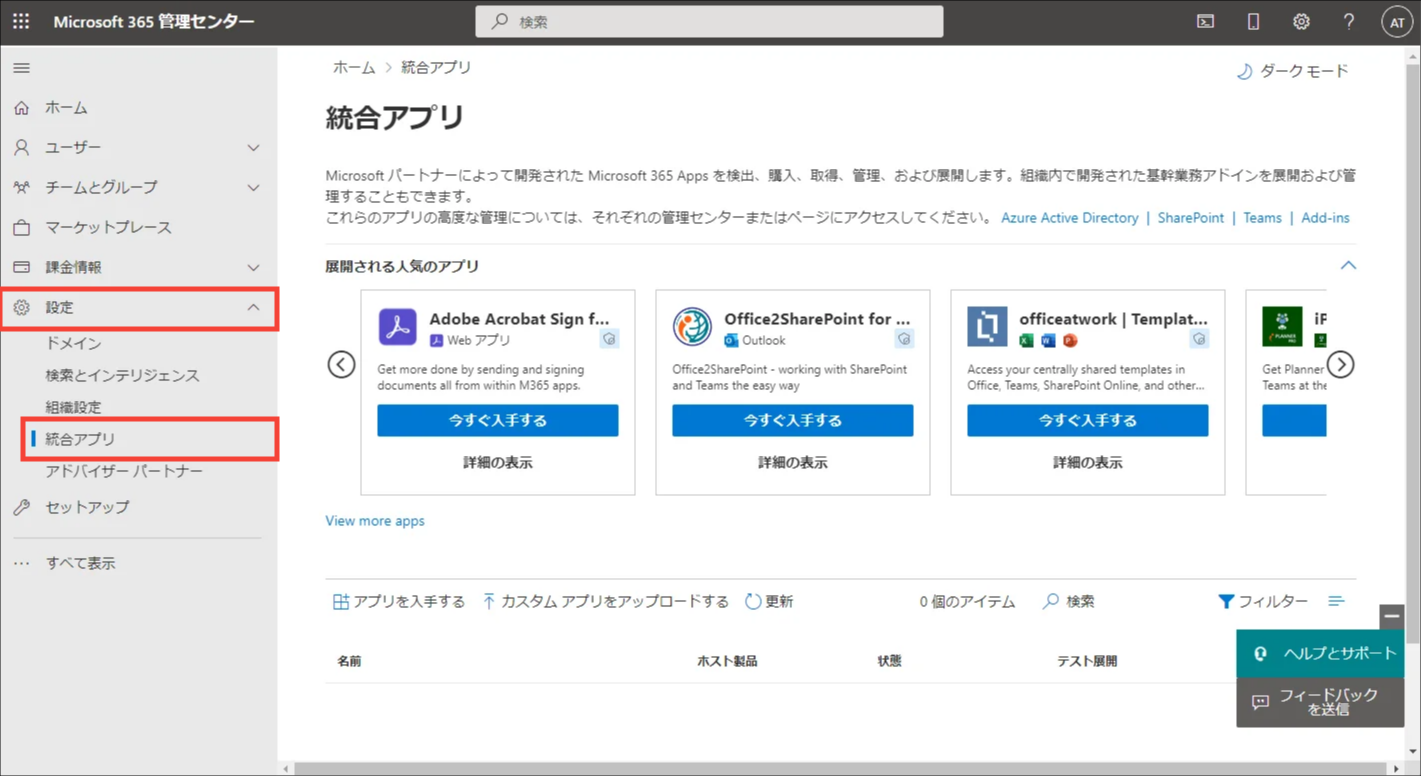
Open Settings > Integrated apps on Microsoft 365 Admin Center. If you do not see the Integrated apps page, open Settings > Add-Ins page.

Click [Get Apps].

Type "acall" in the search field and the Acall Add-in will appear in the search results. Click [Get it now].

On the next screen, select Everyone, Specific users/groups, or Just me to deploy the add-in and click [Next].

When the "Accept Permission Request" screen appears, click [Next].

Click [Finish deployment] on "Review and finish deployment" screen.

Click [Done].

Acall Add-in will be displayed in "Integrated apps".

⚠️ Note
It may take up to 24 hours for add-ins to be reflected for both administrators and general users.
For instructions on how to use the add-in, please refer to "Booking a Workspace from Outlook Calendar".
Comments
0 comments
Article is closed for comments.