Contents
By integrating Acall with Microsoft Teams (hereinafter referred to as "Teams"), you can receive notifications in Teams when guests visit your office and use Acall Reception.
This page explains how to set up Teams integration.
You can find an illustrative example video here. (JP only)
Precondition for Teams notification
Power Automate
To receive visitor notification in Teams, you must use Power Automate from Microsoft.
Power Automate is available with the Power Automate license included in your Microsoft 365 subscription.
Reference:
- https://www.microsoft.com/en-us/power-platform/products/power-automate
-
https://learn.microsoft.com/en-us/power-automate/
Notification destination
Visitor notifications from Acall Reception are posted to "channel" in Teams.
You will not be able to receive visitor notifications in your personal "chat".
"Team" and "Channel" that receive visitor notifications can be set individually for each worker or group.
Before setting up on Acall, please create the "Team" and "Channel" on Teams.
Note
Below is an example of channel operation.
- If General Administration department is selected on Acall Reception, they receive visitor notifications in the "General" channel in the "Acall General Administration" team.
- If Sales Department A is selected on Acall Reception, they receive visitor notifications in the "Sales Department A" channel in the "Acall Sales Division" team.
💡 Note
- There are no team or channel name requirements.
To learn more about "Team," "Channels" and "Chat" in Teams, please check out Microsoft's articles "First things to know about teams in Microsoft Teams," "Create a team from scratch in Microsoft Teams," and more.
Integrate Teams with Acall
Download the Power Automate package for Acall Visitor Notification
Package file is available that can be imported into Power Automate to create flow.
Download the package file from the following URL.
Note
If you cannot use the package or want to create it from scratch due to internal security reasons or other, please refer to the following.
Create a Power Automate flow for Teams Integration Without Using a Package File
Create a Power Automate flow for Acall visitor notification
Import the downloaded package file to create a flow.
💡 Note
You must create a flow for each notification destination.
For example, if you want to notify the "Sales Department" team and the "General Affairs" team, create two flows.
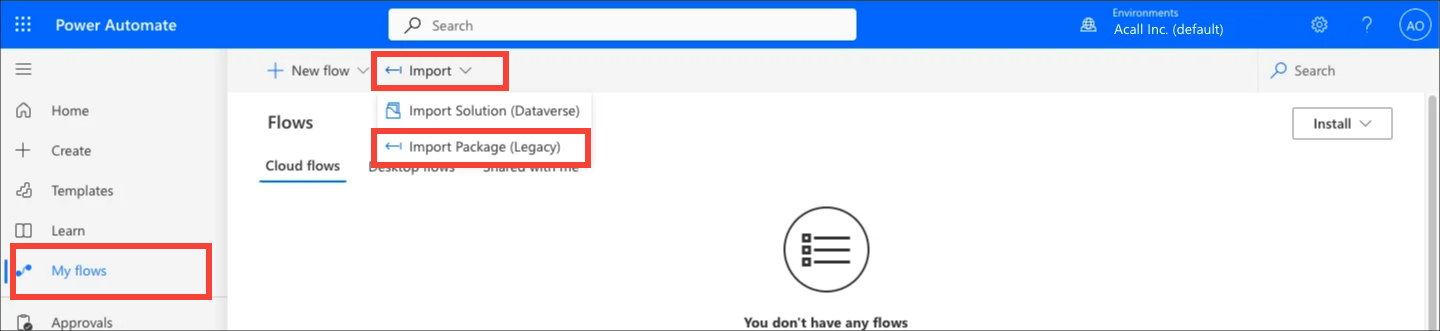
Open the Power Automate settings.
https://make.powerautomate.com/
Click [My flows] on the side menu and click [Import] > [Import Package (Legacy)].
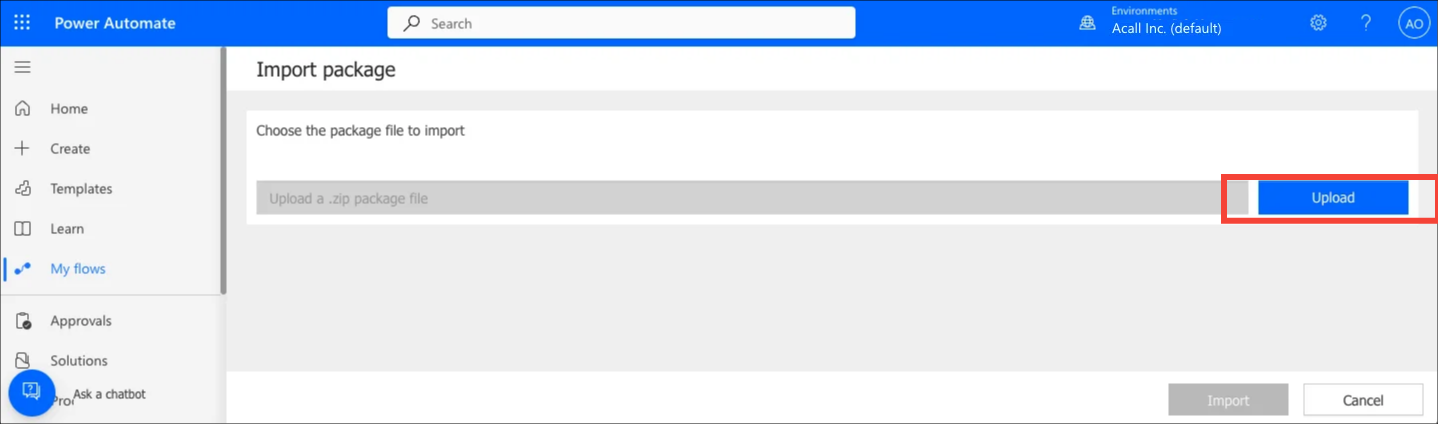
Click [Upload] and select the downloaded package file.
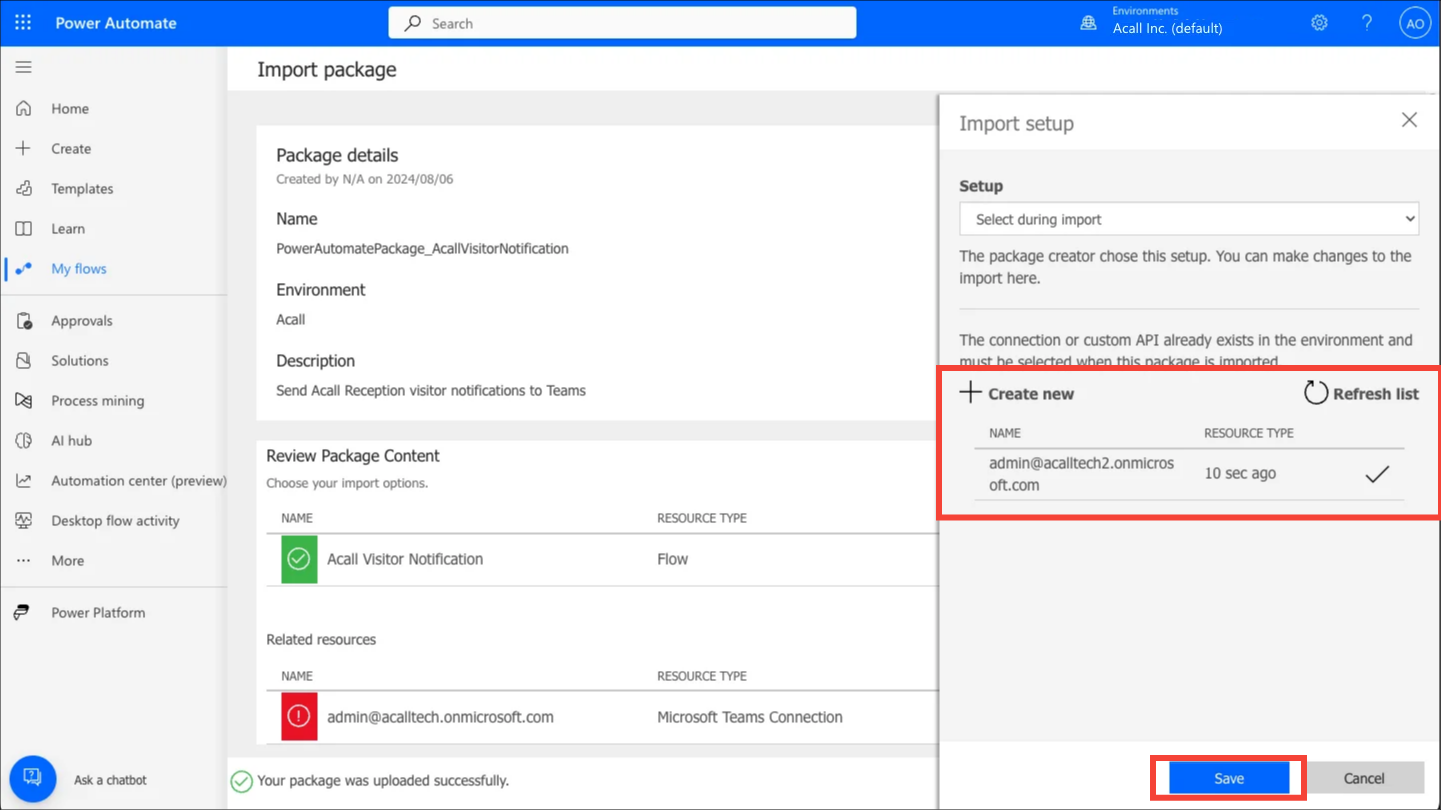
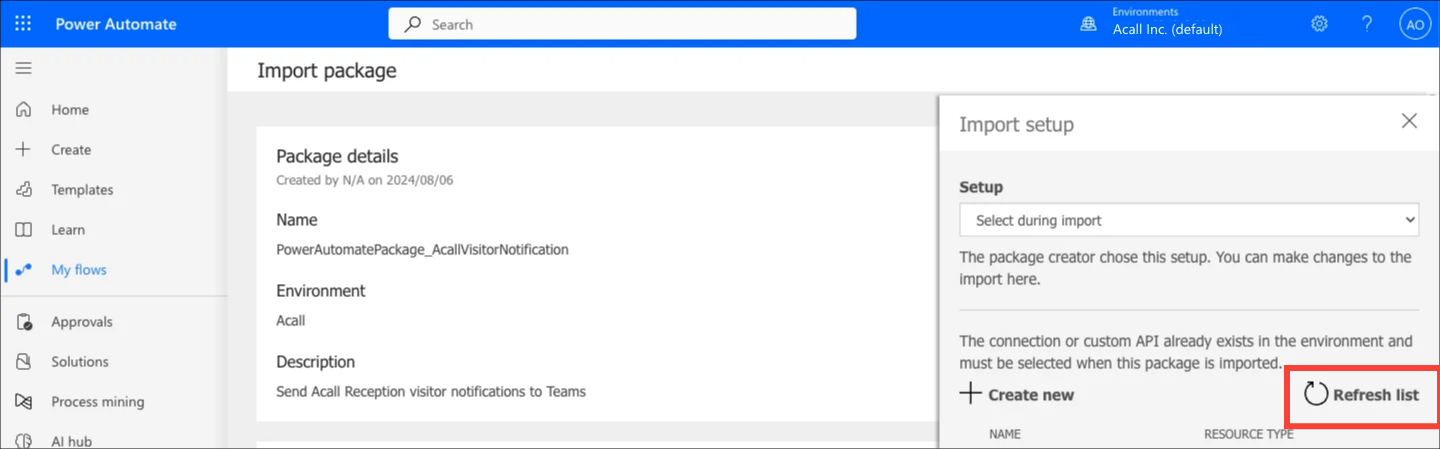
Click [Select during import].
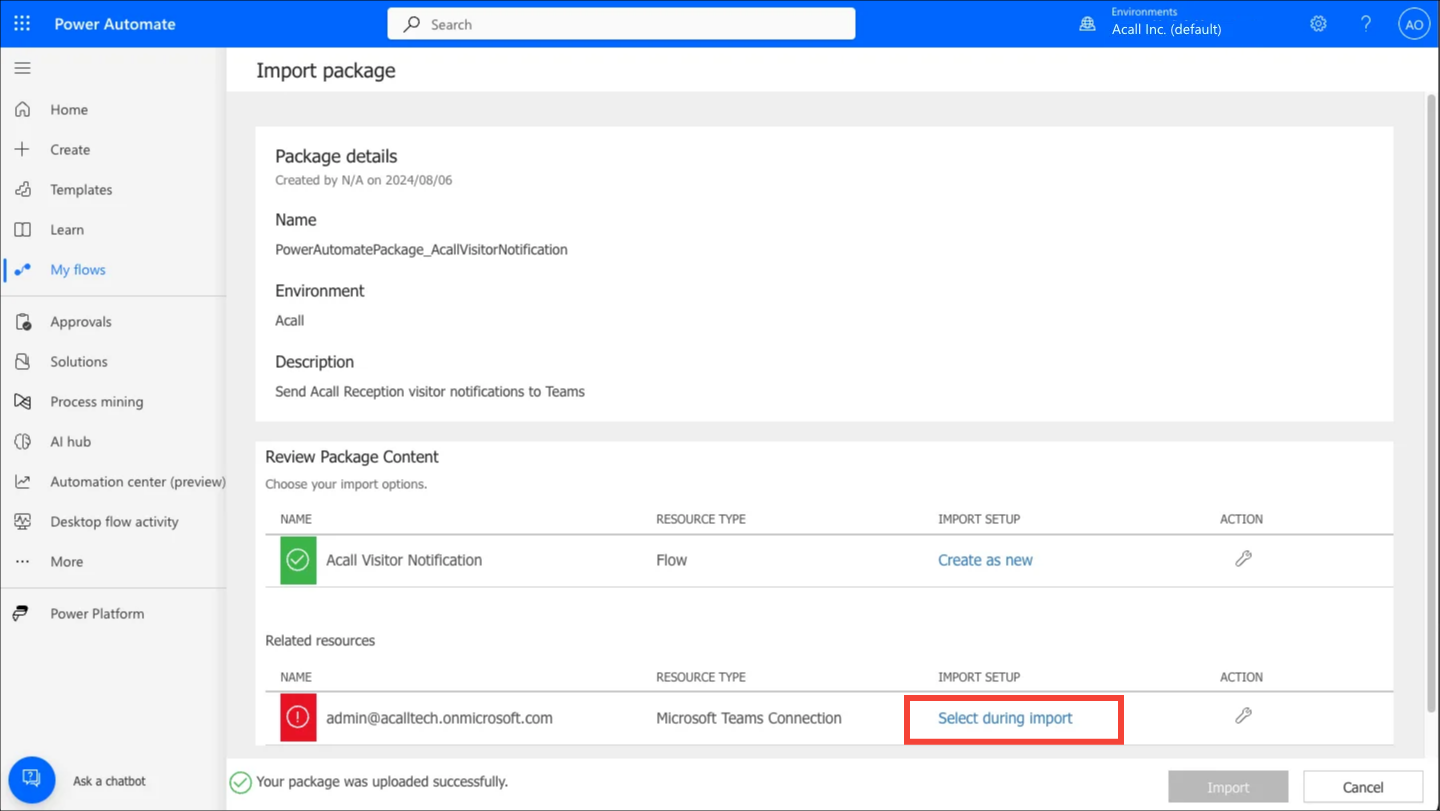
Set up the connection information to post visitor notifications in Teams.
If you have an existing connection, select the same connection; if you do not have a connection/would like to create a new one, click [ + Create New ].
After selecting the connection, click [Save].
💡 Note
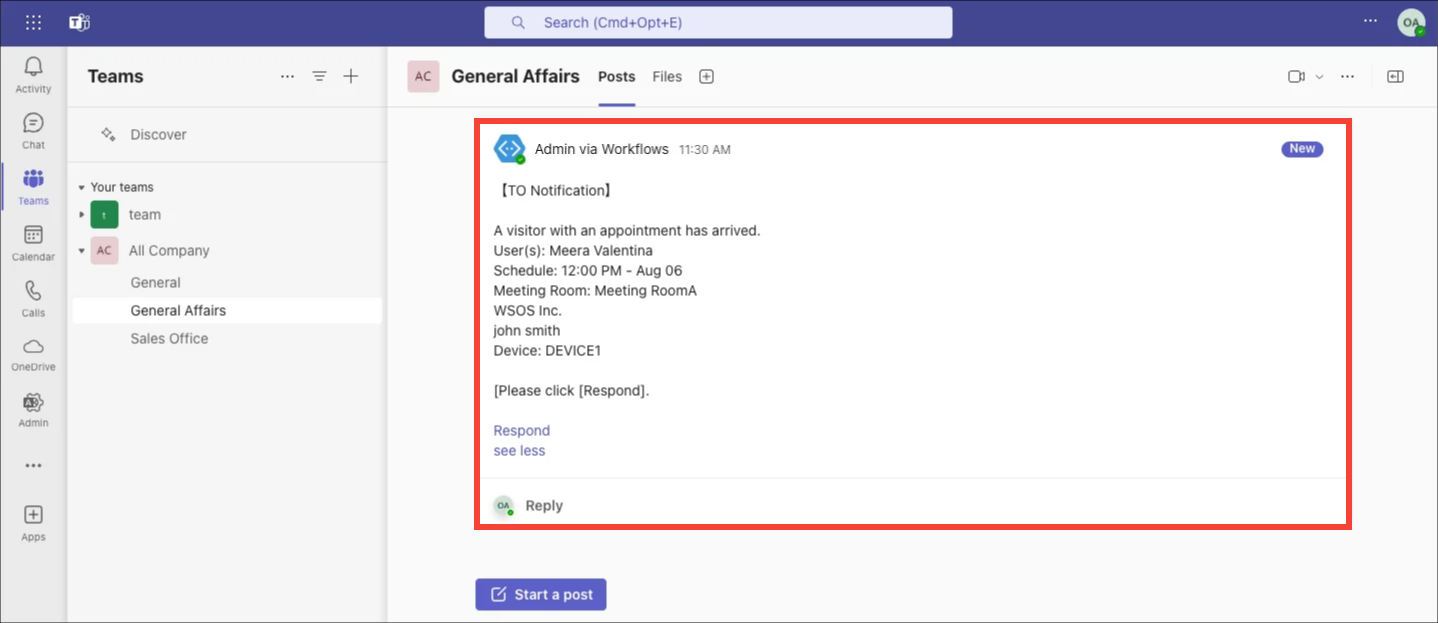
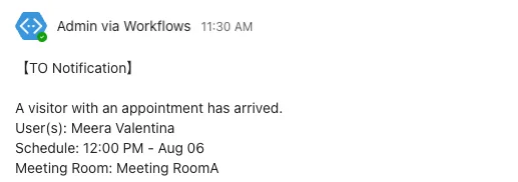
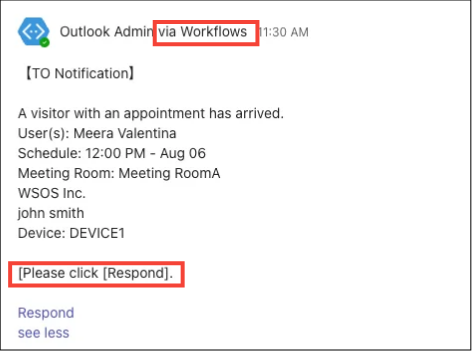
Notification messages are posted to Teams under the name of the connection.
For example, if you use the connection of "Admin" account, visitor notification will be posted as "Admin via Workflows," as shown below.
If you want to avoid personal names, please prepare an account just for notifications in Microsoft 365 and create a connection.
💡 Note
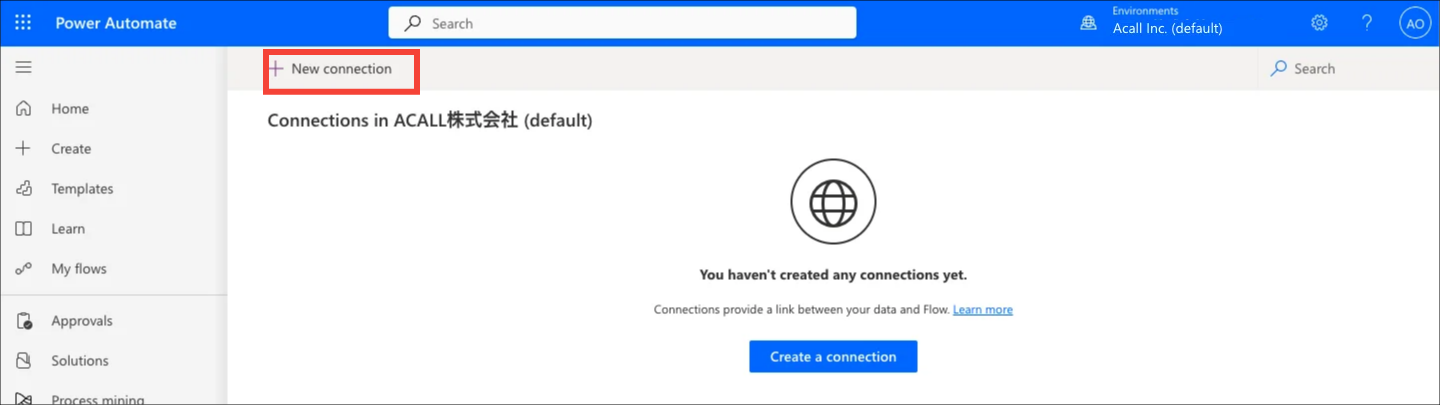
To create a new connection, follow the steps below.
Click [ + Create new ] for a connection and list of connections will be displayed.
Click [ + New connection ].
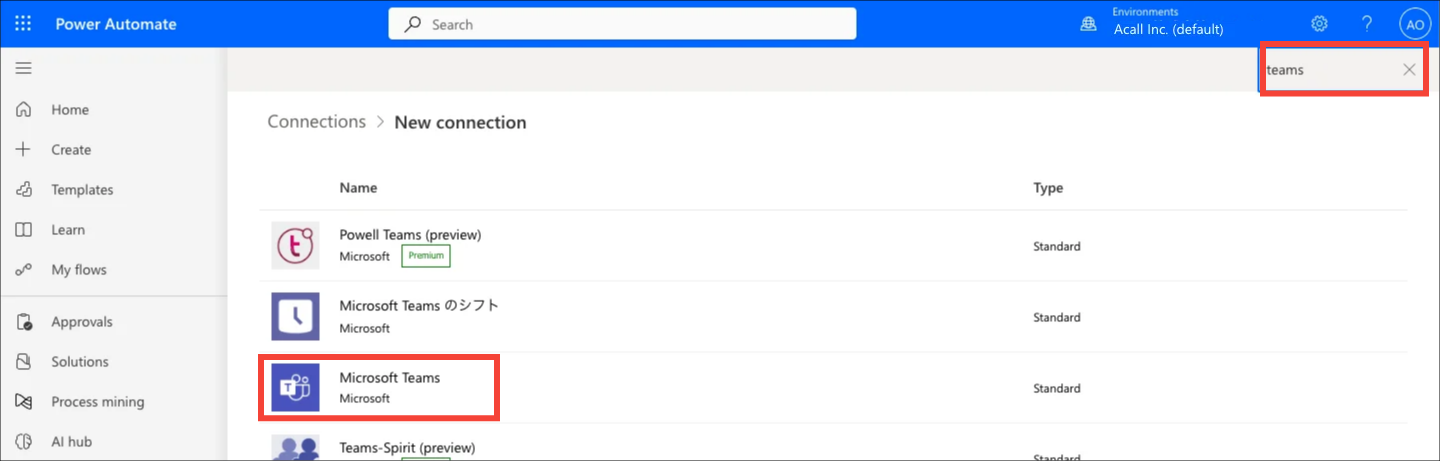
Search for "teams" in the search box in the upper right corner and select the "Microsoft Teams" connection.
Click [Create].Select an account to complete the creation of the connection.
Return to the package import screen and click [Refresh list] to select the connection you have created.
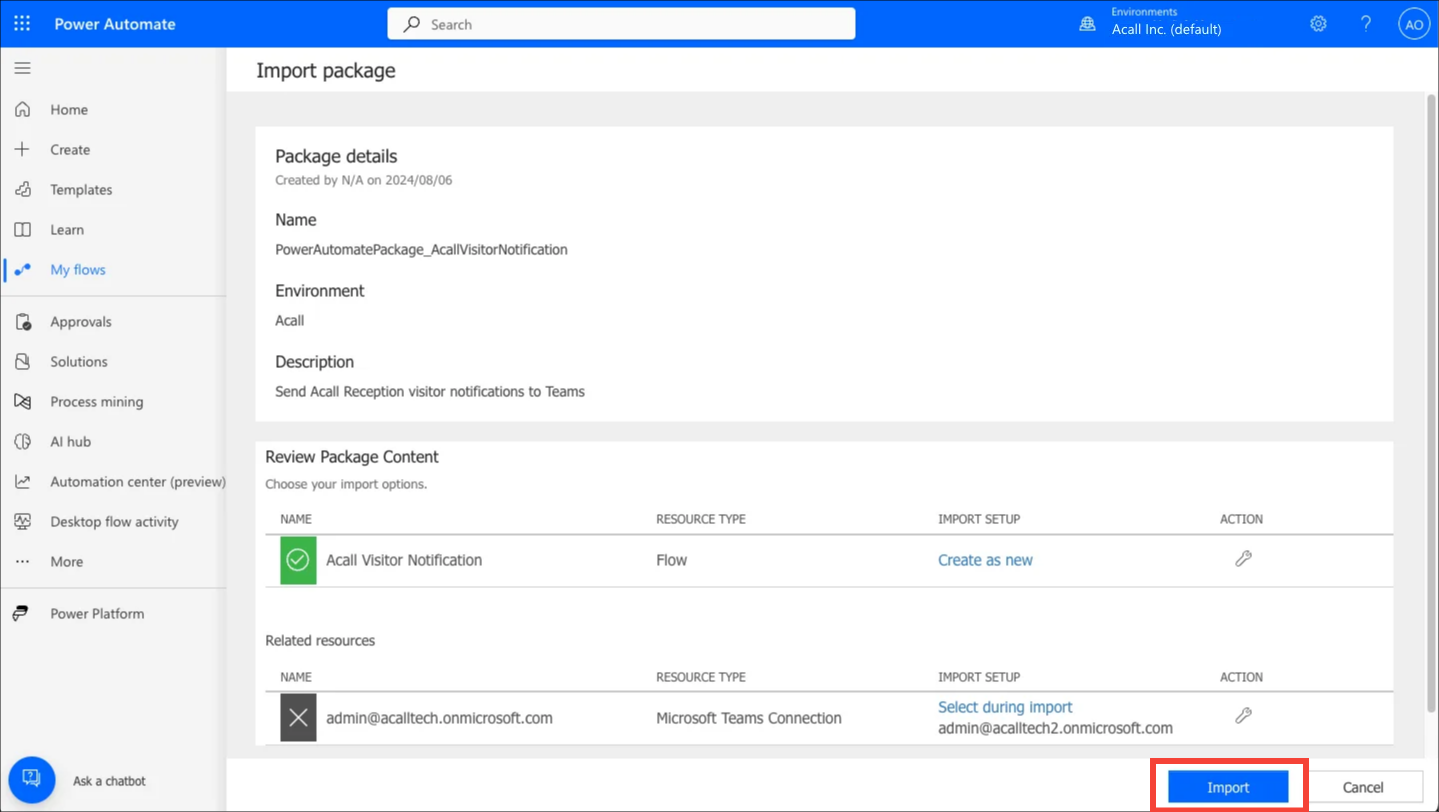
Click [Import] to create a new flow.
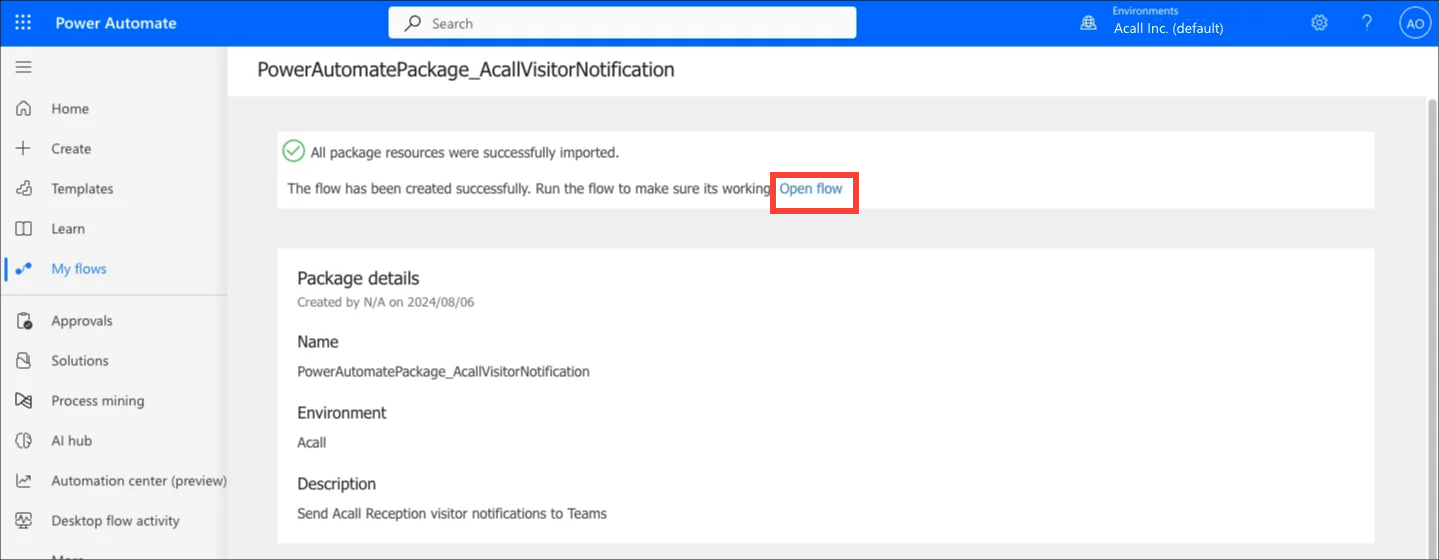
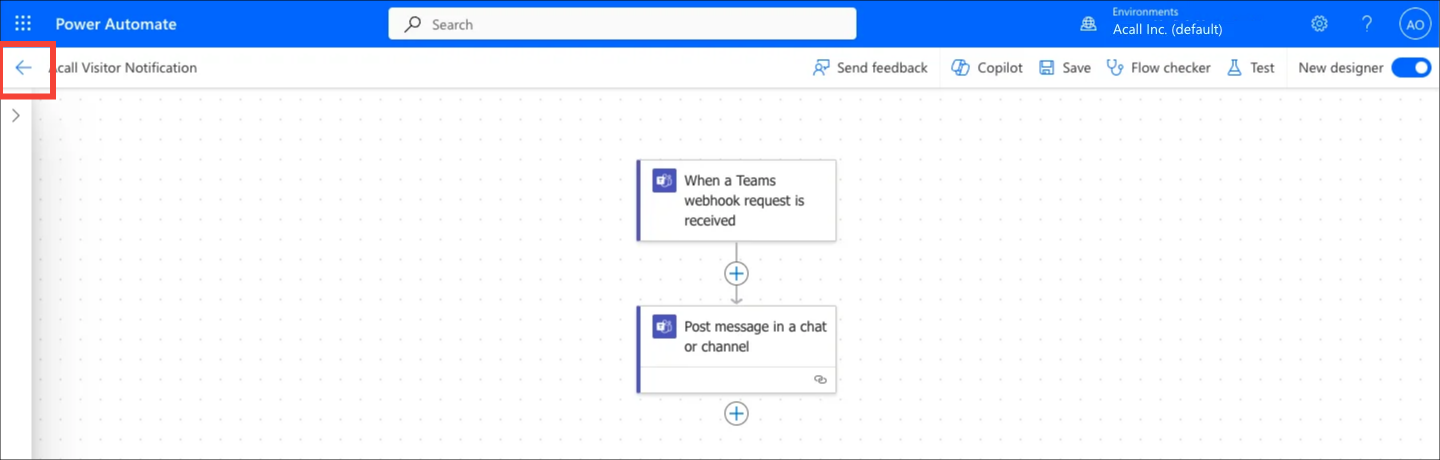
After importing is complete, click [Open flow] to open the created flow.
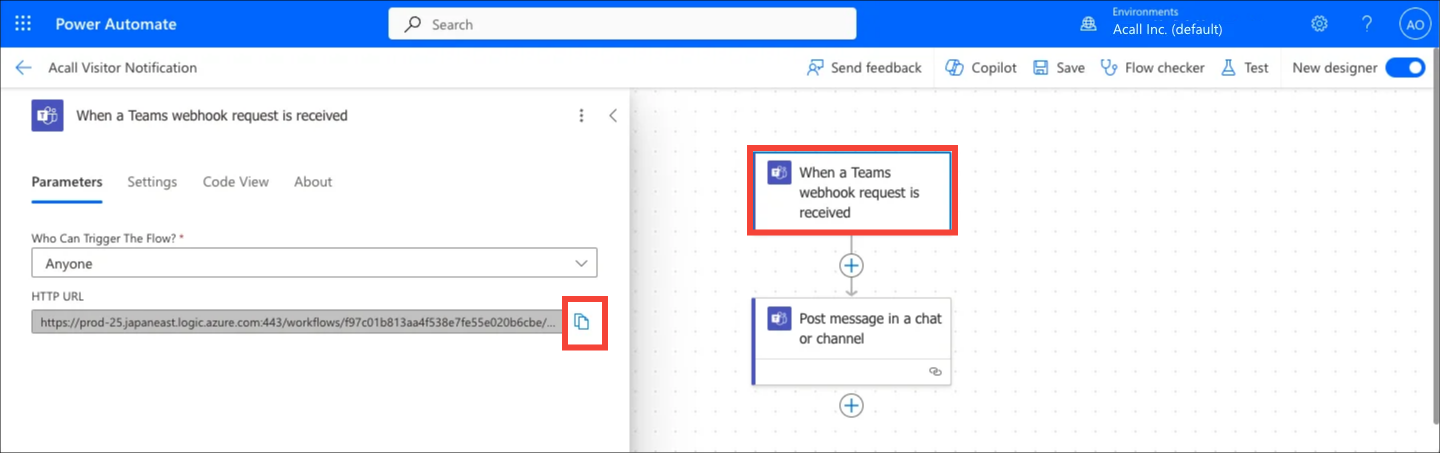
This flow has the following two steps.
- "When a Teams webhook request is received" trigger
- "Post message in a chat or channel" action

Click "When a Teams webhook request is received" trigger to open the edit screen.
You do not need to change the trigger settings, but the URL in "HTTP URL" will be the Webhook URL to which the visitor notification will be sent.
You will need to set up this Webhook URL in Acall Portal as described below.
Click on the copy icon and save as a text file.
Click on the "Post message in a chat or channel" action to open the edit window.
Click [x] on "Team" and "Channel" to remove the default values.
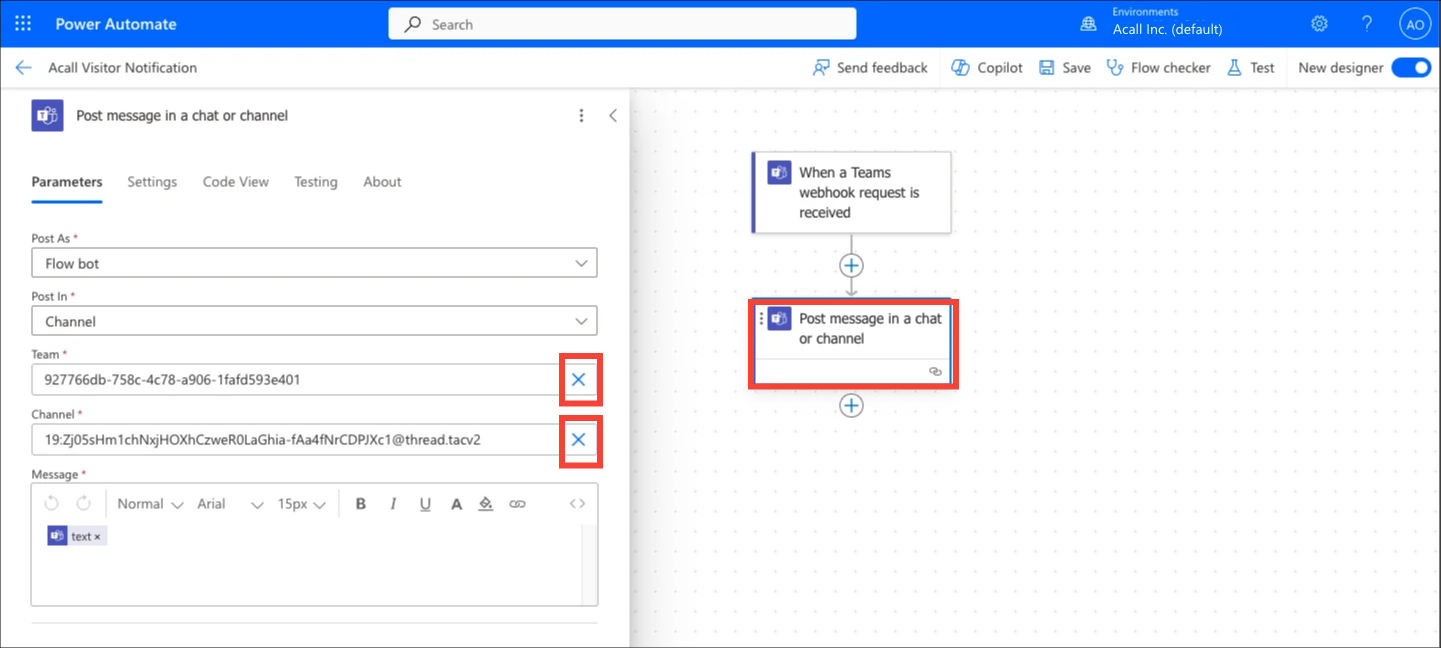
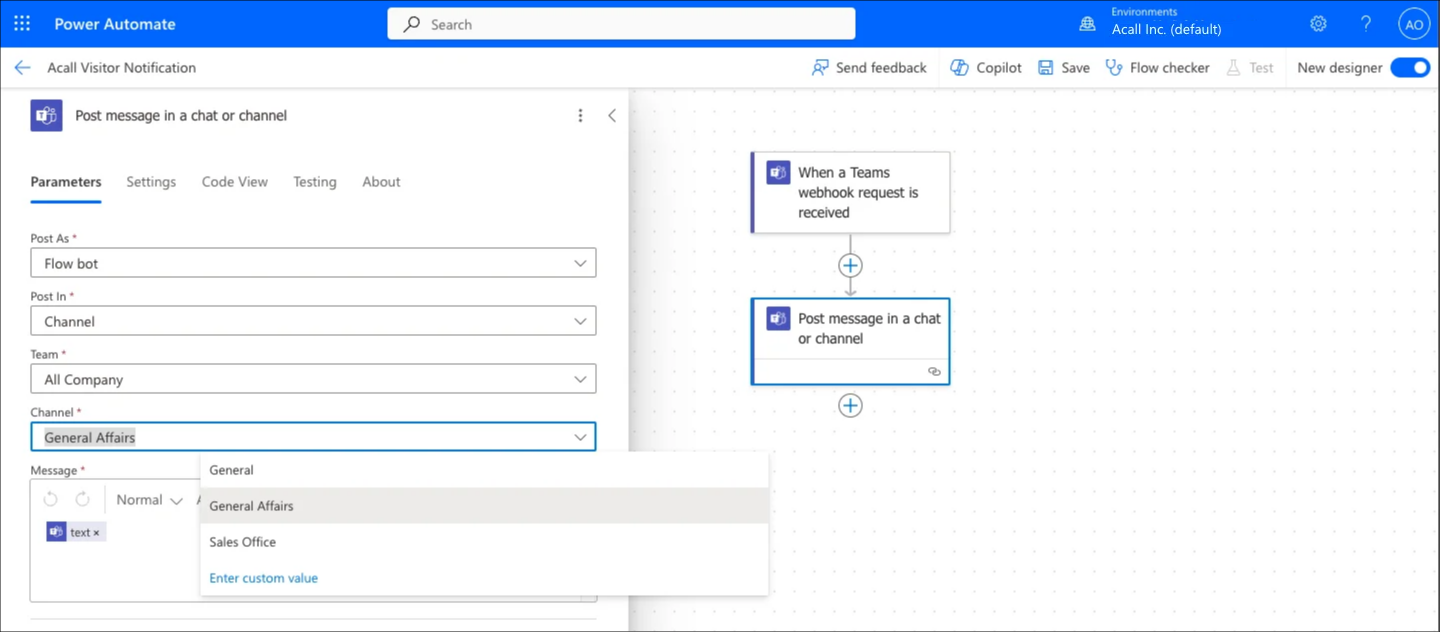
Select the team/channel you want to send visitor notifications from the drop-down list.
⚠︎
If you select "User" from the "Post As" dropdown, the "via Worksflows" text in the visitor notification will not be displayed.
However, we recommend that you leave "Flow bot" as it is because the "Respond" link will not be displayed as a hyperlink.
⚠️
In private channels (non-public channels), due to Microsoft's specifications, it is not possible to post messages from the "Flow bot." However, it can be used if changed to "User." Please be aware of the specifications of the hyperlink above.
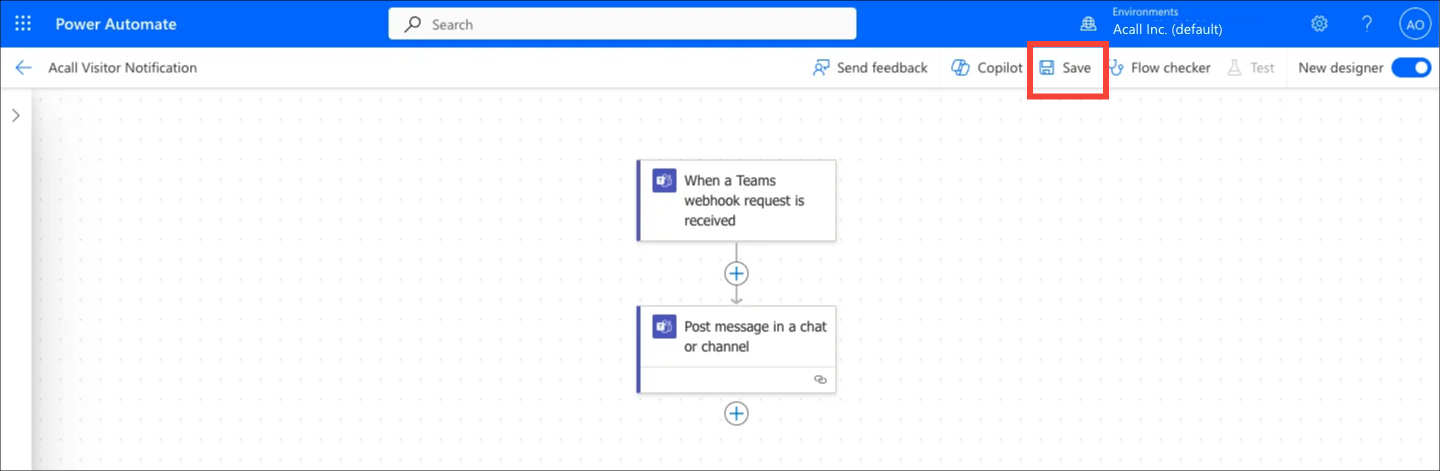
Click [Save] at the top of the screen to save the flow.
Click [ ← ] at the top of the screen to close the flow edit screen.
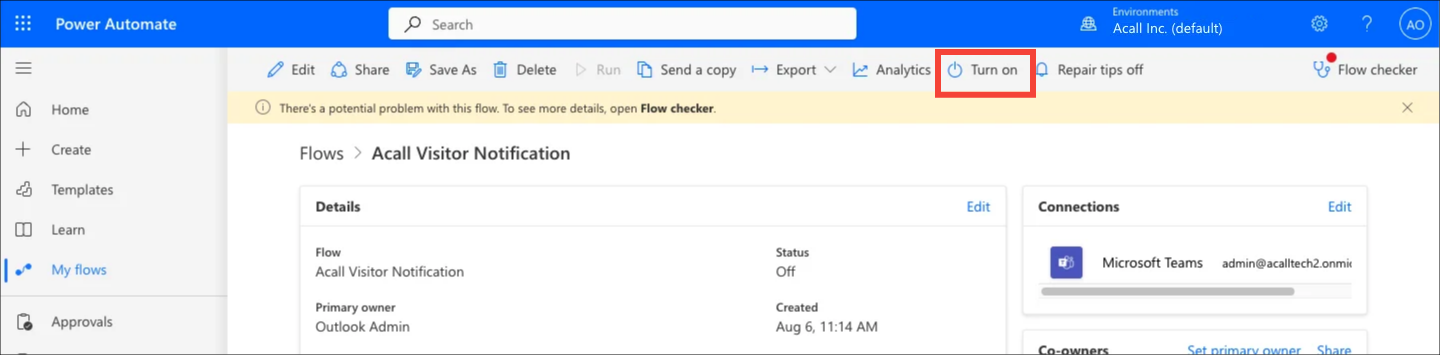
Click [Turn on] at the top of the screen to activate the flow.
💡 Note
The contents that follow the general operations of Power Automate, such as renaming flows and setting up sharing, are omitted from this page.
Connect Acall Portal with Teams
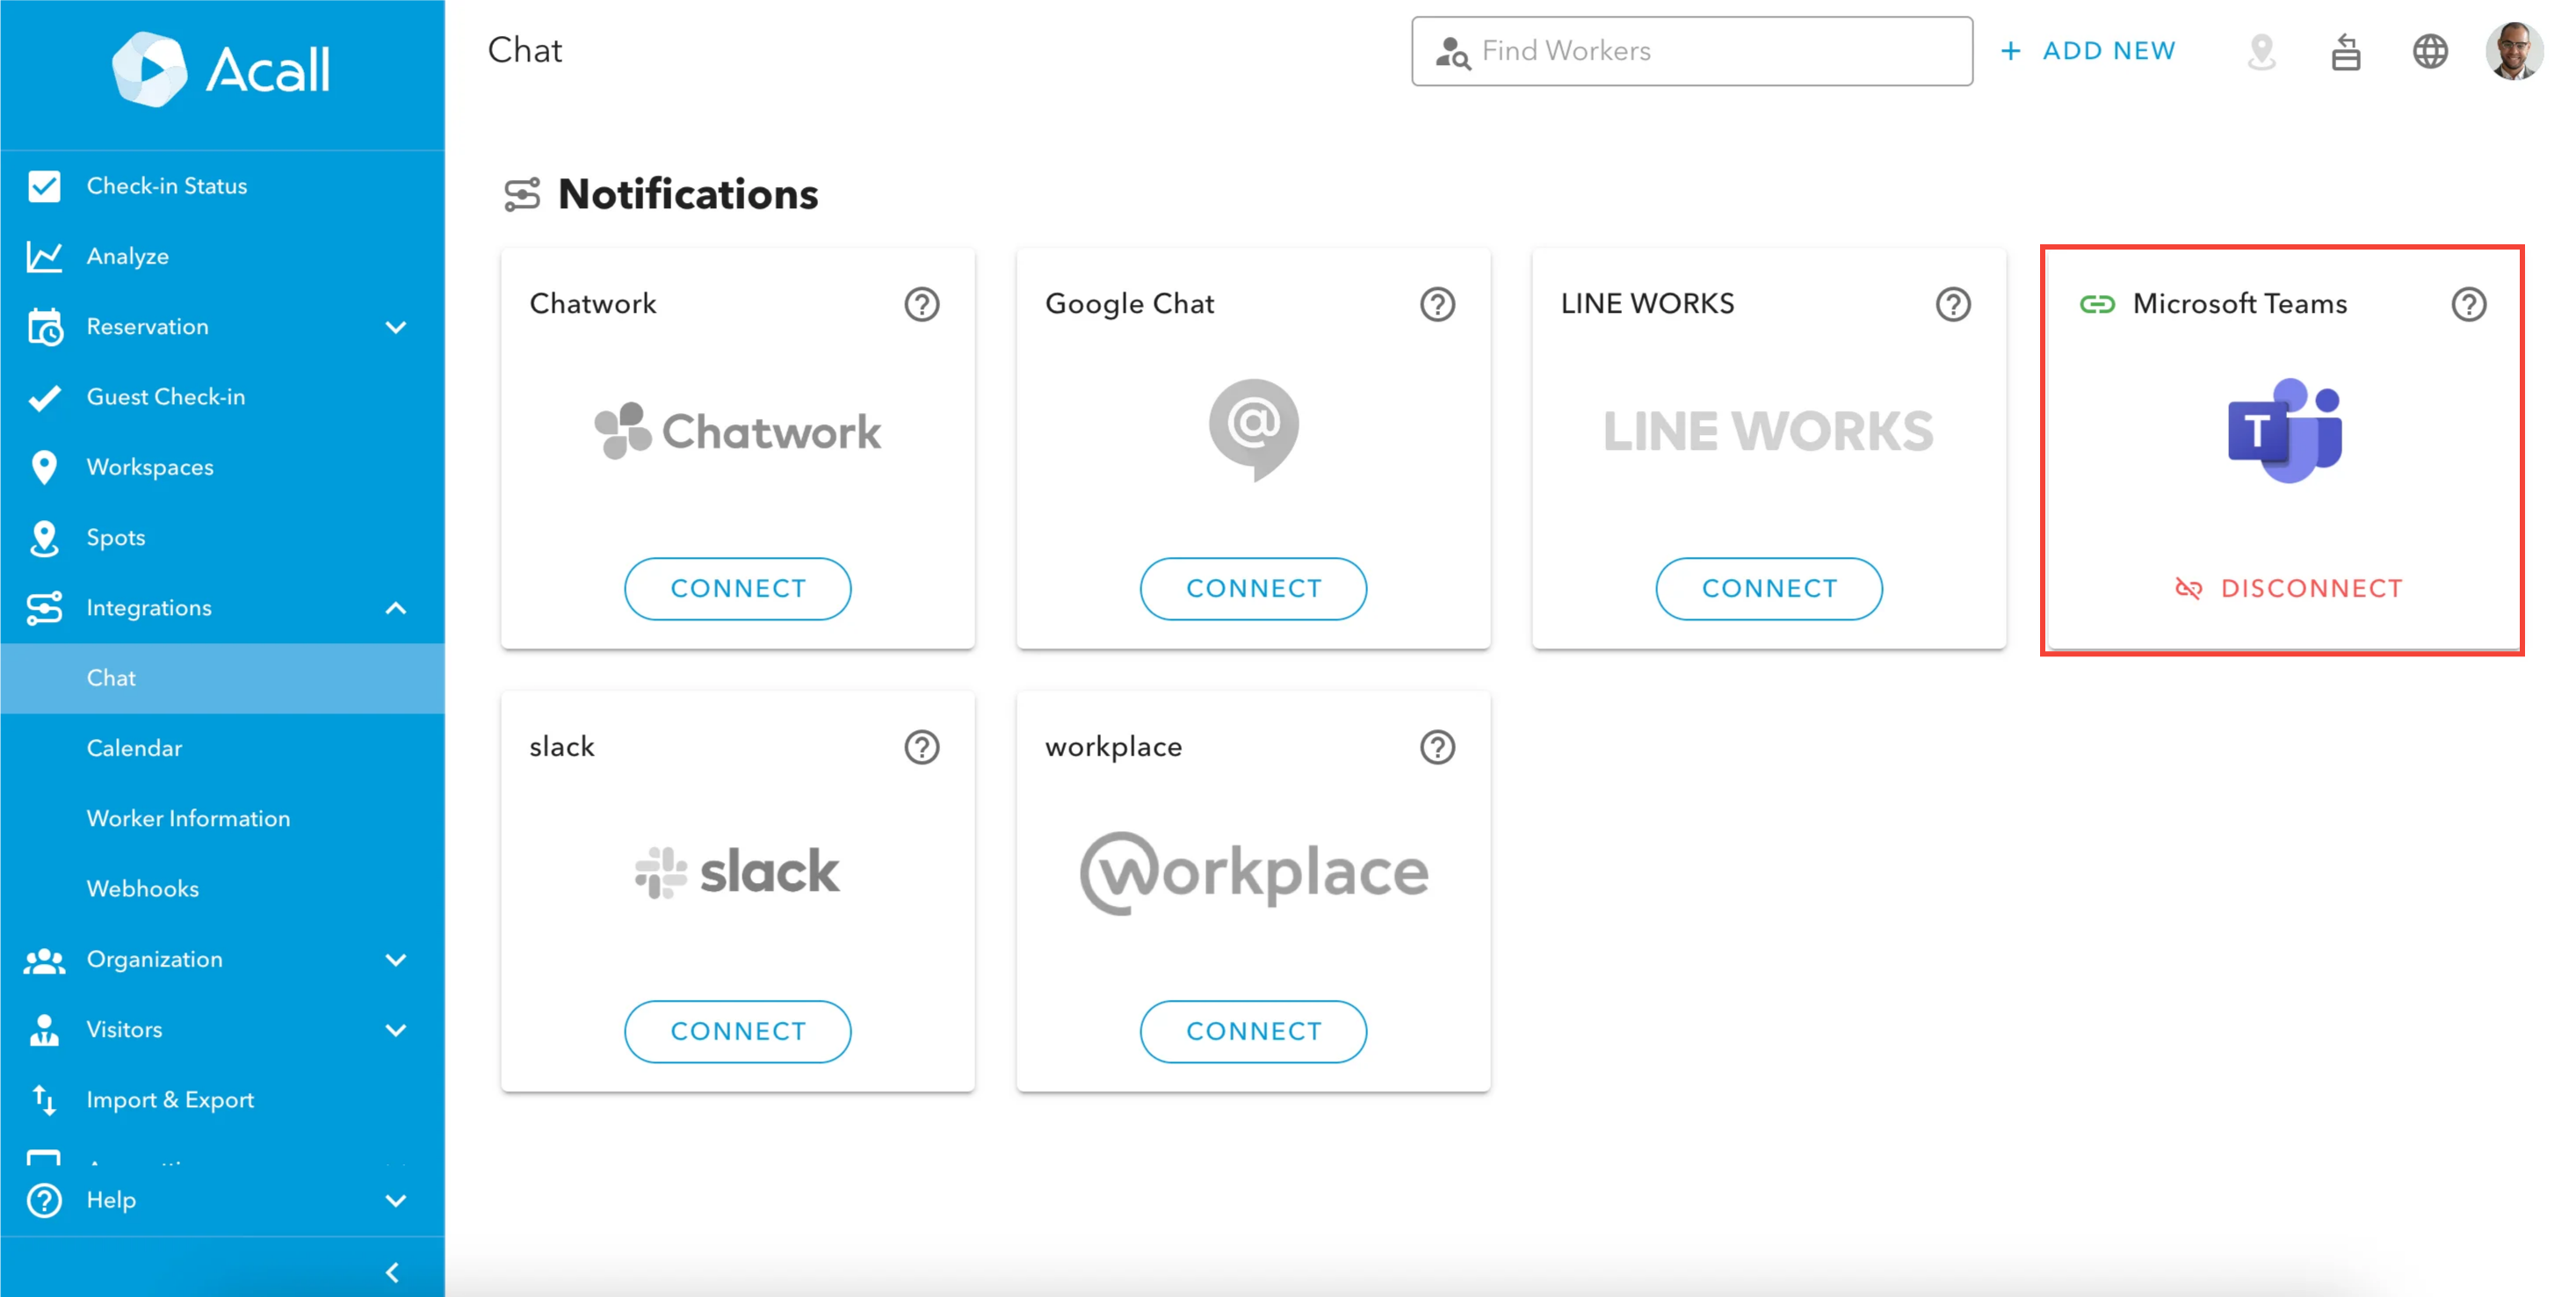
Click [Integration] > [Chat] in the side menu of Acall Portal.
A screen for connecting to each chat service will be displayed.
Click [CONNECT] for "Microsoft Teams".
Enter the "Webhook URL" you copied on Teams and click [CONNECT].
Once the integration has completed, the screen below will be displayed.
Send notifications to a worker (person in charge) in Teams
This section explains how to set up with an example which an employee in sales office responds to an appointment with a client.
💡 NOTE
As you can find in "Precondition for Teams notification," all visitor notifications from Acall Reception are posted to the "channel" of the "team".
They cannot be posted to an individual's "chat".
Teams settings
Create a Power Automate flow and generate a Webhook URL for each channel receiving notifications.
See below for instructions.
- Download the Power Automate package for Acall Visitor Notification
- Create a Power Automate flow for Acall visitor notification
Worker settings
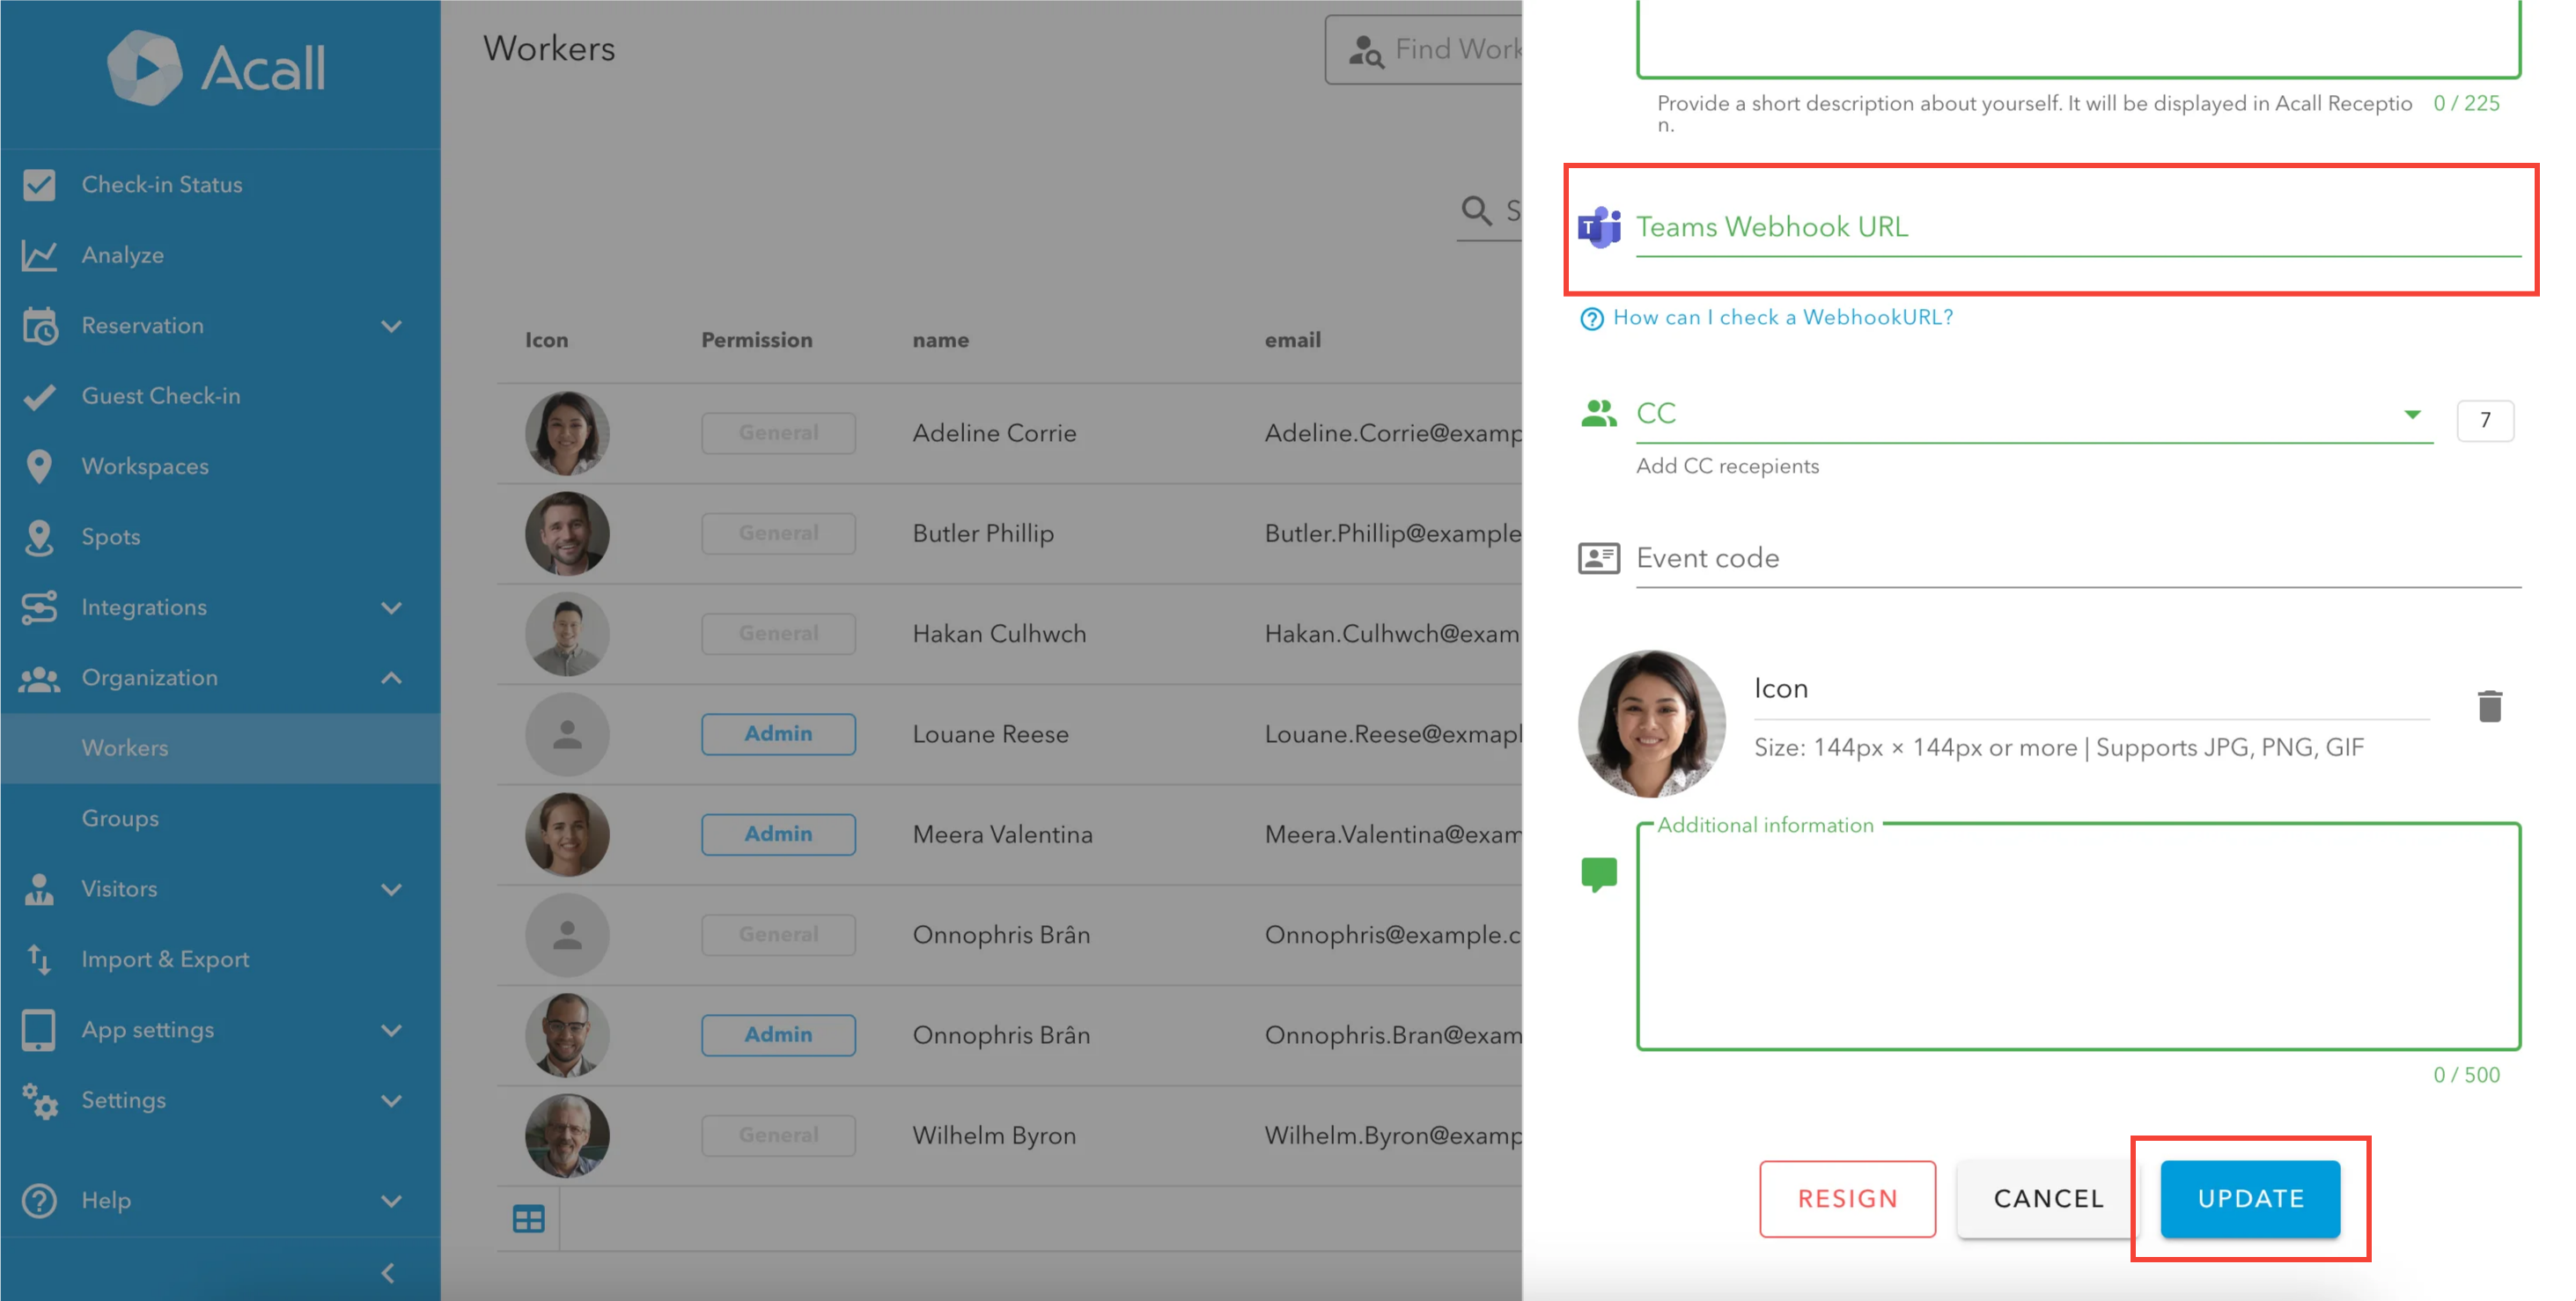
After logging in the Acall Portal, click [Organization] > [Workers] on the side menu.
Click [Edit] icon of the worker you want to edit for opening an edit screen.
Enter the Webhook URL of the channel for which you want to receive visit notifications, and click [UPDATE].
💡 NOTE
You can register "Teams Webhook URL" in a batch by CSV import as well.
Import / Export All
Acall Reception settings
After logging in the Acall Portal, click [App settings] > [Acall Reception] on the side menu.
Click [Edit] icon of the worker you want to set up.
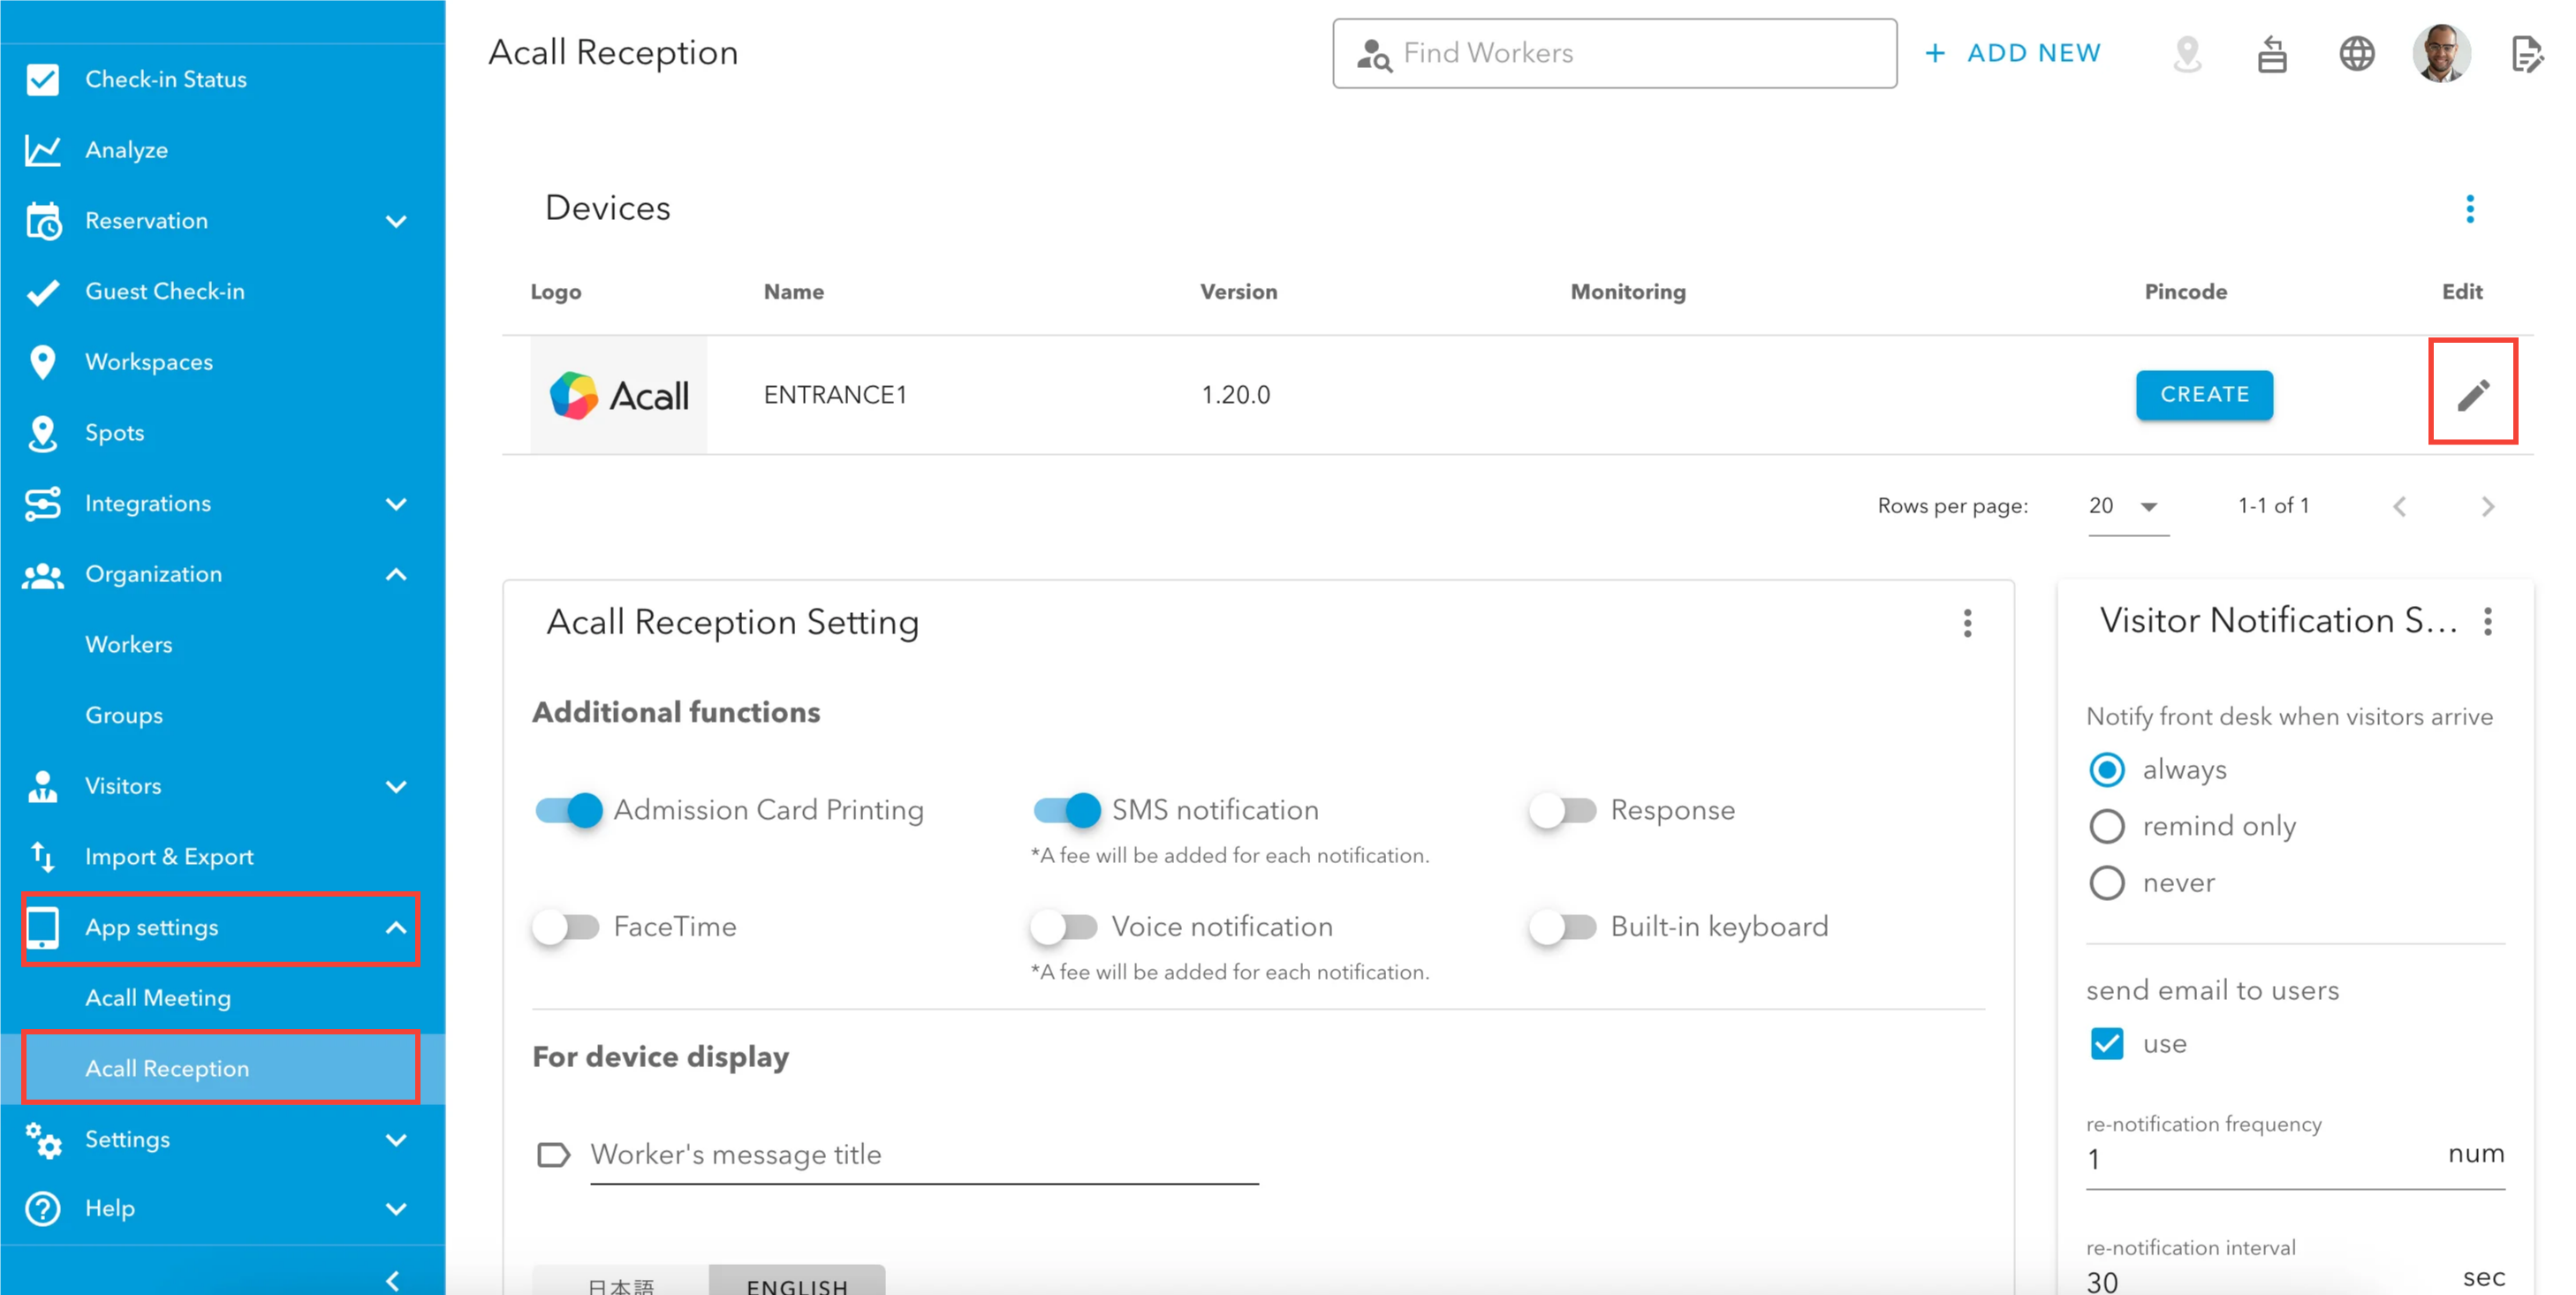
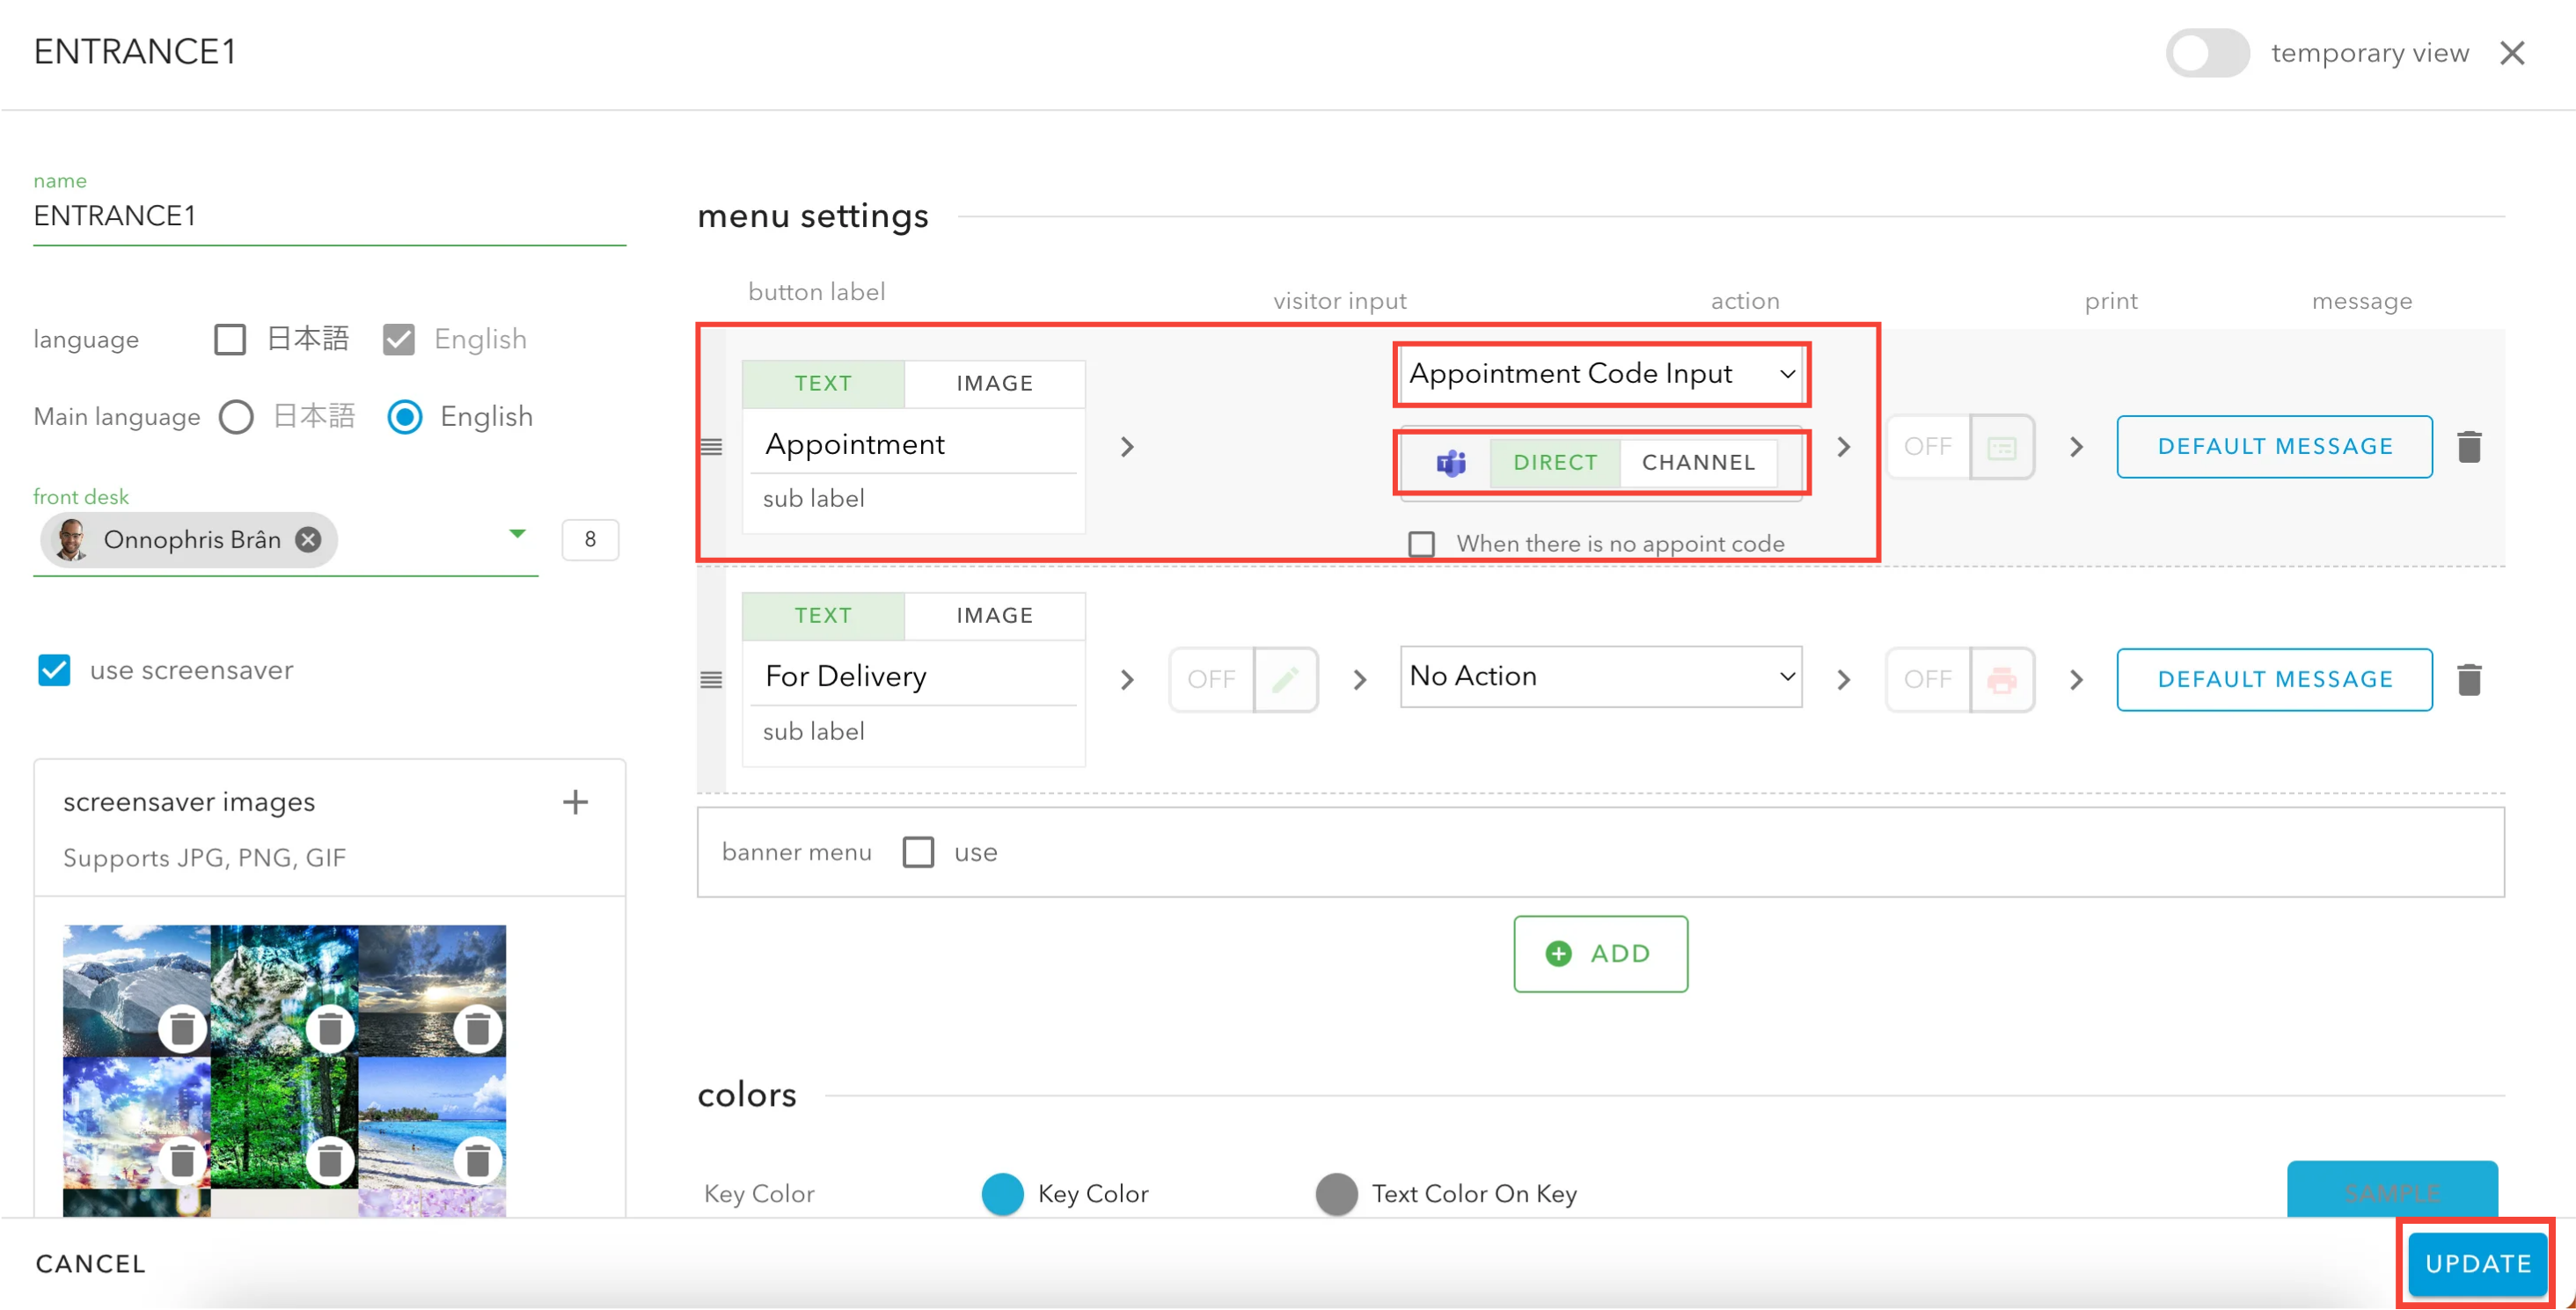
Open edit screen and set up as follows.
| Button Label | Action |
| Appointment |
①Select [Appoint Code Input] ②Select [DIRECT] |
Click [UPDATE].
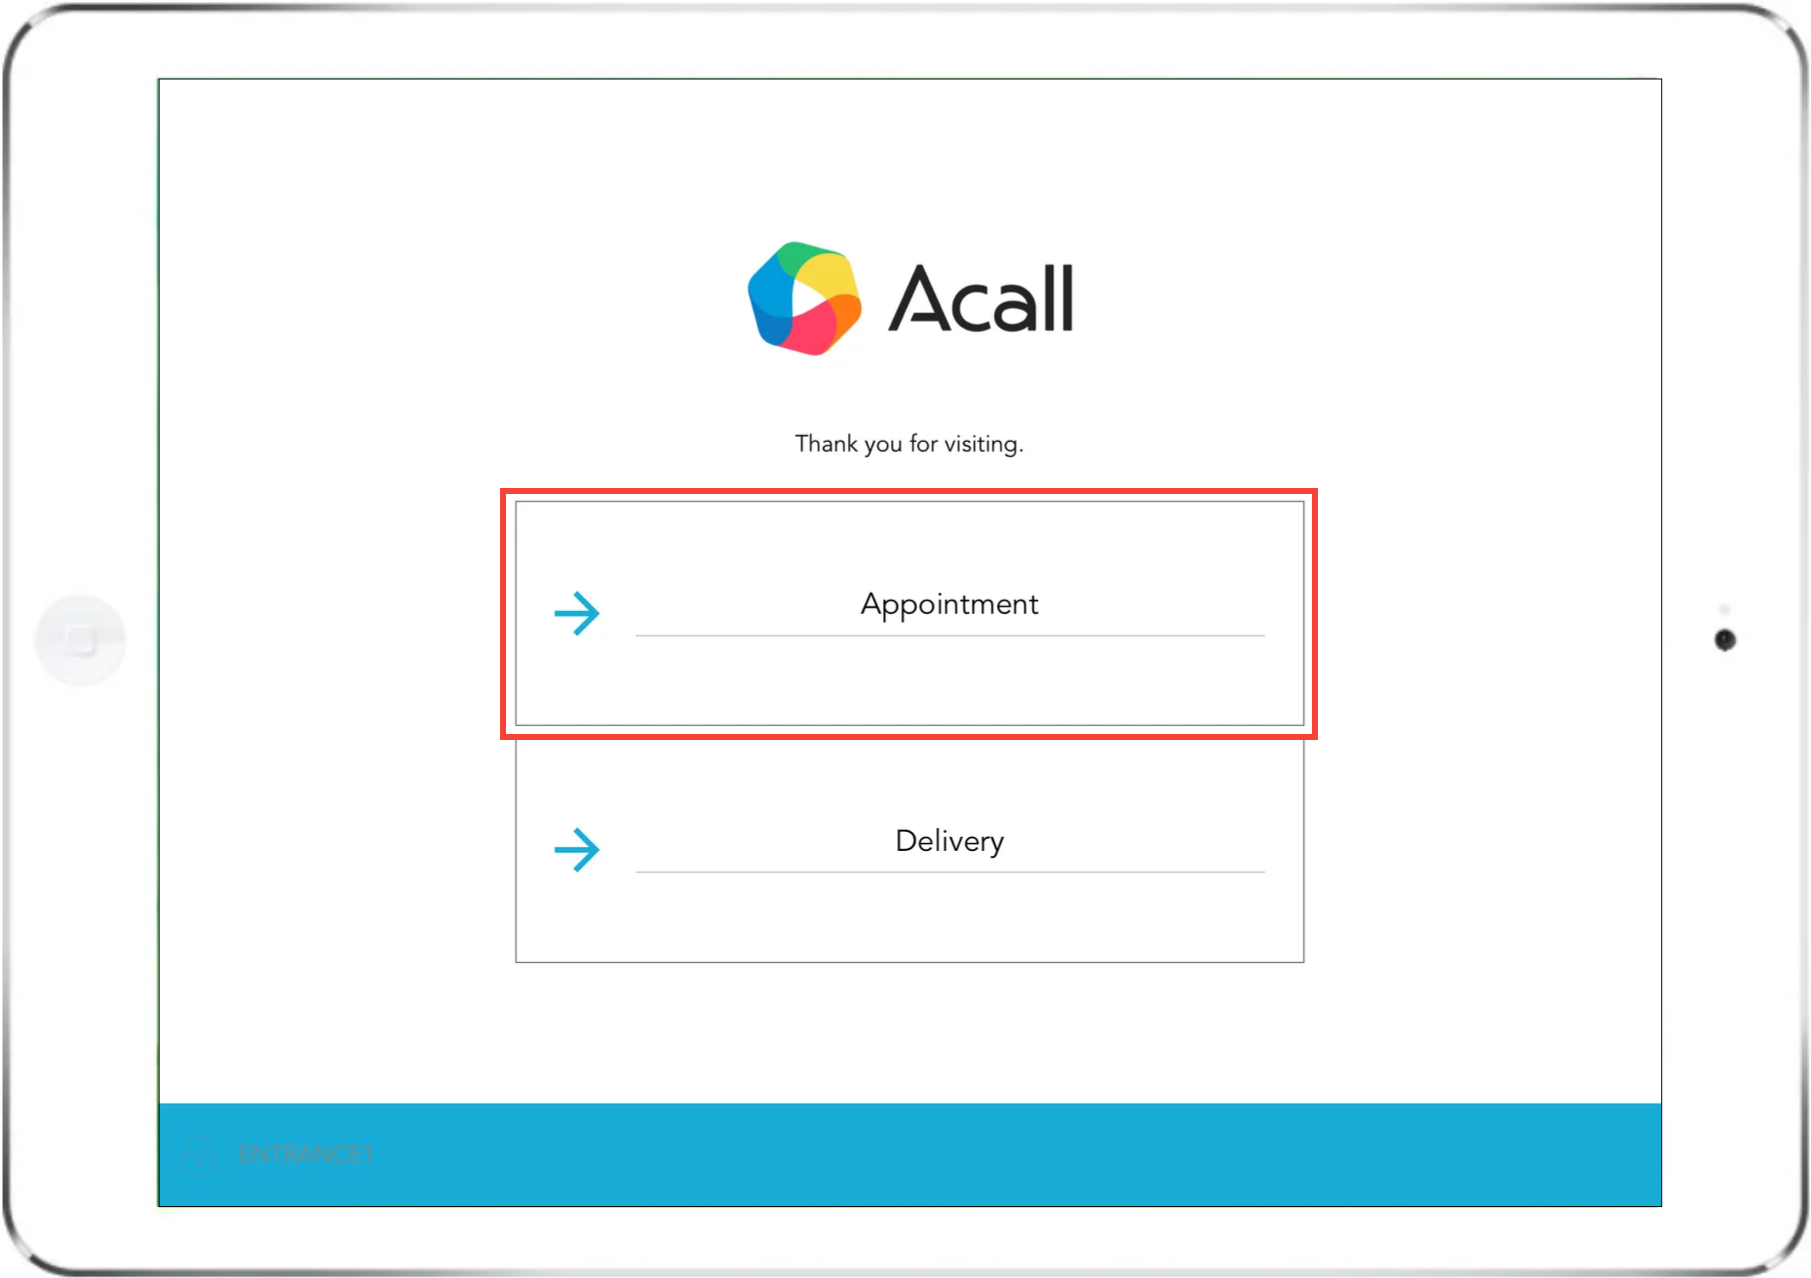
Confirm the operation
Tap a reception menu on Acall Reception.
Hold up the QR code which was issued when creating an appointment to the camera.
💡 NOTE
Please refer to [Send an appointment code to a guest] for information about creating a QR code.
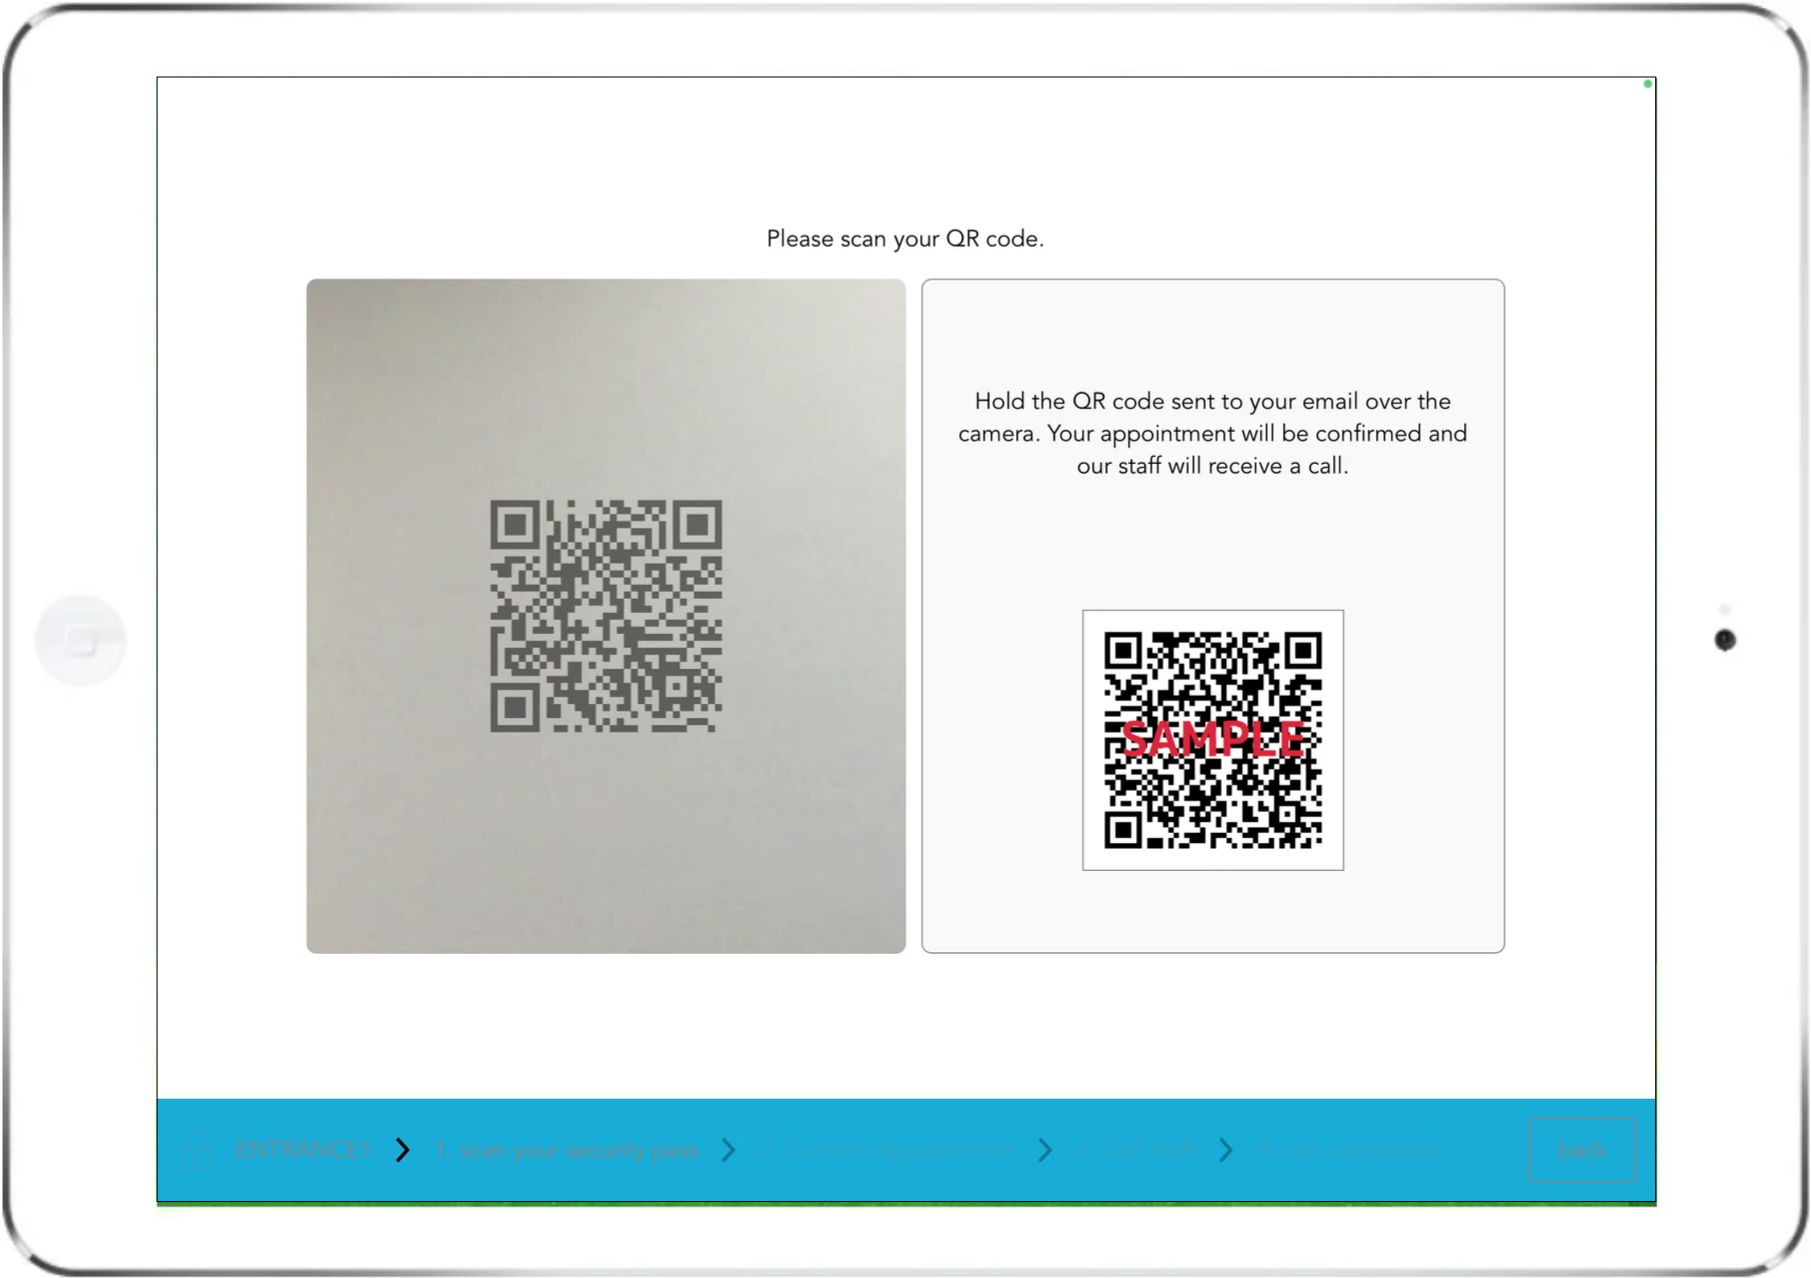
Tap [OK].
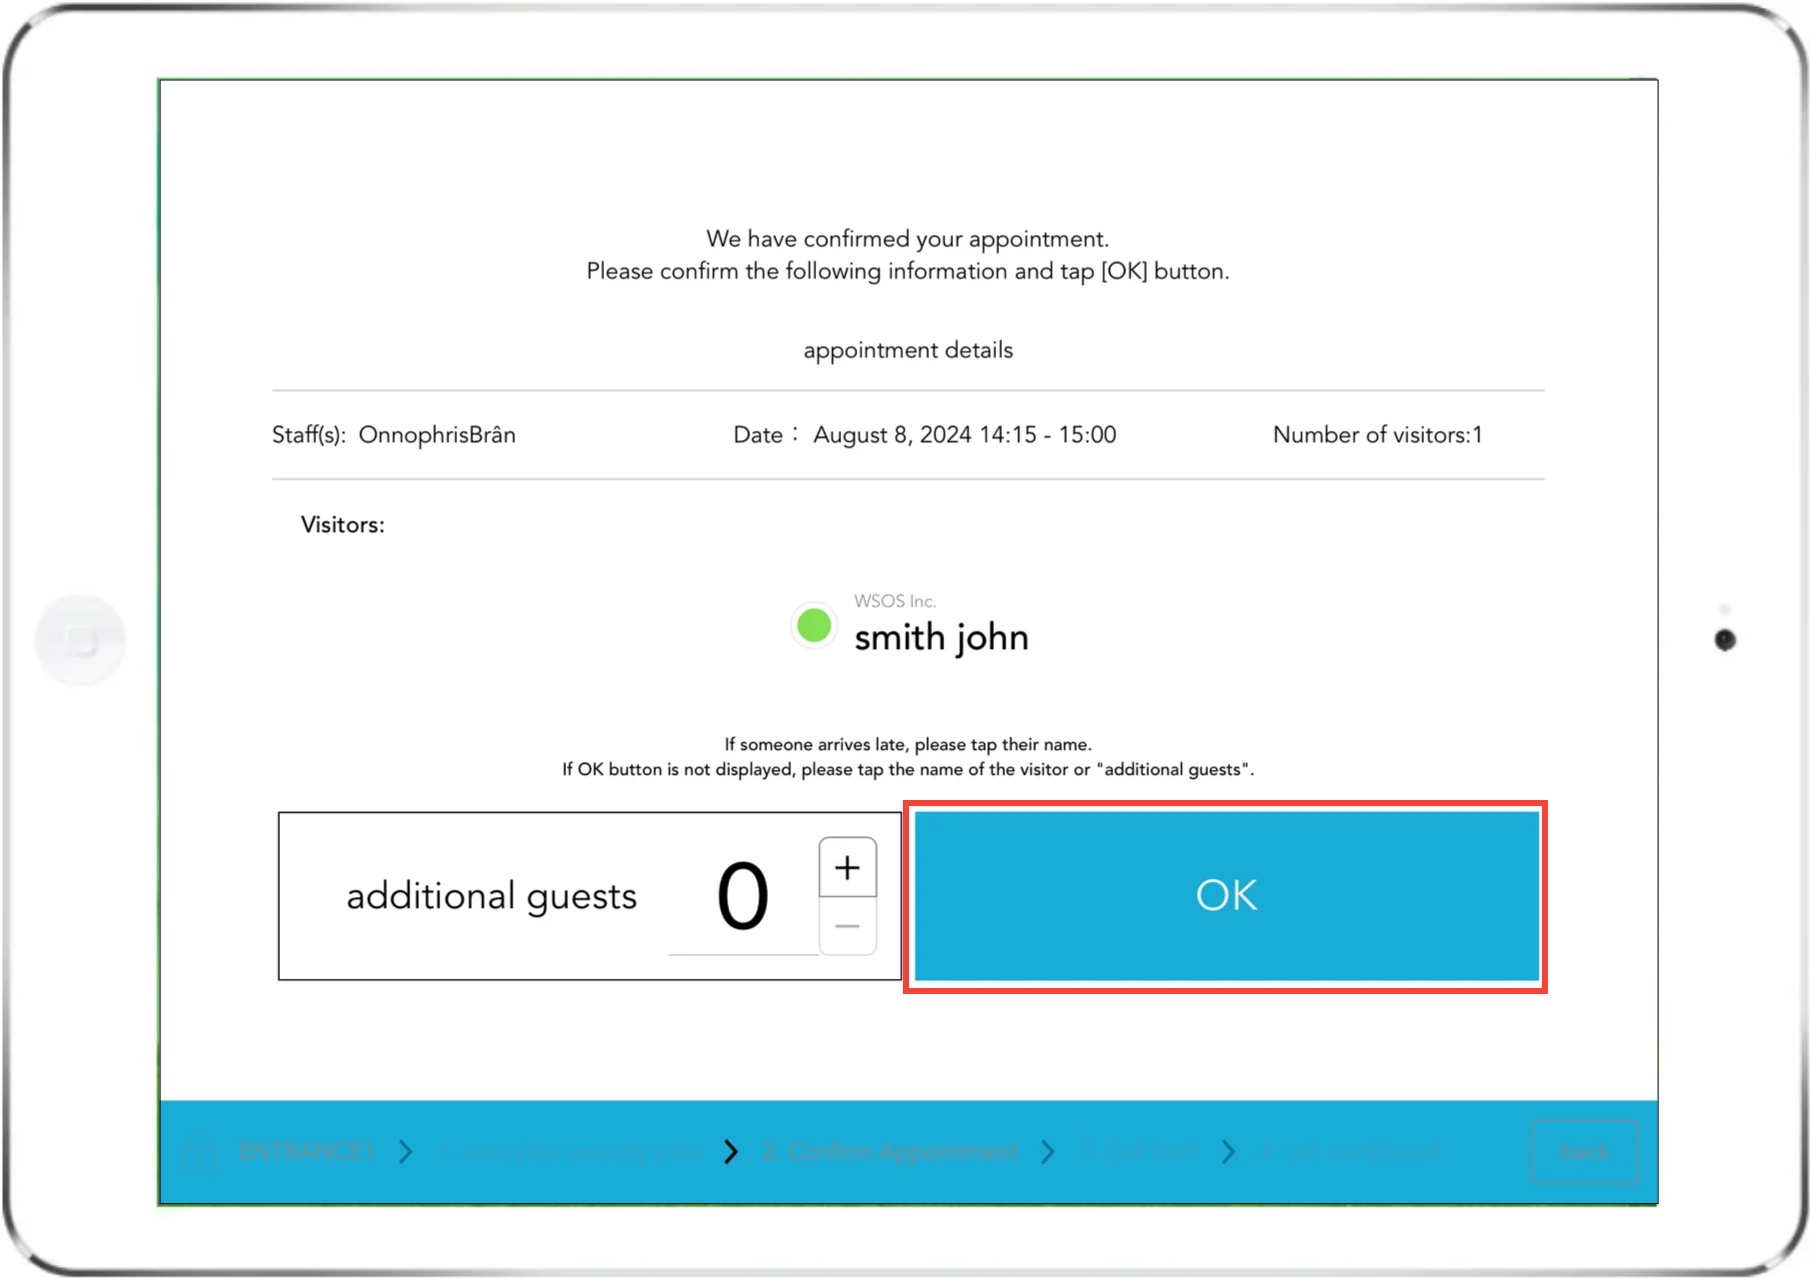
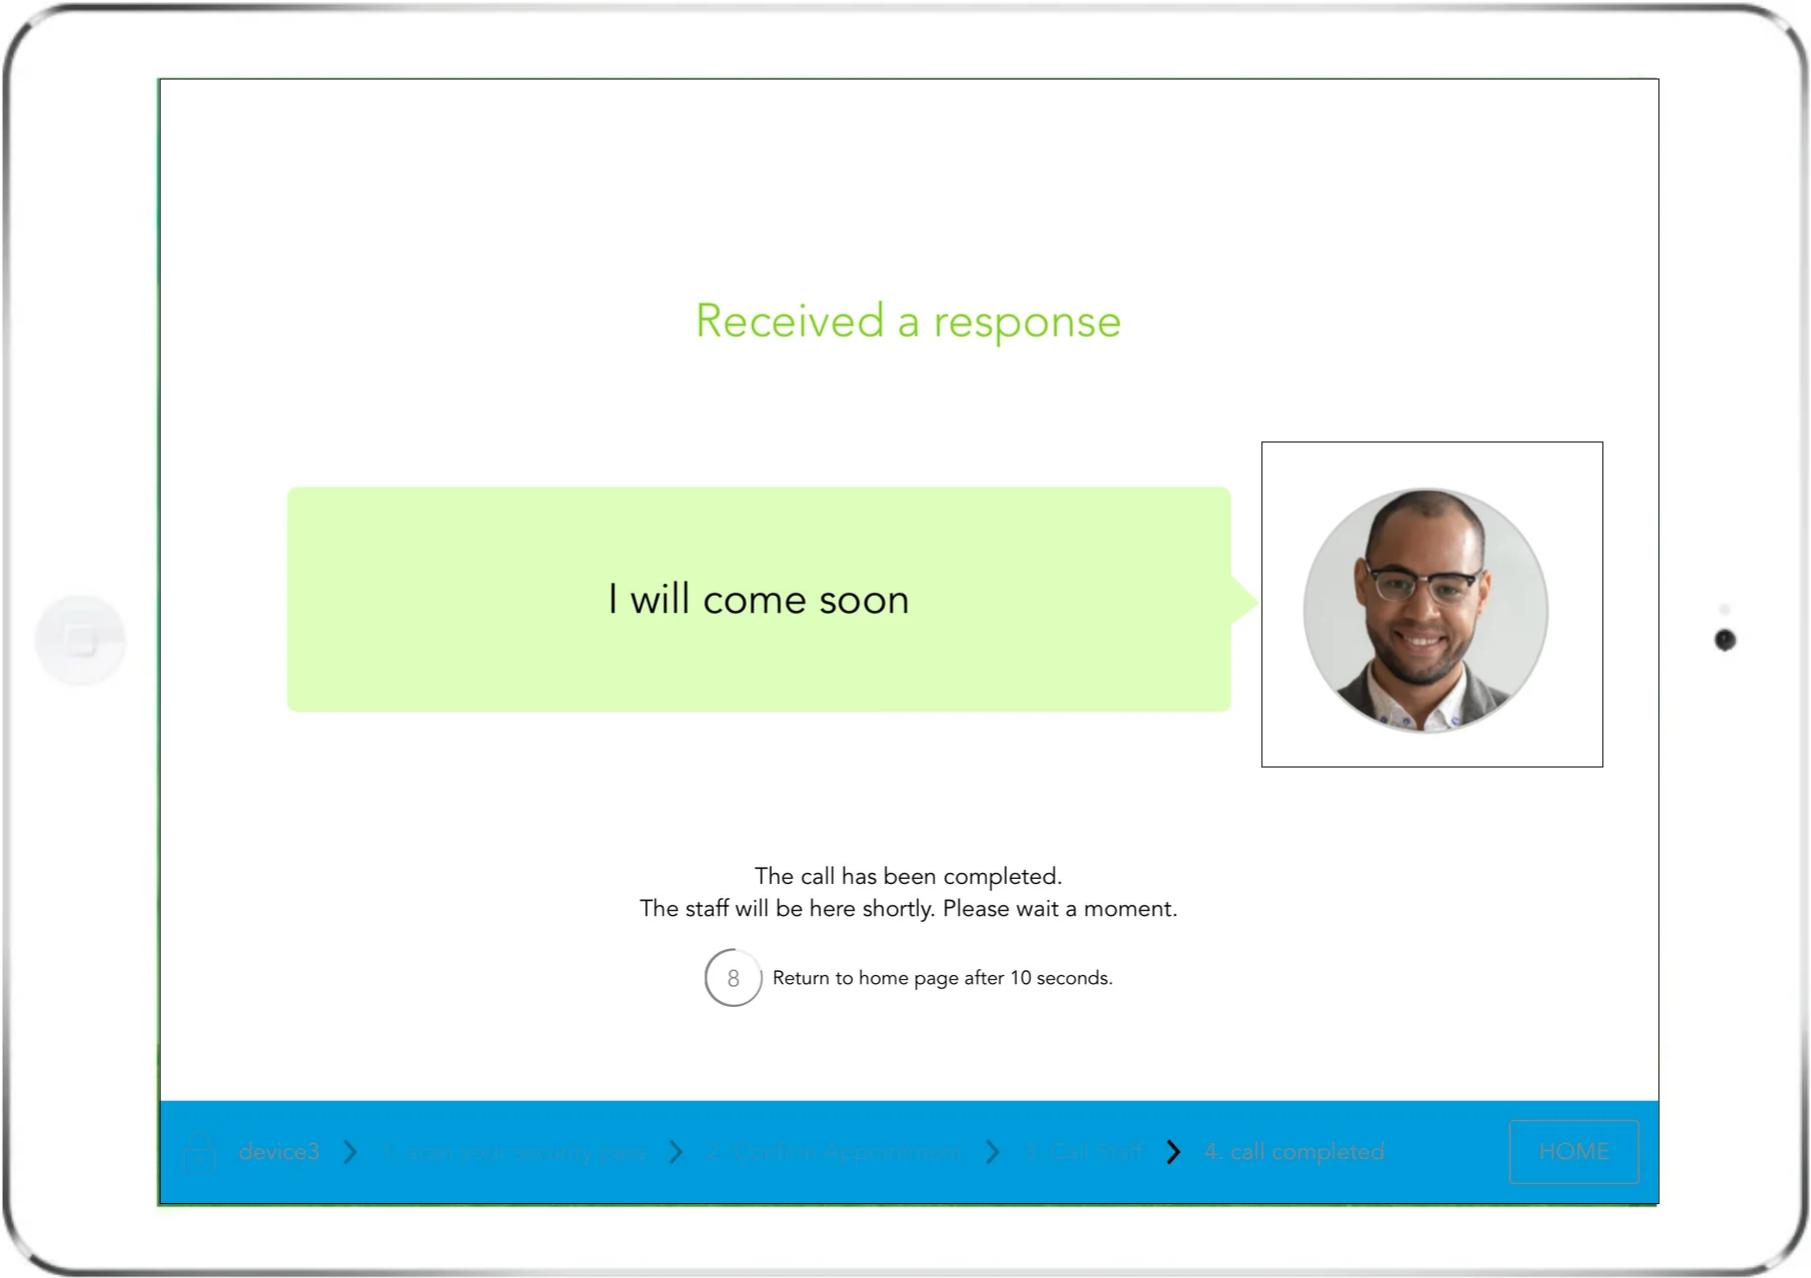
The following screen will be displayed on Acall Reception.
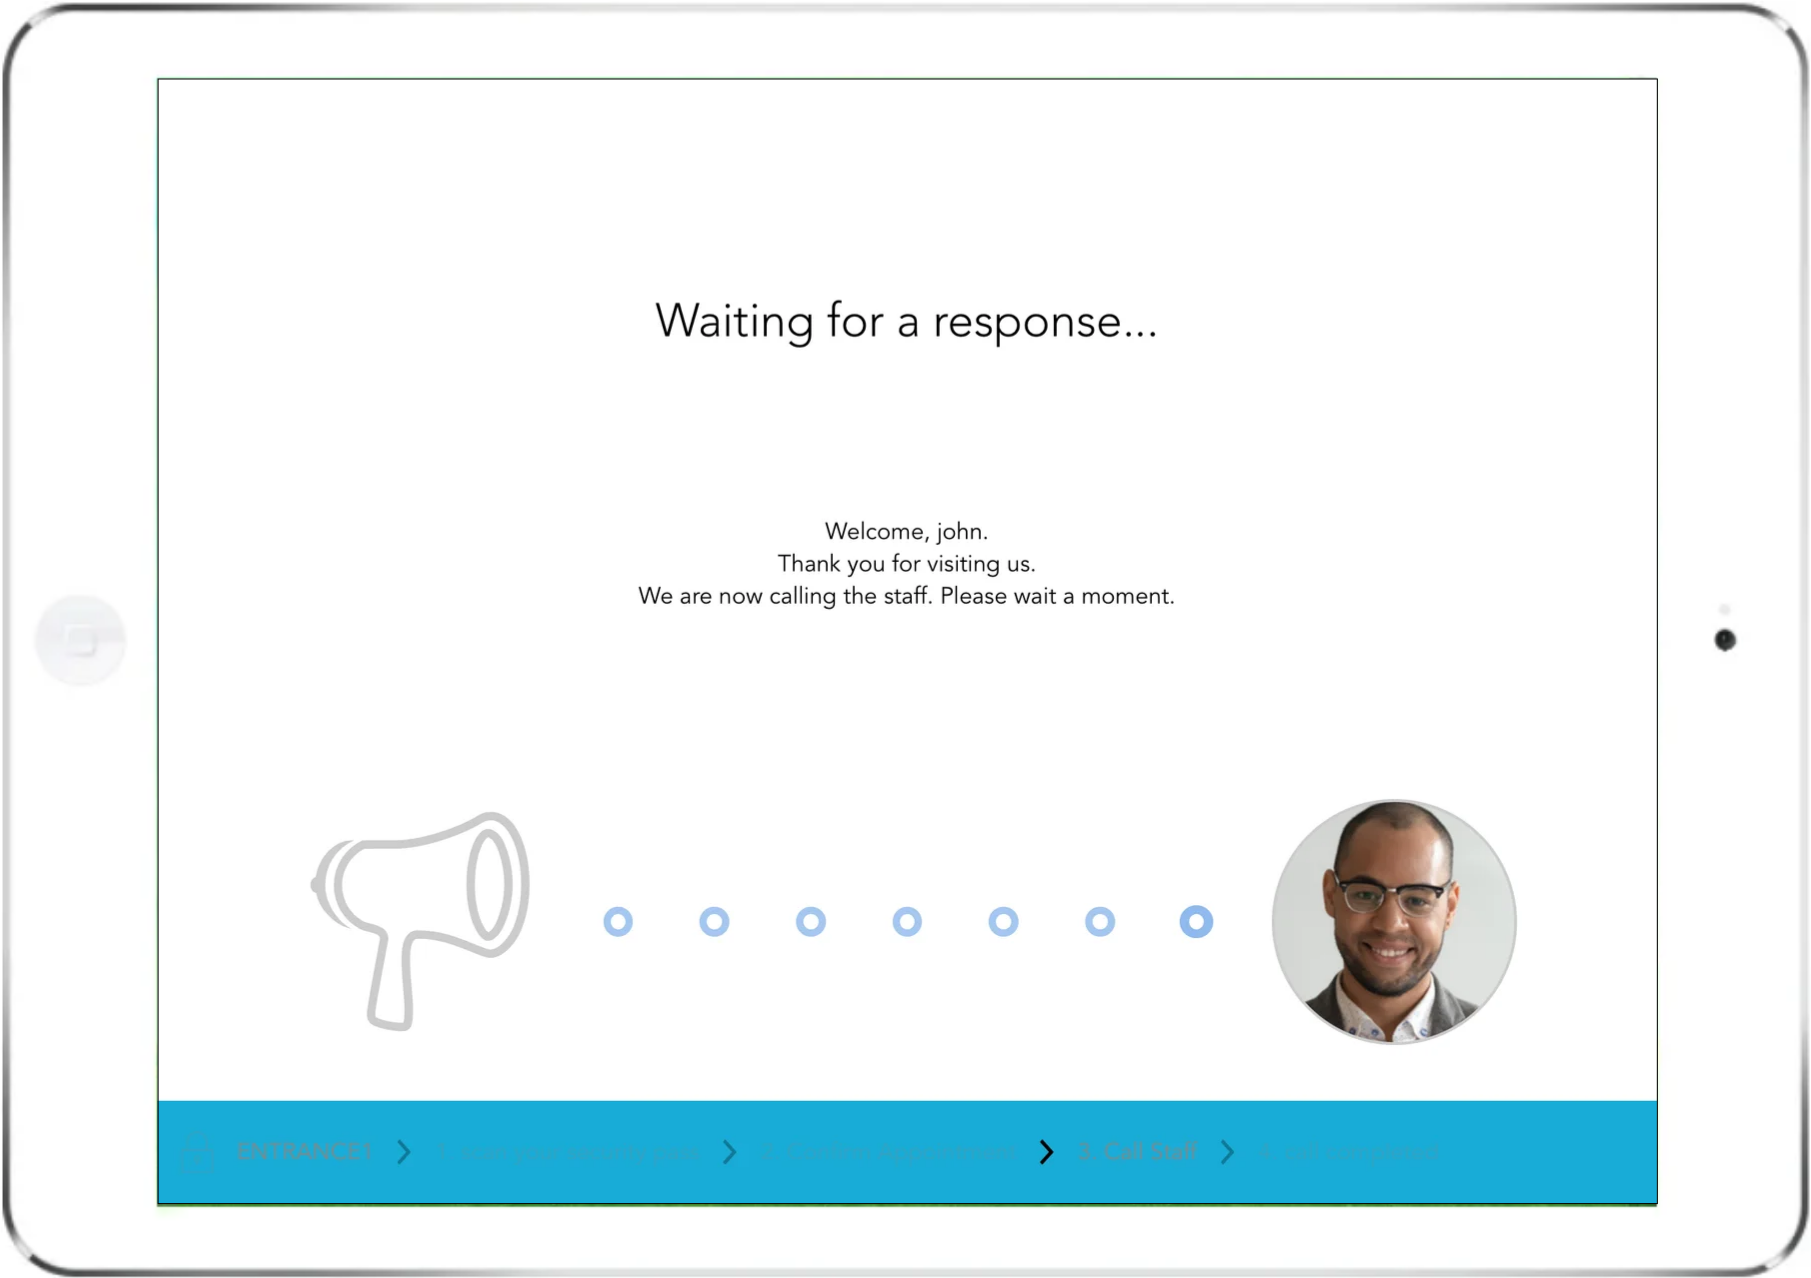
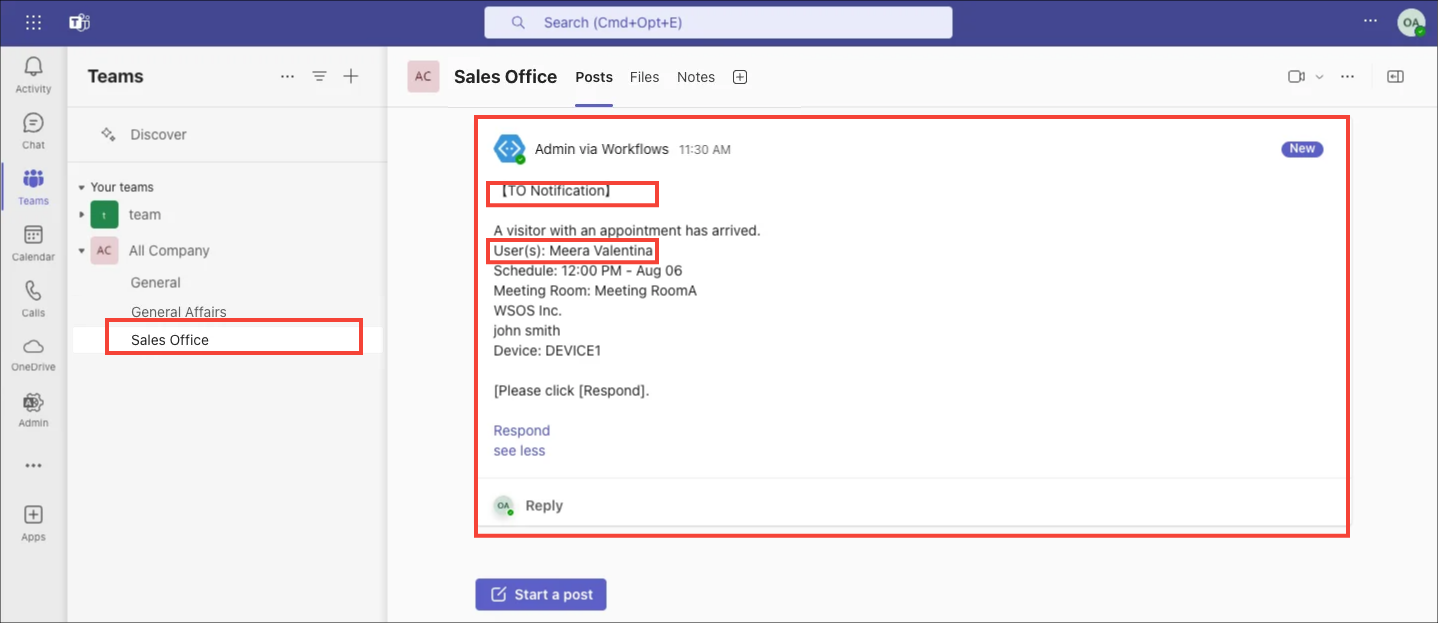
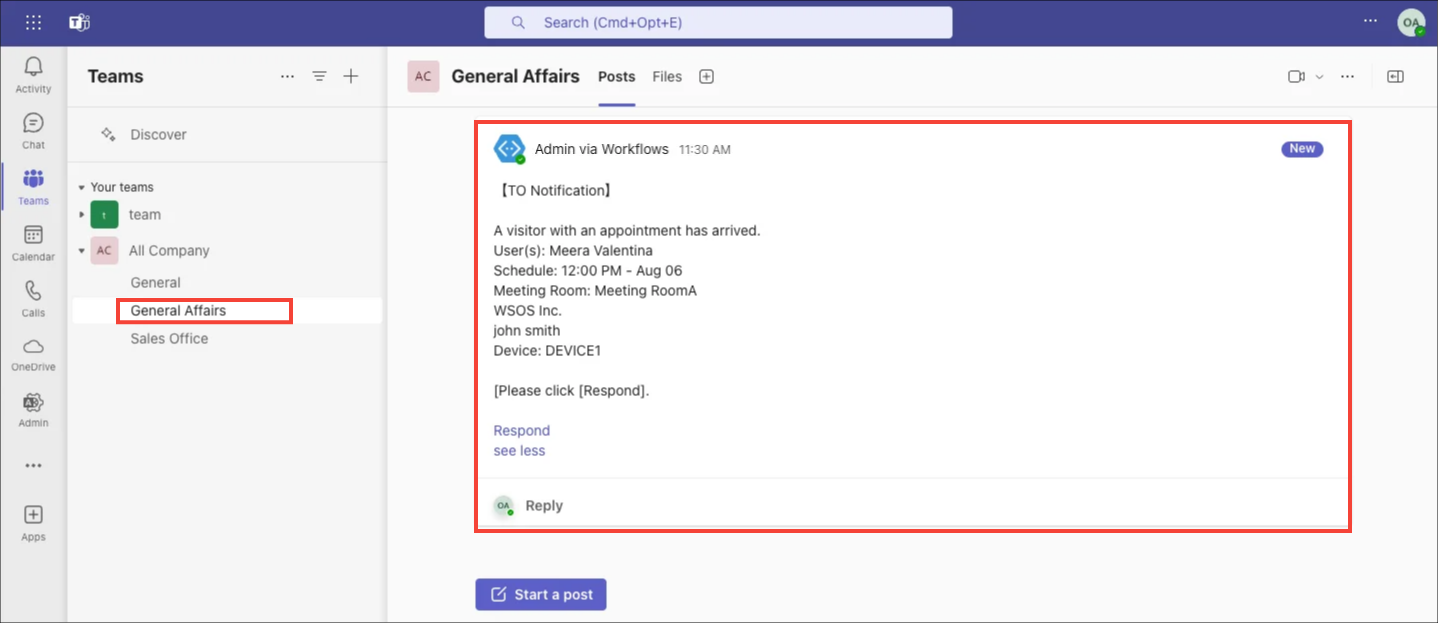
A visitor notification will be posted to the channel you set for the worker.
Click [Respond] in the notification.
💡 NOTE
All members in the channel will be notified.  However, you will be able to confirm to whom the notification is addressed because 【TO】 and "User (Person in charge)" will be included in the body of the message.
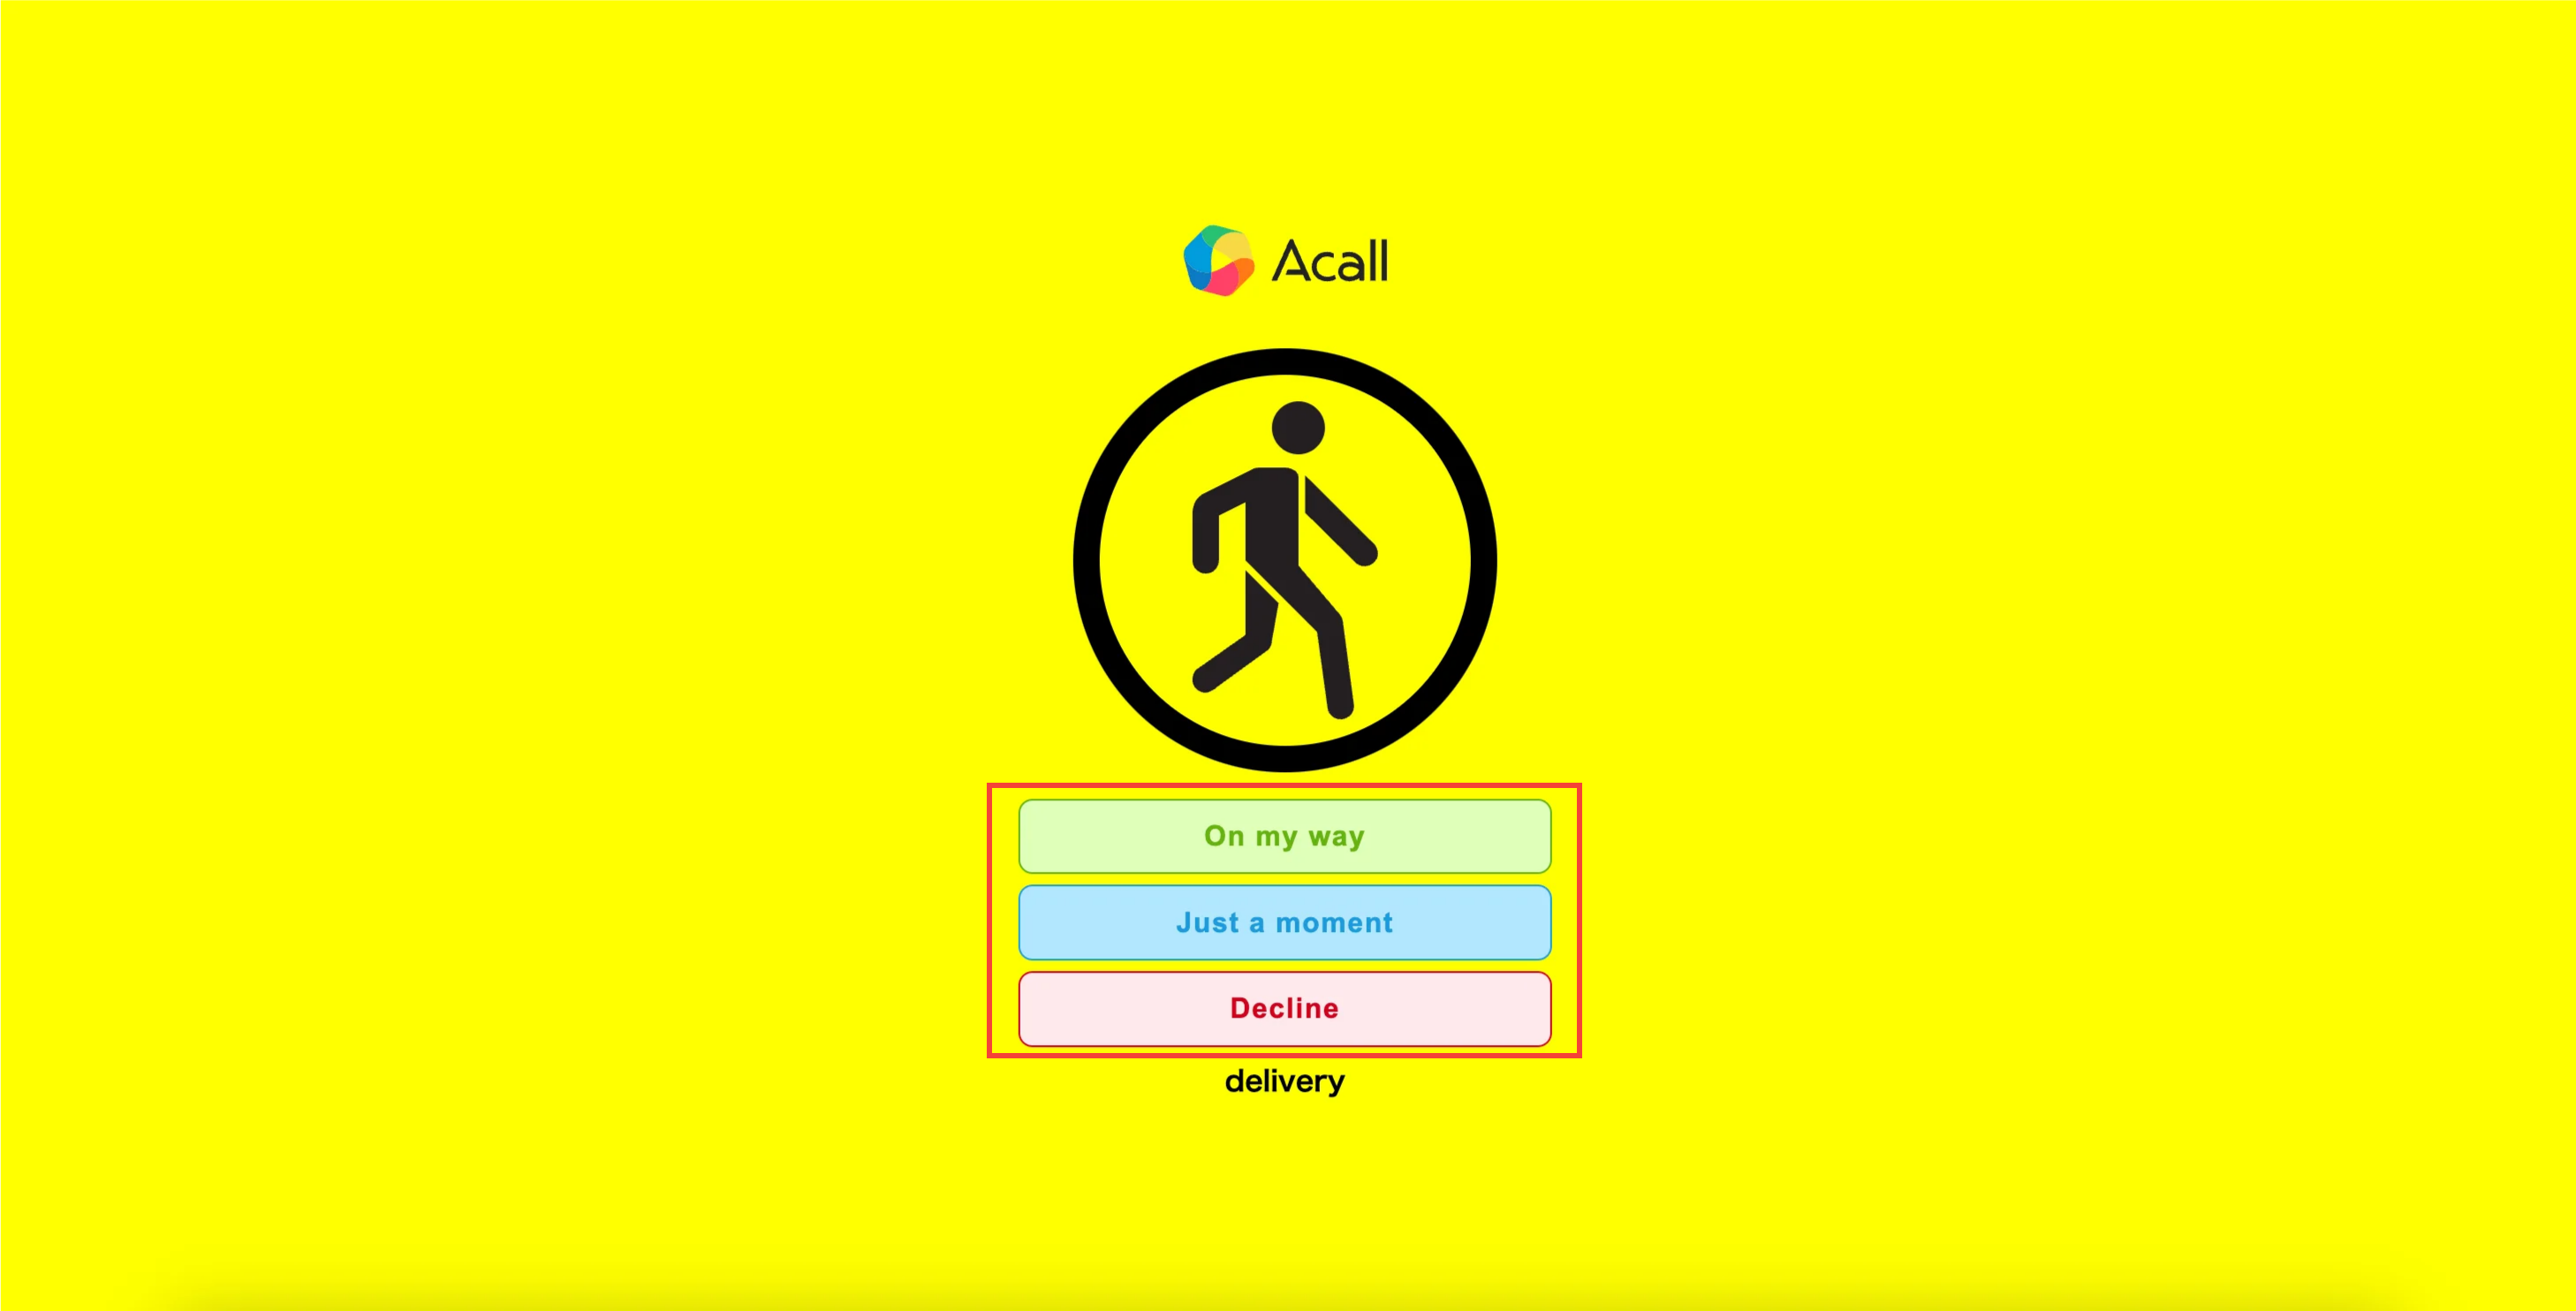
The following screen will be displayed on your browser.
Click one of the response buttons.
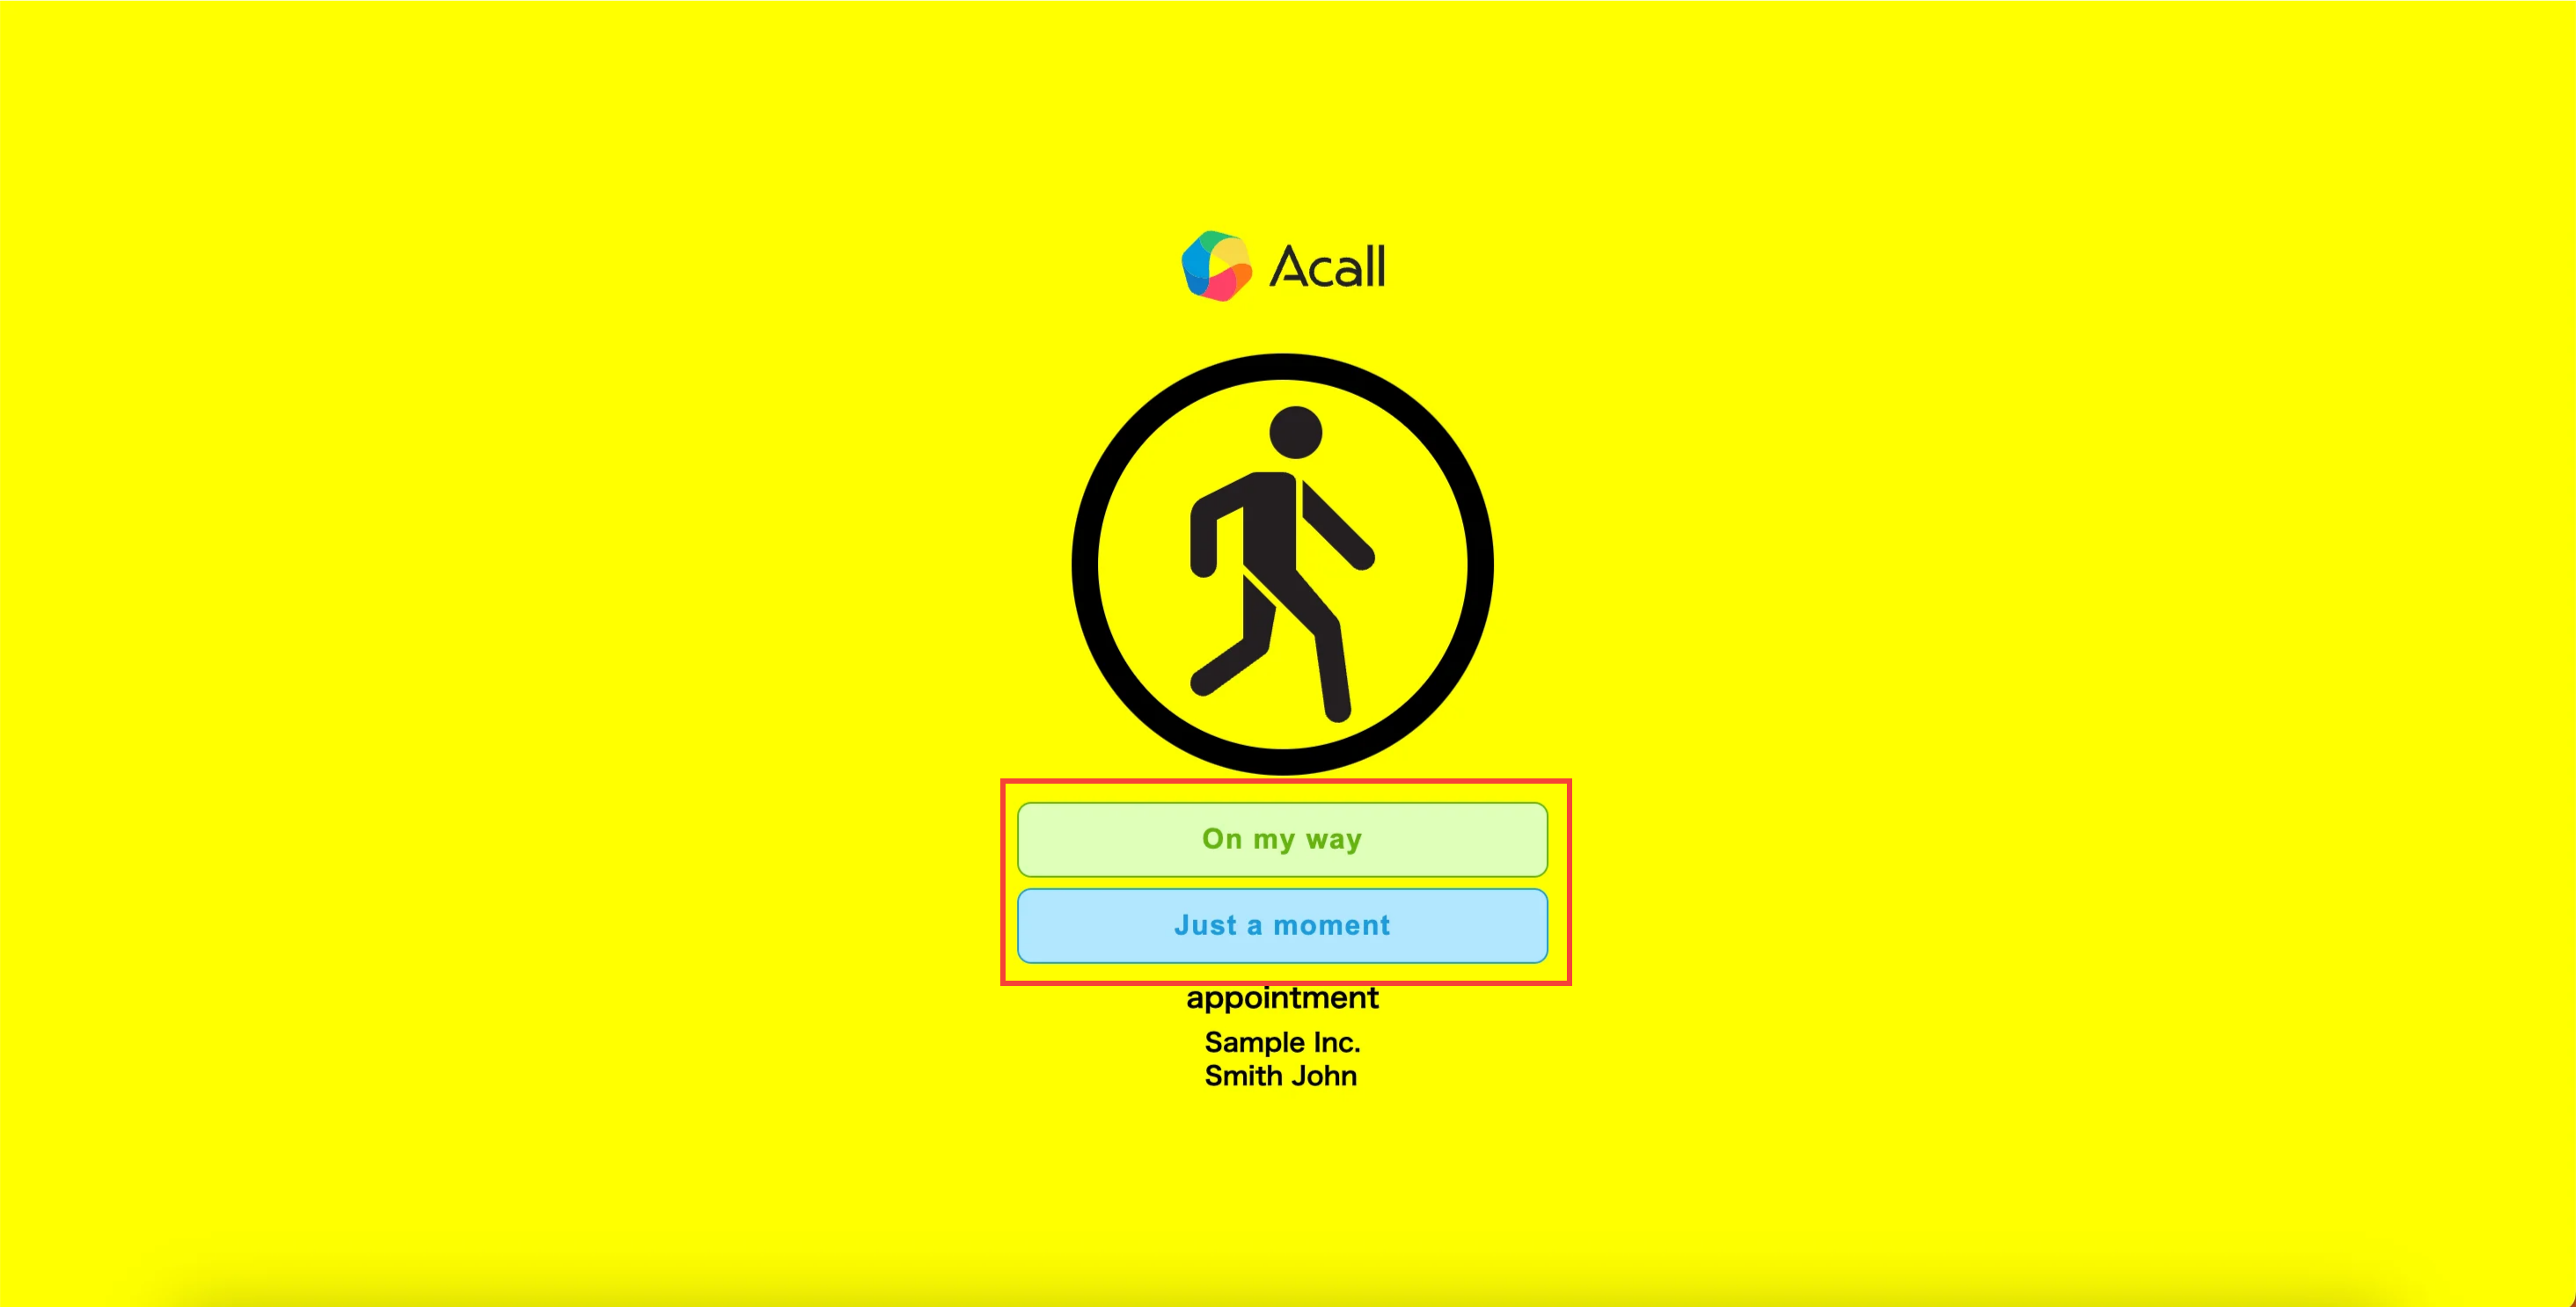
The response result will be displayed.
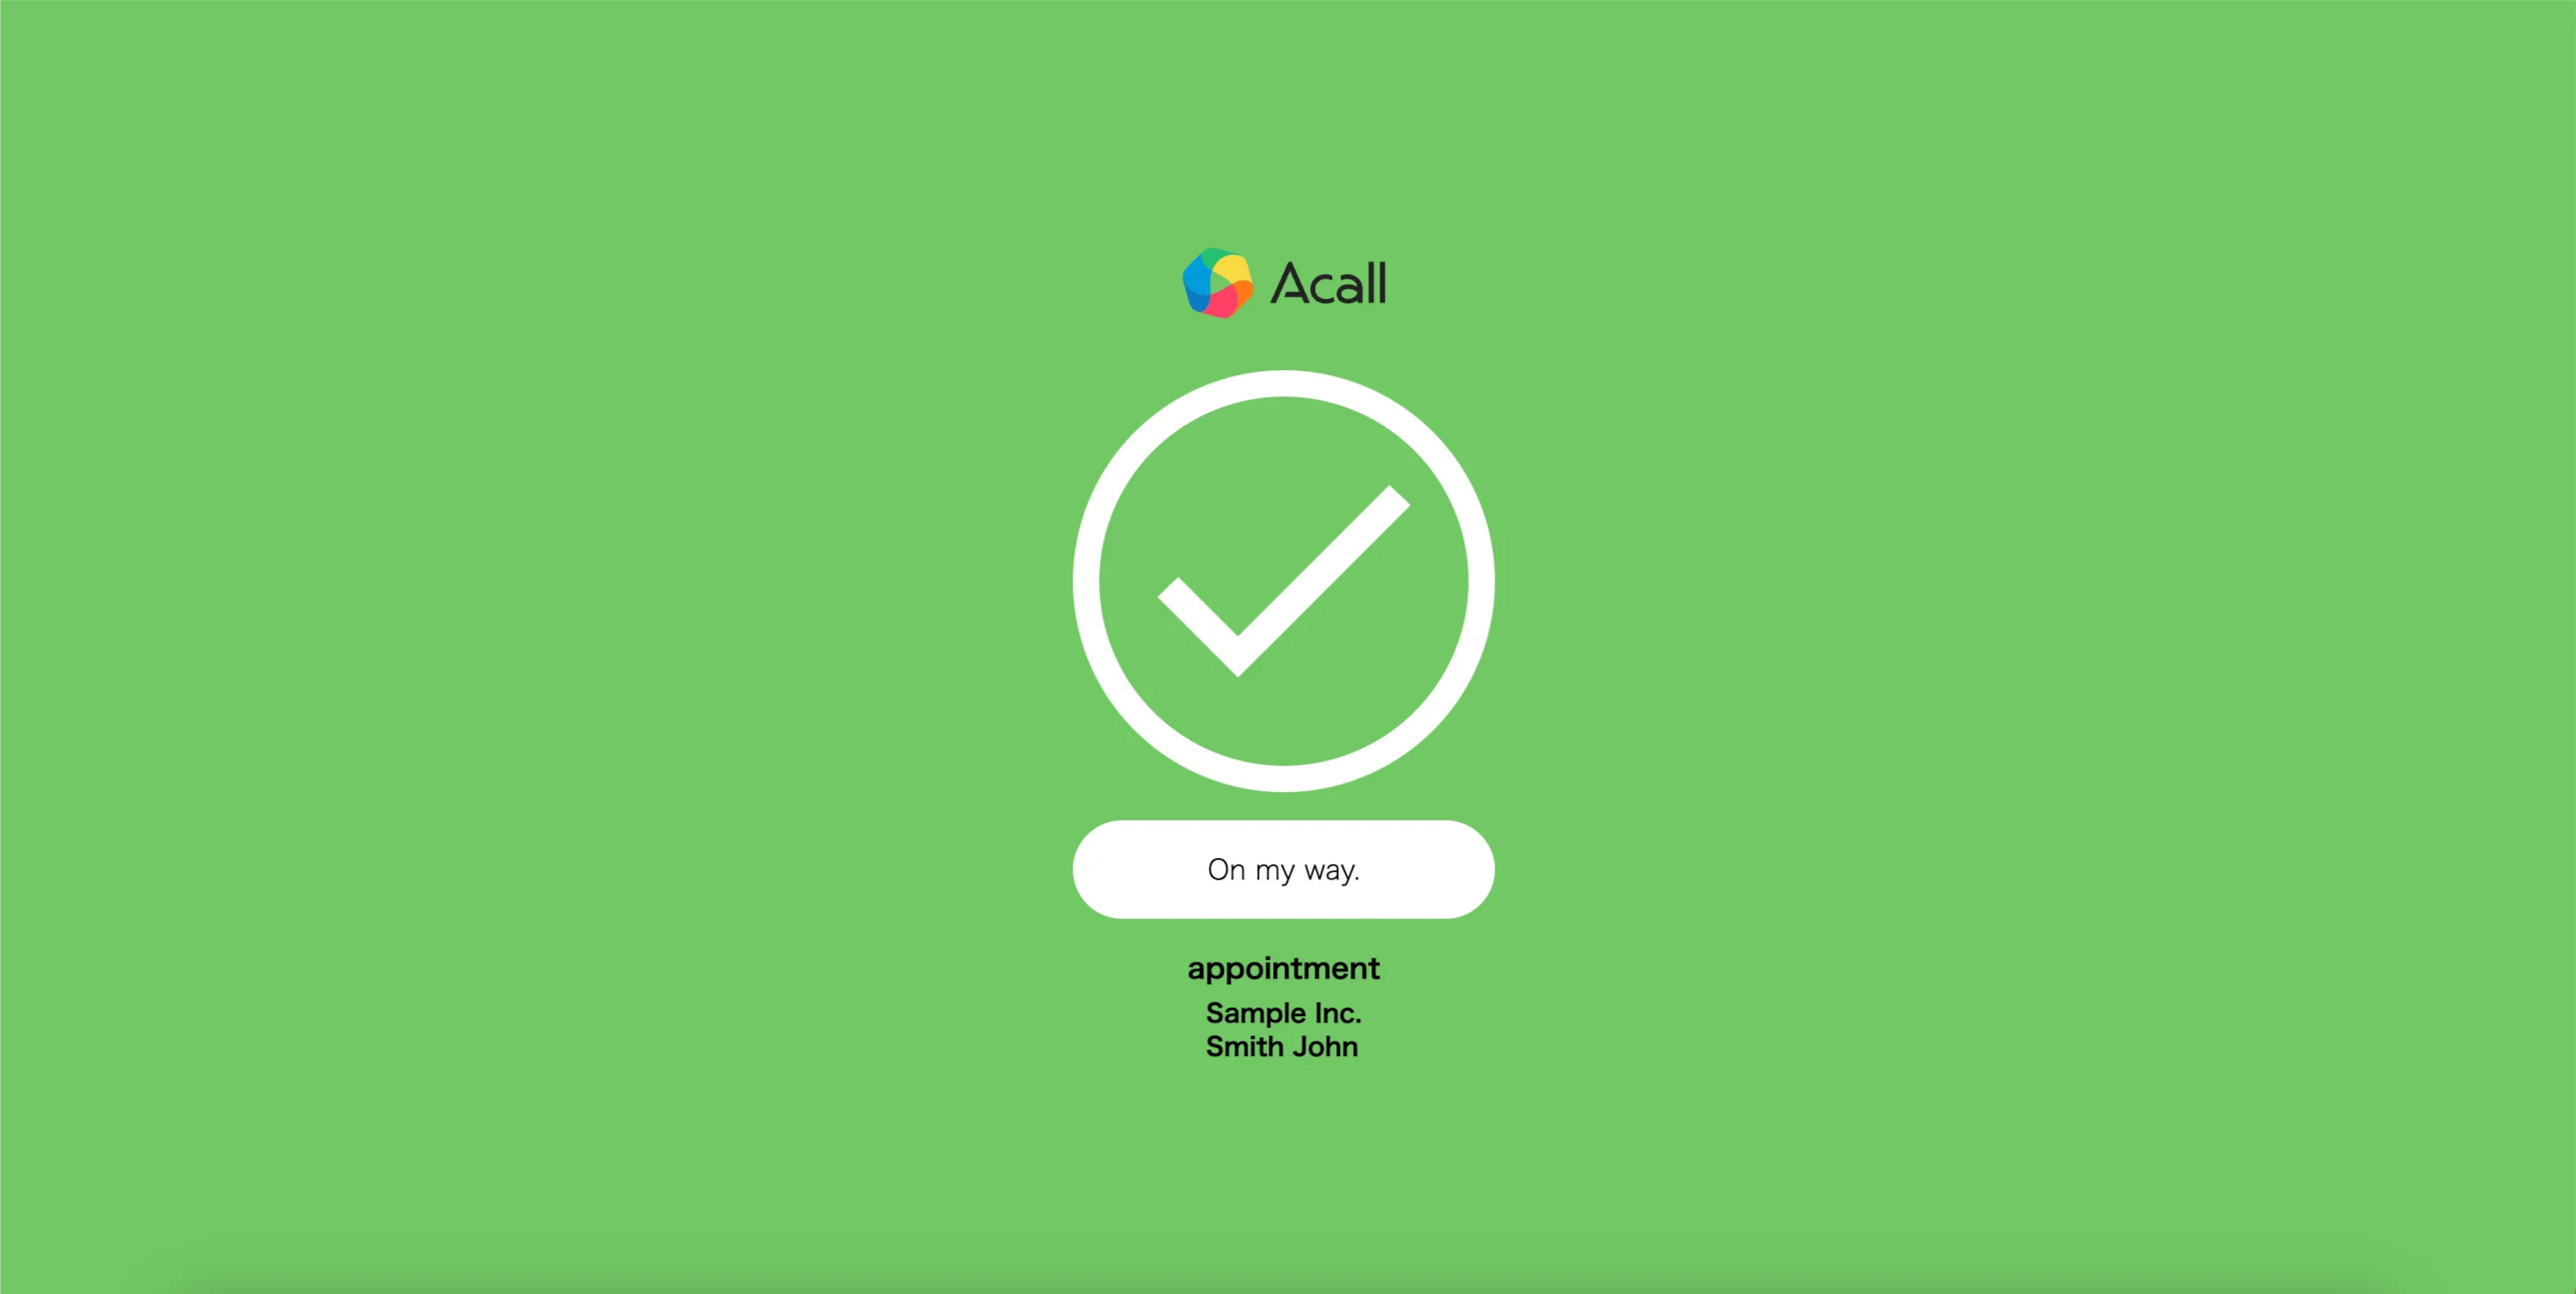
The response result will be displayed on Acall Reception.
💡 NOTE
If you want to customize Acall Reception,
please refer to [Customizing the Reception iPad Menu] and [Setting Acall Reception Language].
Receive group (department) calls in Teams
This section explains how to set up the service with an example which the General Affairs Department responds to a delivery company.
💡 NOTE
As you can find in "Assumptions for Teams Notifications,"
All visitor notifications on Acall Reception are posted to the "channel" of the "team".
They cannot be posted to an individual's "chat".
Teams settings
Create a Power Automate flow and generate a Webhook URL for each channel receiving notifications.
See below for instructions.
- Download the Power Automate package for Acall Visitor Notification
- Create a Power Automate flow for Acall visitor notification
Group settings
After logging in Acall Portal, click [Organization] > [Groups] on the side menu.
Click [Edit] icon on the group you want to send notifications for opening the edit screen.
Enter the Webhook URL of the channel that will receive visitor notifications and click [UPDATE].
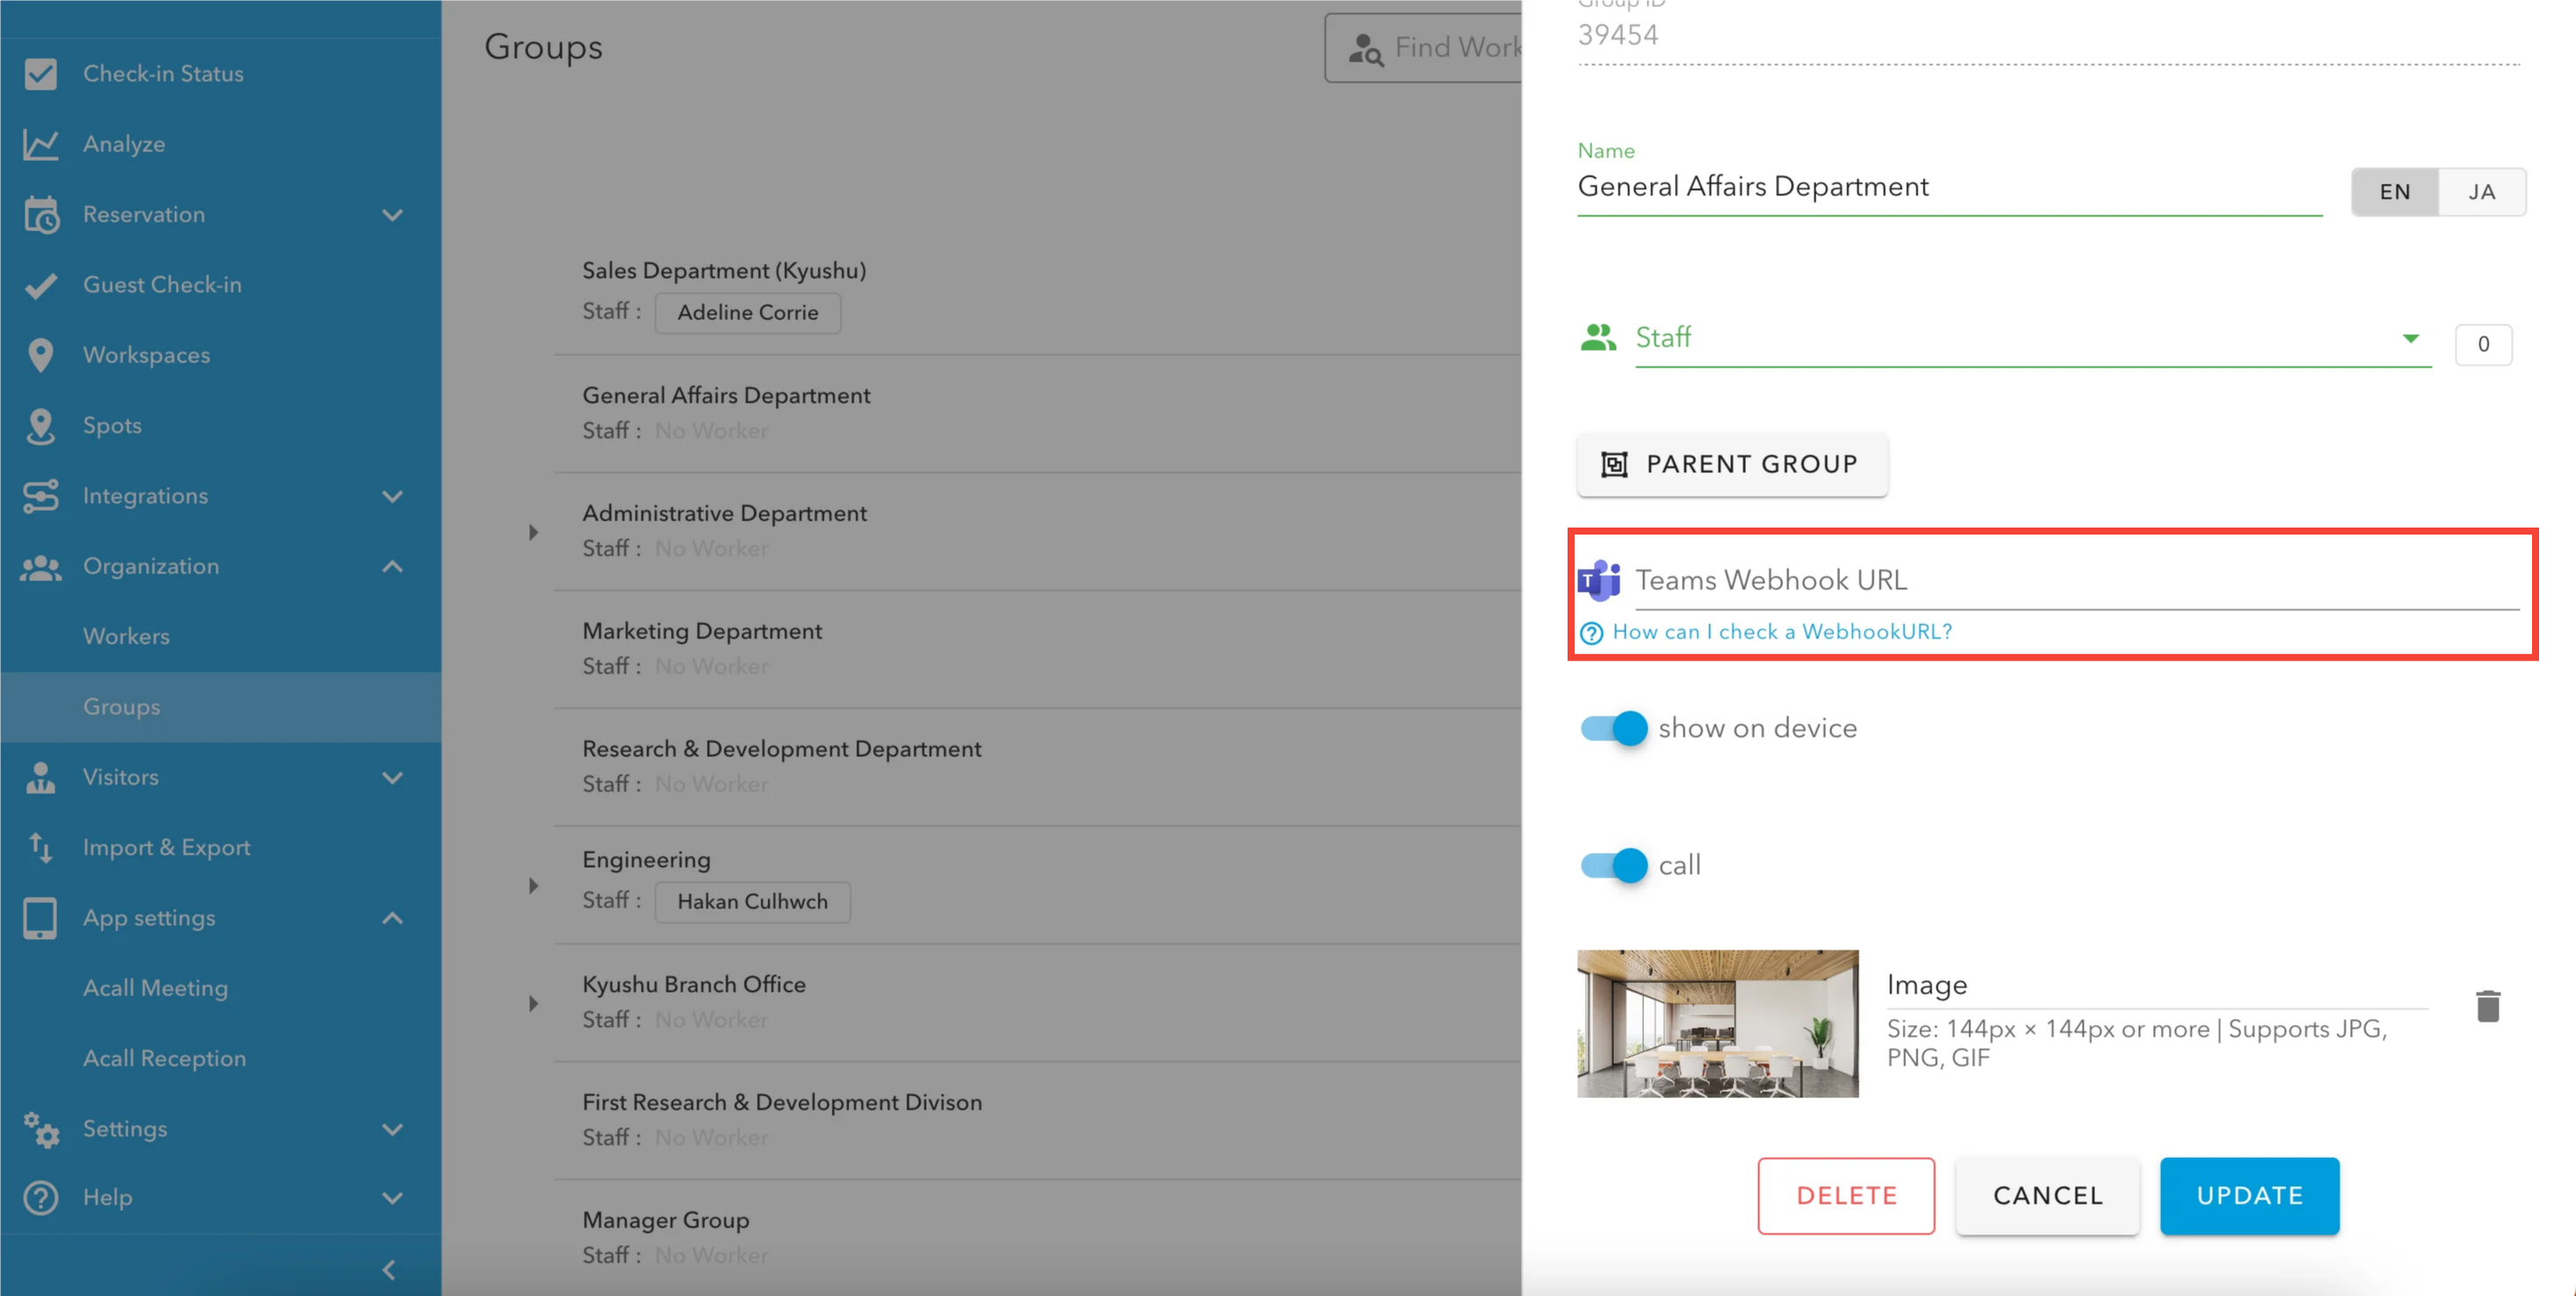
💡 NOTE
You can register "Teams Webhook URL" in a batch by CSV import as well.
Importing and Exporting Group Information
Acall Reception settings
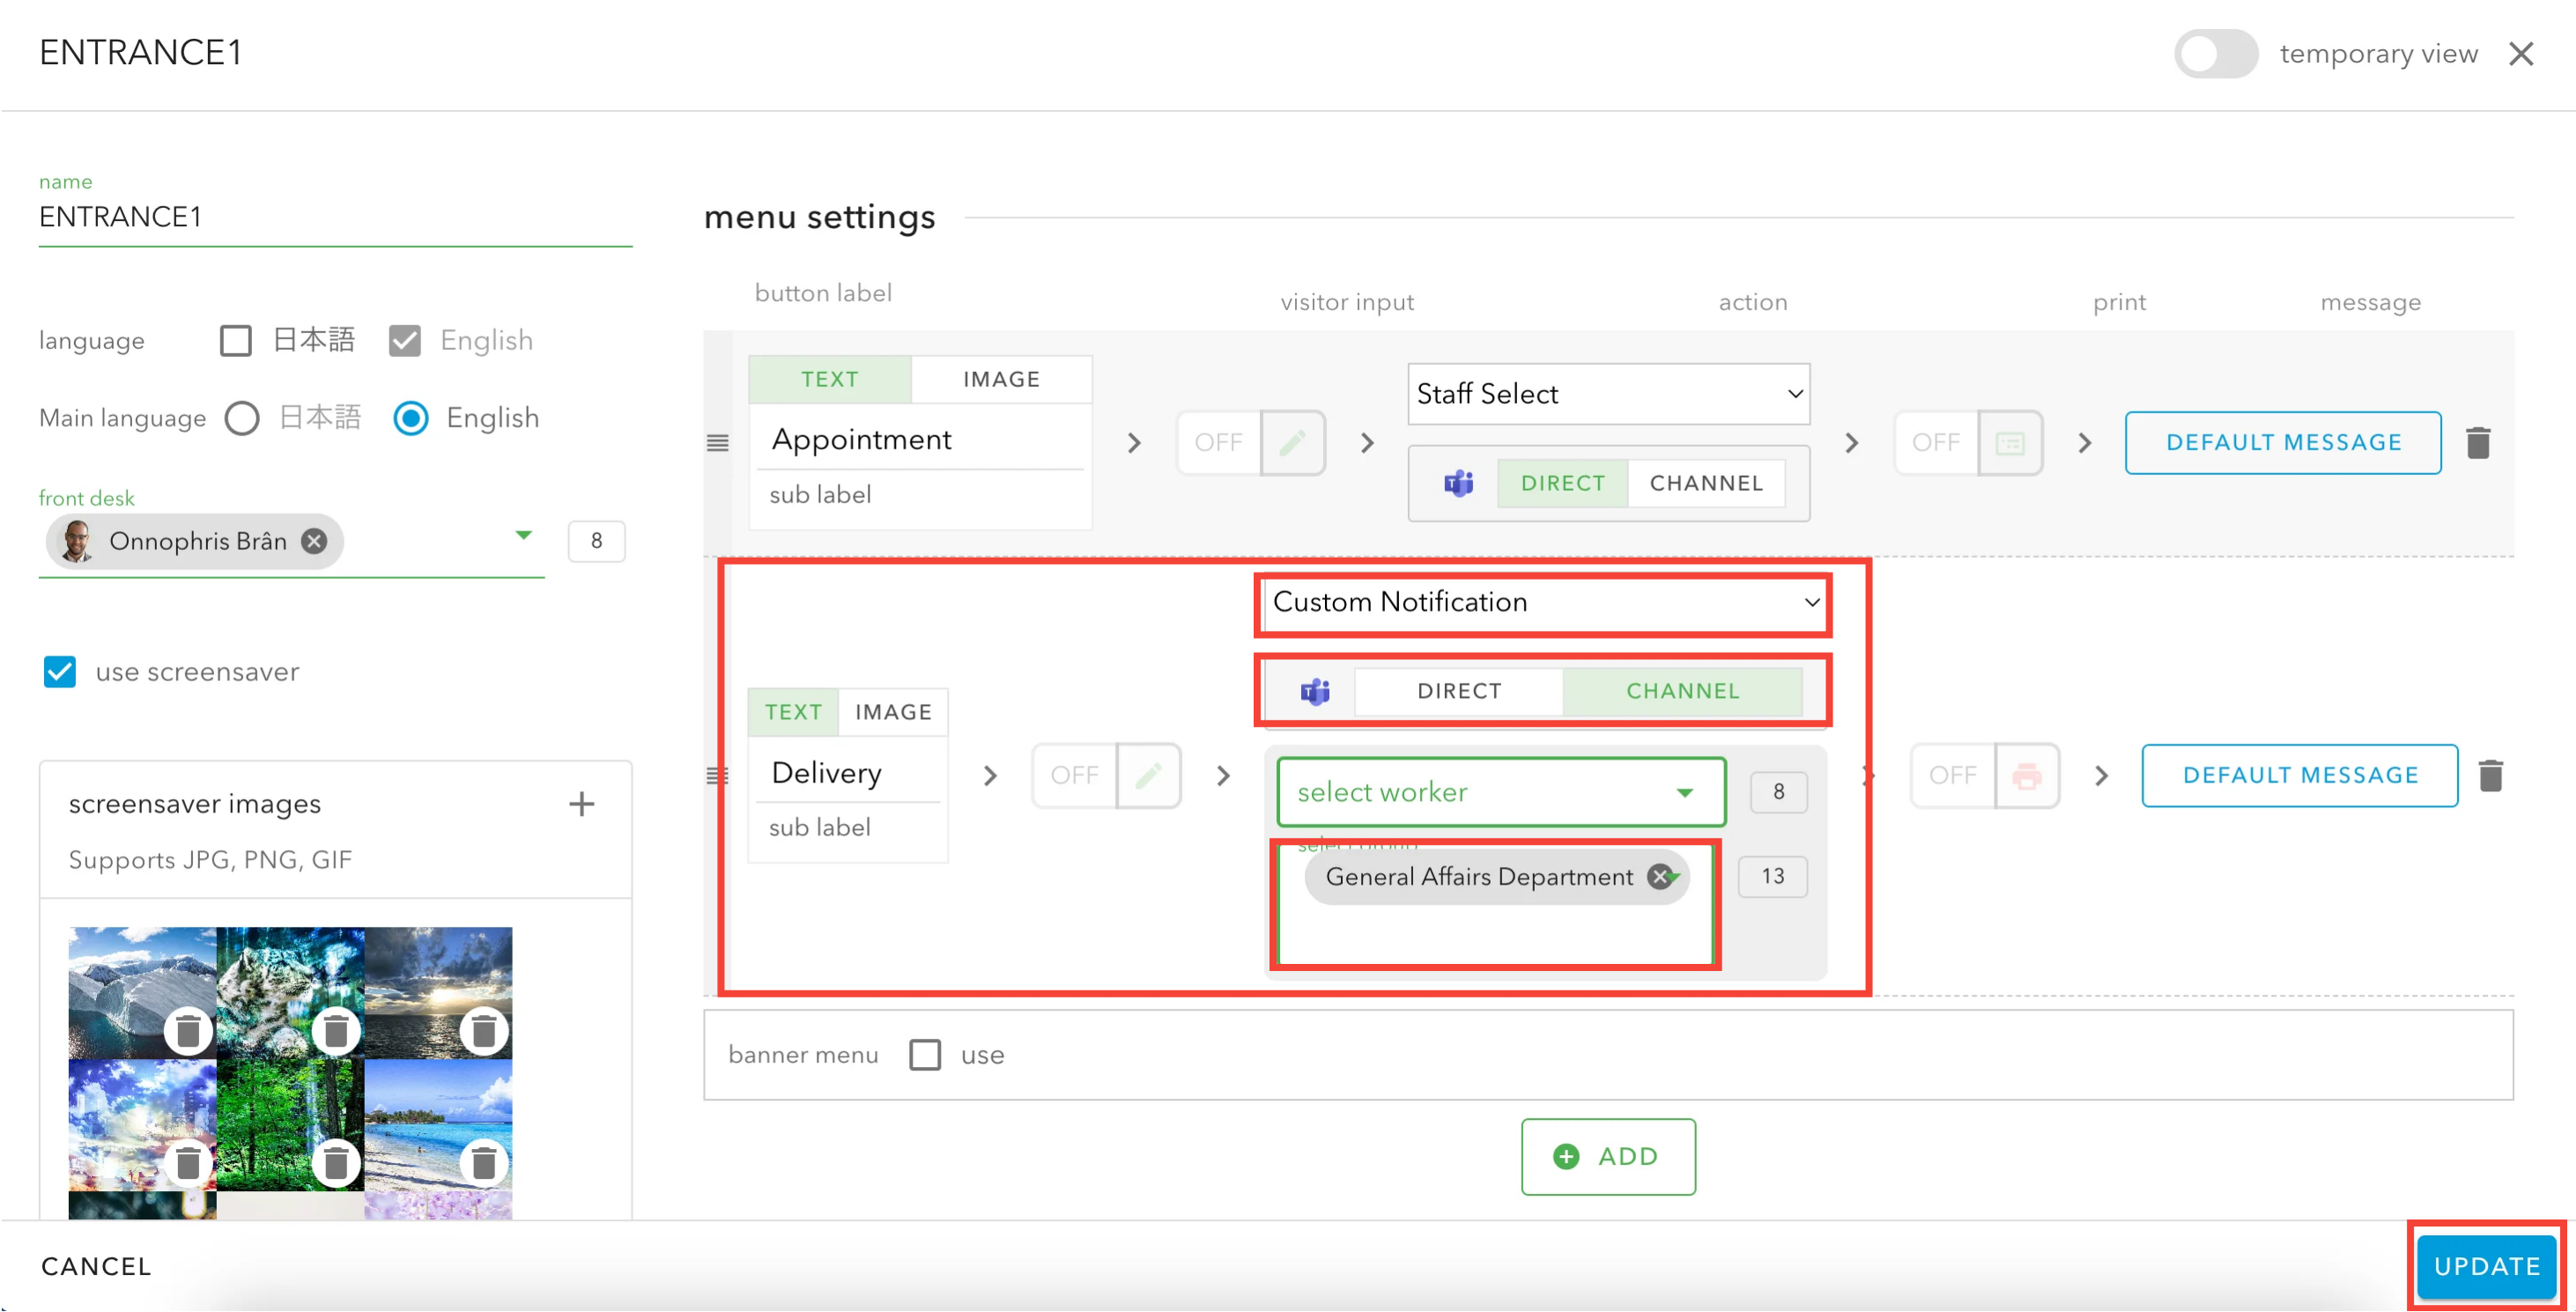
After logging in Acall Portal, click [App settings] > [Acall Reception] on the side menu.
Open edit screen and enter set up as follows.
| Button Label | Action |
|
Delivery |
①Select [Custom Notification] ②Select [CHANNEL] ③Select [select group, "General Affairs Department"] |
Click [UPDATE].
Confirm the operation
Tap a reception menu on Acall Reception.
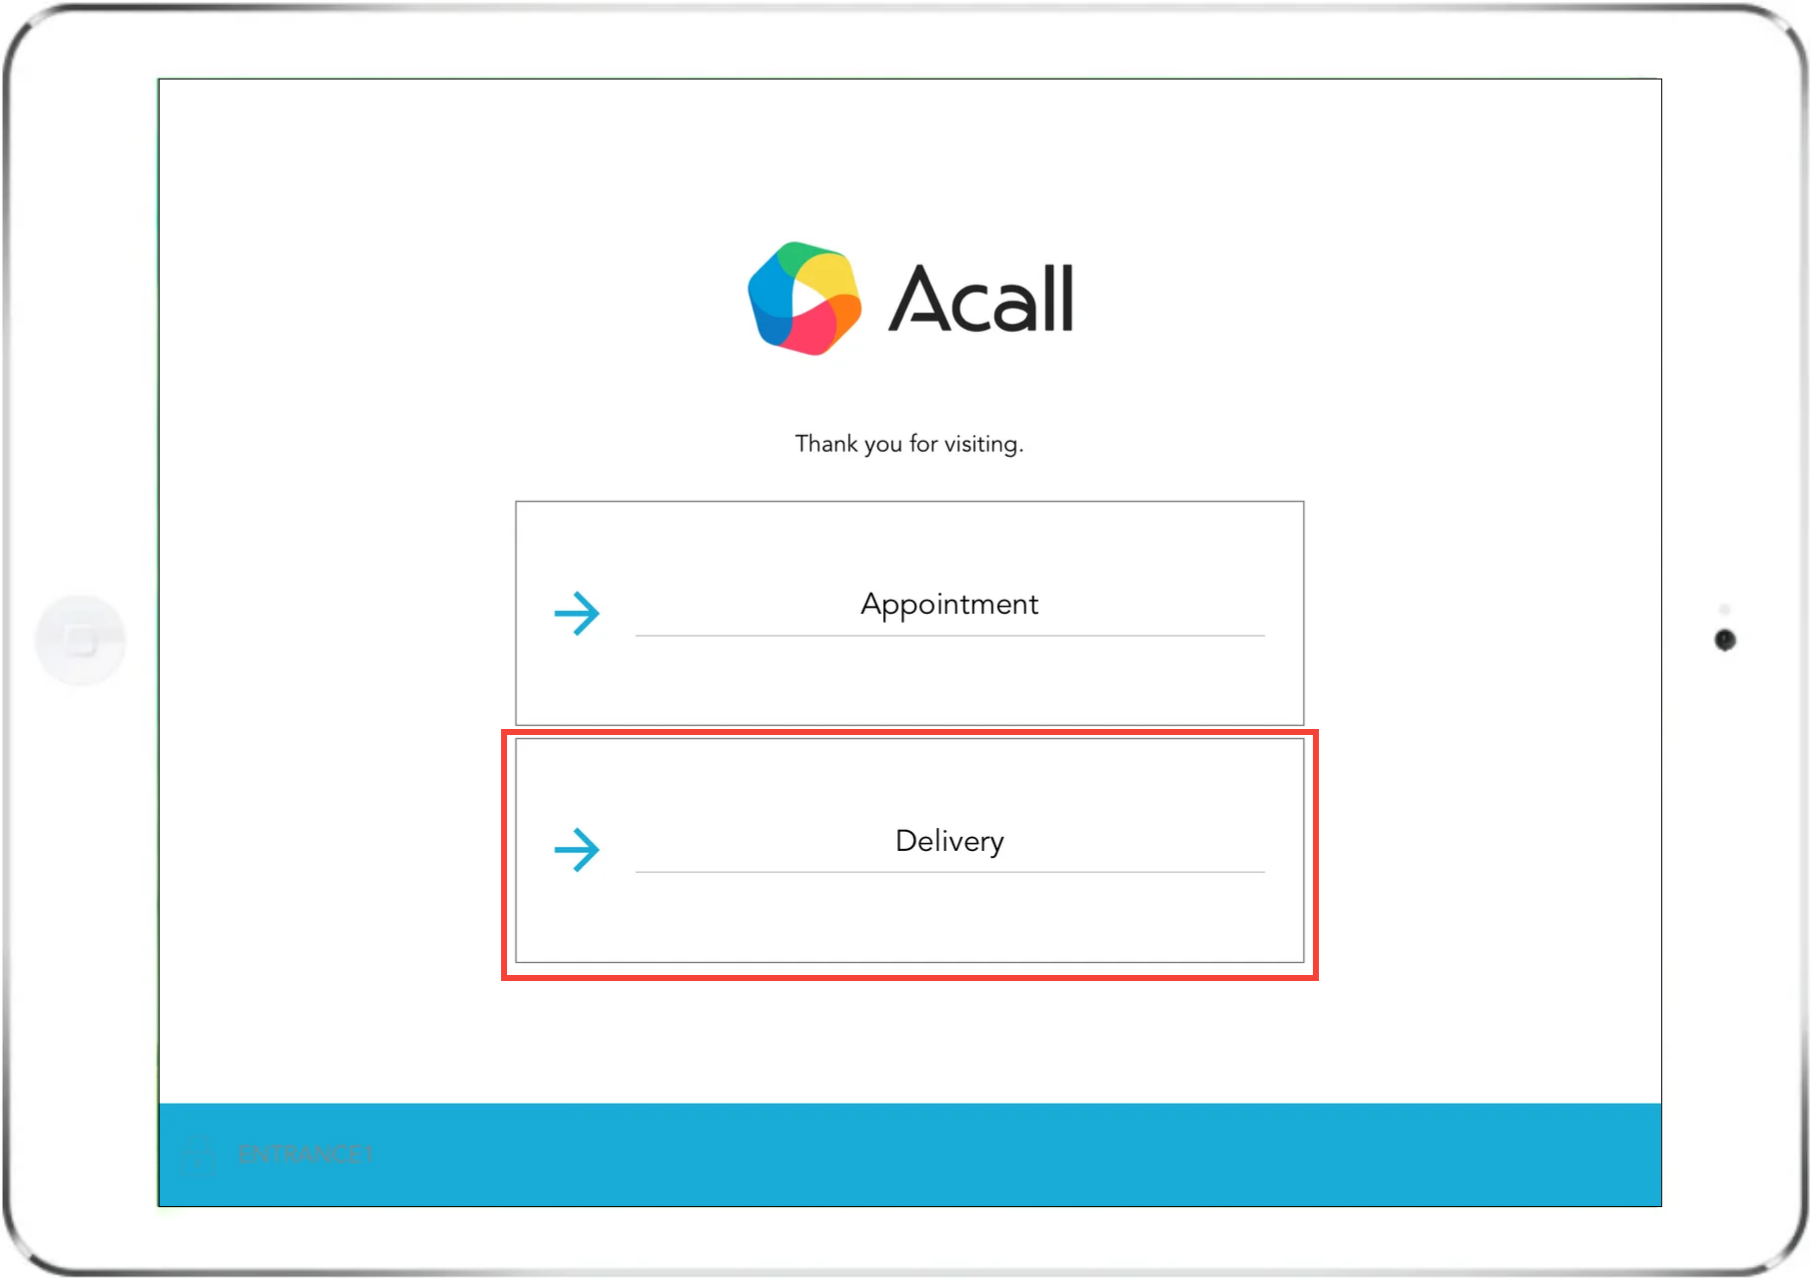
The following screen will be displayed on Acall Reception.
A visit notification will be posted to the channel set as the group.
Click [Respond] in the notification.
The following screen will be displayed on the browser.
Click one of the response buttons.
The response result will be displayed.
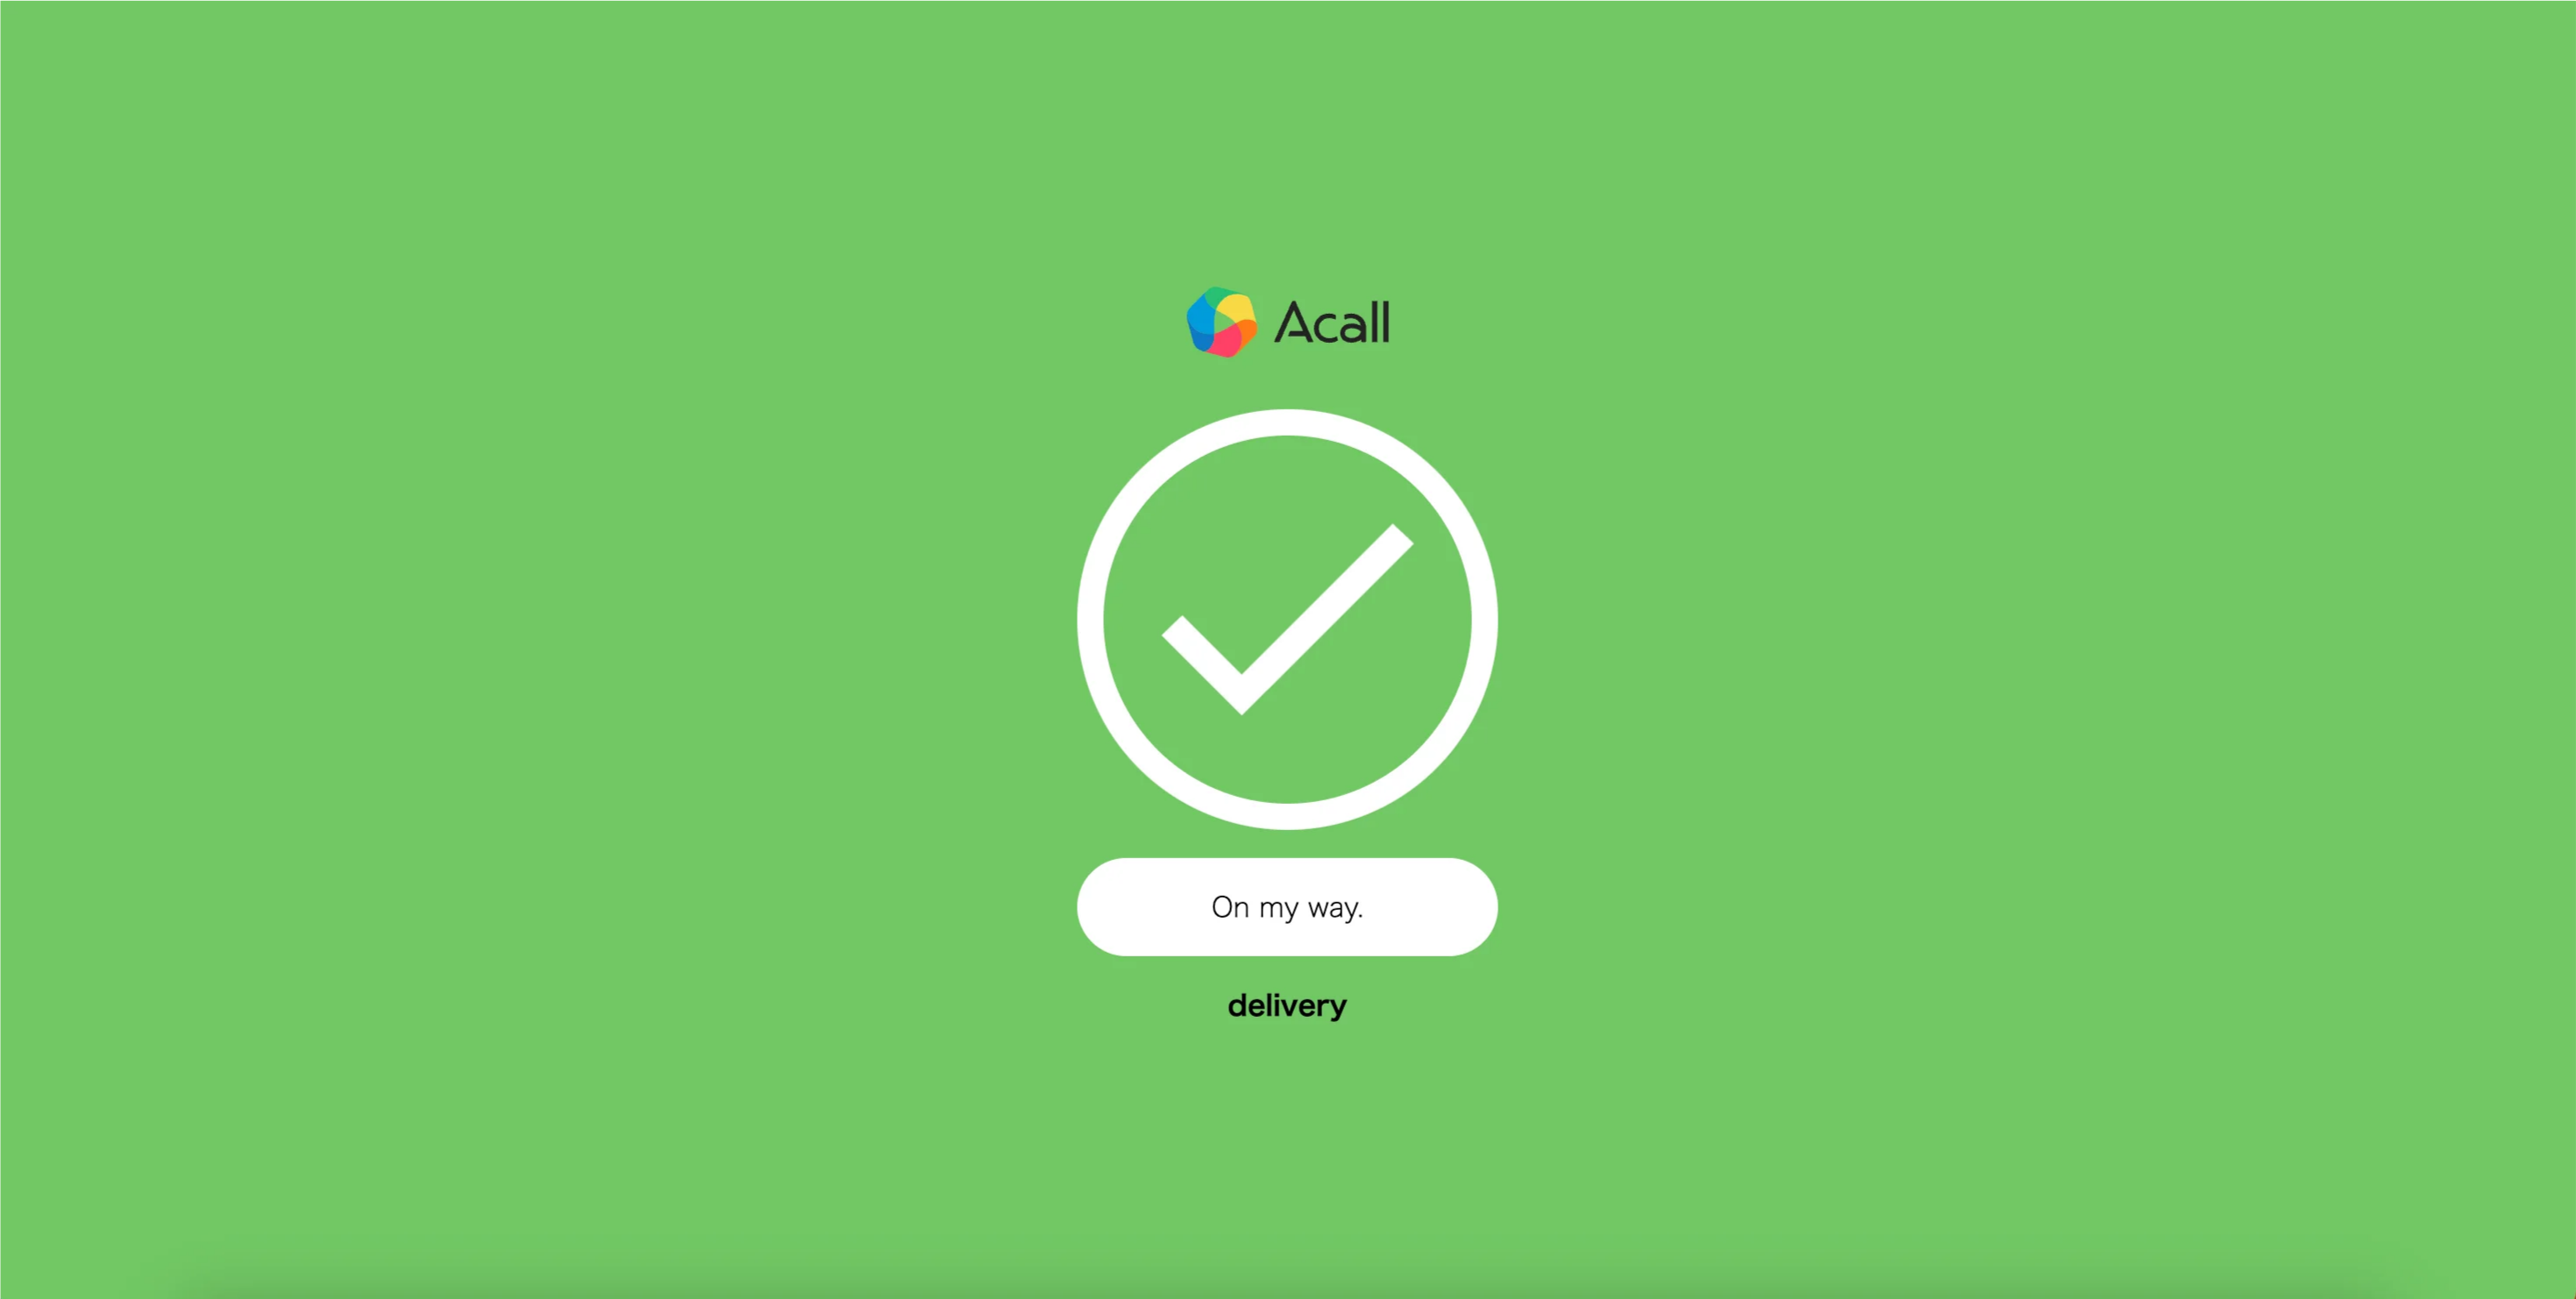
The response result will be displayed on Acall Reception.
💡 NOTE
If you want to customize ACALL RECEPTION,
please refer to [Customizing the Reception iPad Menu] and [Setting Acall Reception Language].
Illustrative example video
This is an illustrative example video. (about 40 seconds)
Comments
0 comments
Article is closed for comments.