Contents
This page explains how to check the availability of a spot and reserve it on Acall Portal and how to edit or delete a reservation.
💡 NOTE
You can reserve a spot on Acall Mobile app as well.
[Acall Mobile] Reserve a Seat/Meeting Room in Advance
Check spot availability
You can check the availability of a spot by specifying the date, time, and floor.
Click [Reservation] > [Spot] on side menu of Acall Portal.
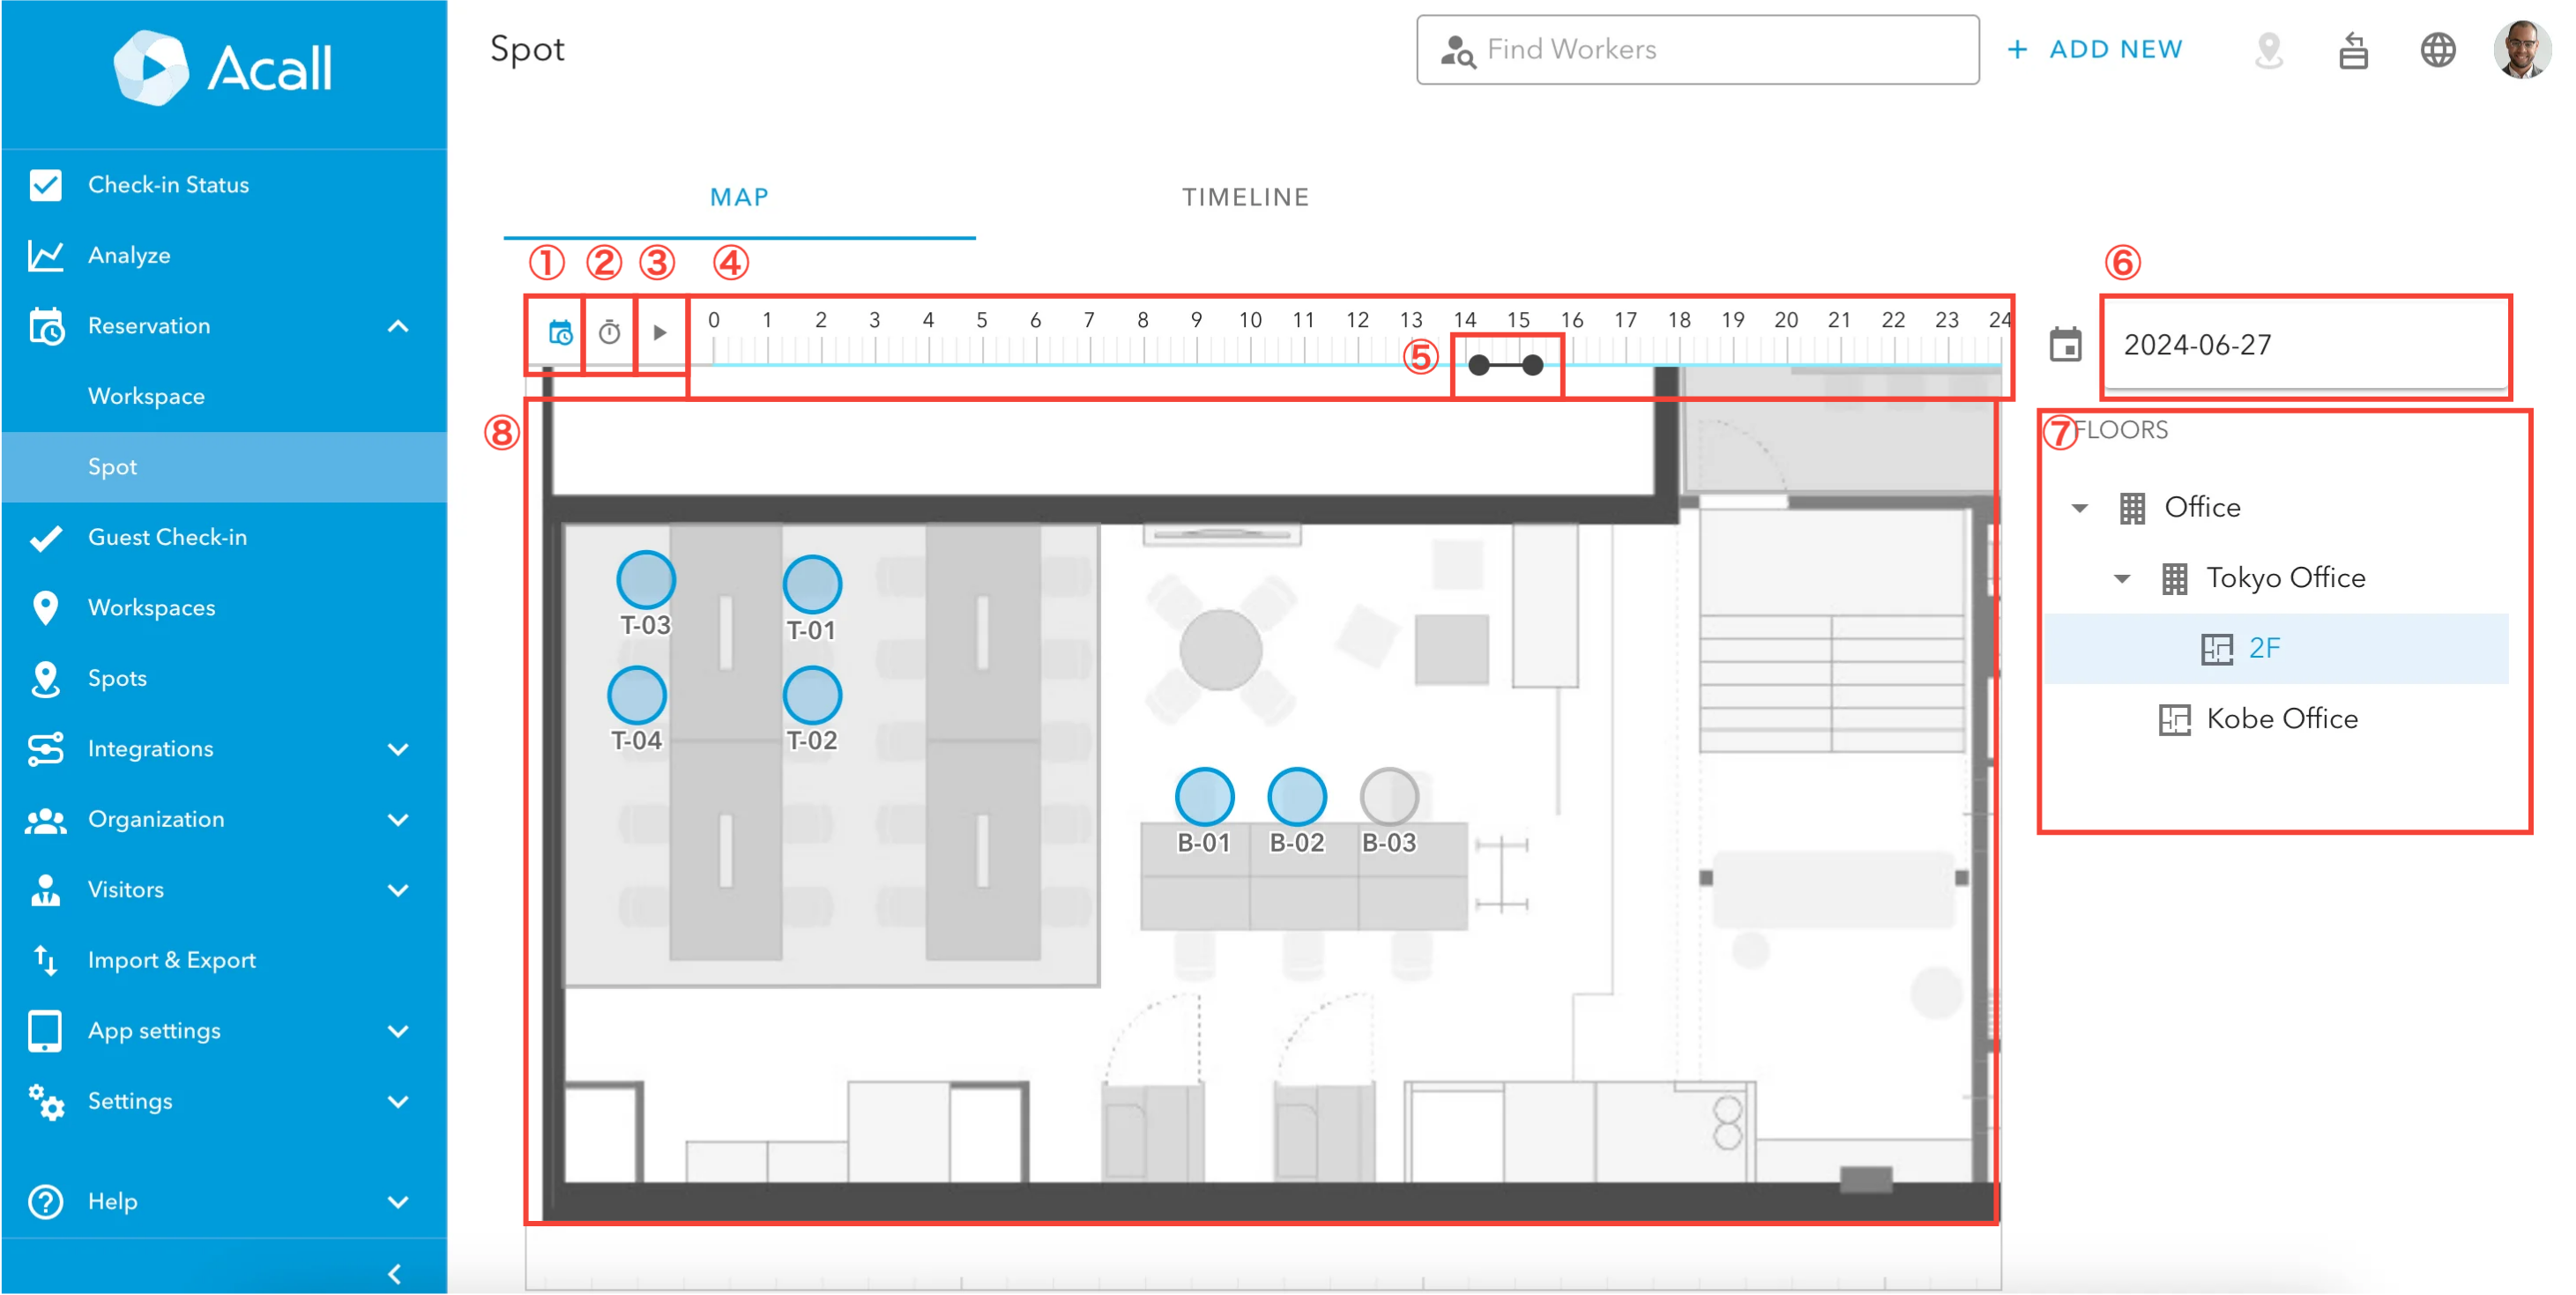
Spot reservation screen will be displayed.

| No. | Item | Description |
| ① |
Work Plan Icon |
Select whether the initial value of the start and end time of the schedule reflects your work plan.
Default is ON. Please refer to "Work Plan" for more information. |
| ② |
Clock Icon |
Click and the reservation status one hour after from the current time will be displayed. |
| ③ |
Playback Icon |
Click and play the reservation status on the floor map. |
| ④ | Timeline |
Timeline displays the available time of the floor. |
| ⑤ | Slider | Select the time you want to view the availability of the floor. |
| ⑥ | Calendar |
Click a date to display a calendar. Select the date you want to view the availability. |
| ⑦ | FLOORS |
Buildings and floors where spots are set are listed. |
| ⑧ | Floor Map |
The reservation status of the spot will be displayed on the floor map. Spots that is available for reservation are displayed in light blue.
Spots where other workers have already reserved are displayed in red.
Spots that are not available, such as outside of working hours, are displayed in gray.
|
Click the calendar icon and select the date you want to check availability.
Select a floor.
On the timeline, drag and drop the time slot for seeing reservation status.
Select a reserved spot (red color) to see who has reserved the spot and the reservation time.
Reserve a spot
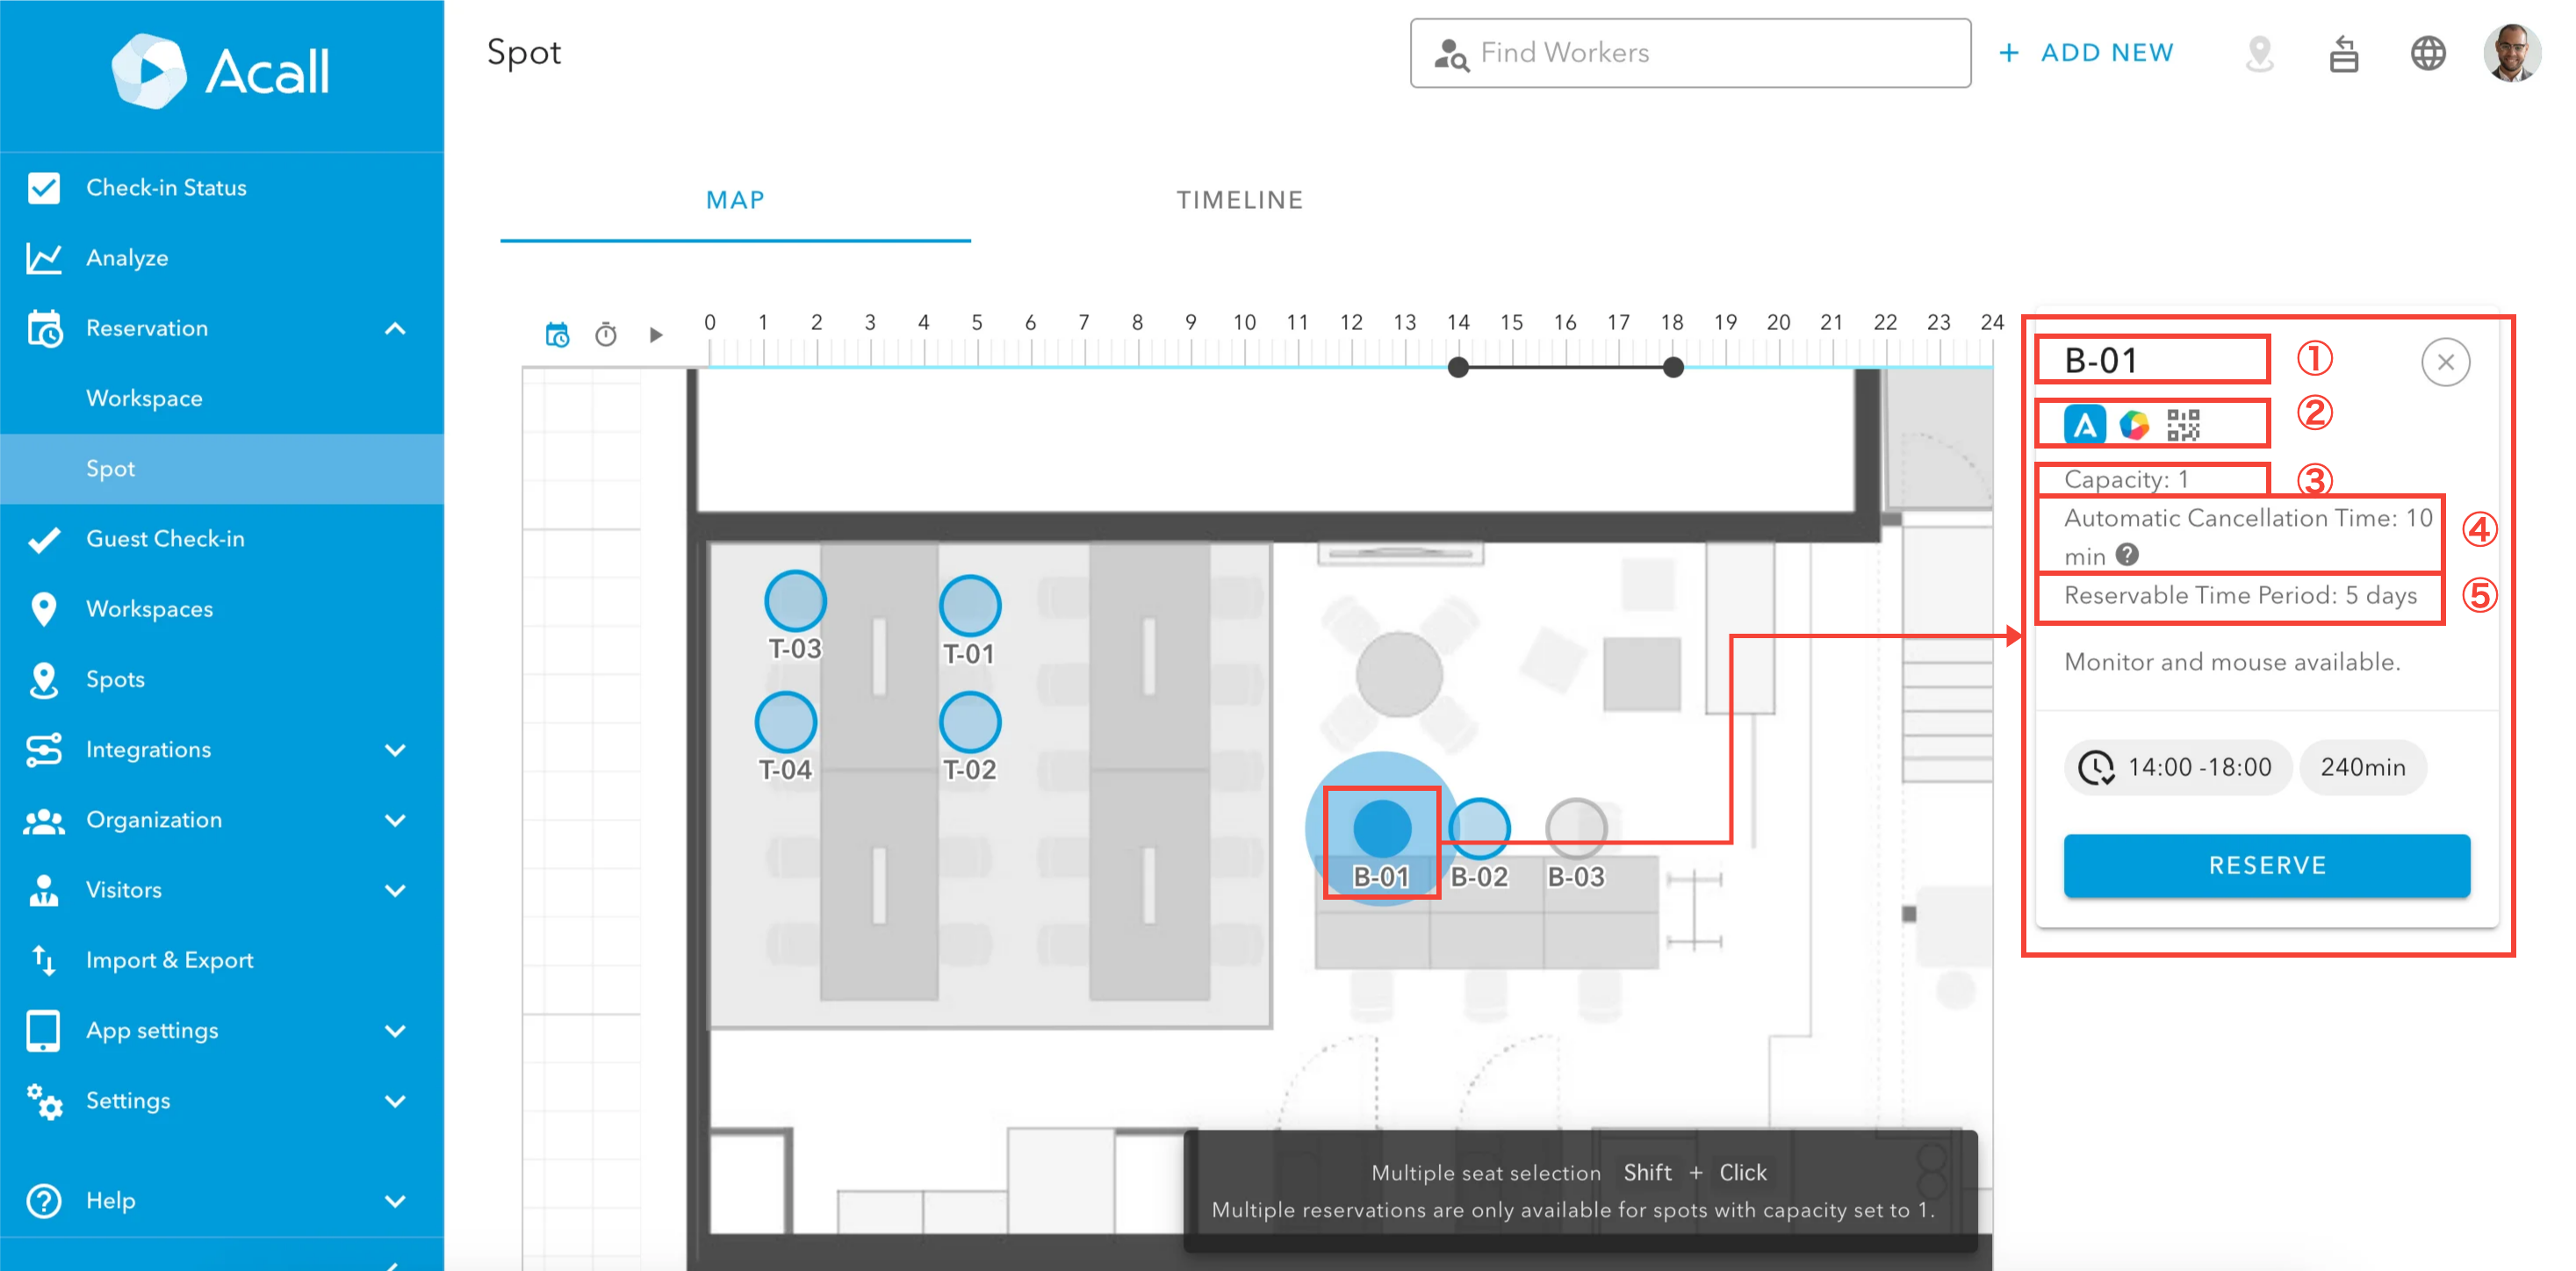
Click the spot you want to reserve on the floor map.

| No. | Item Name | Description |
| ① | Spot Name |
The name of the spot is displayed. |
| ② | Authenticator |
Check-in method is displayed. Acall Desktop Acall Mobile Acall Portal
Hover the cursor over the icon to see instructions on how to check in. |
| ③ | Capacity |
The number of people who can use the spot simultaneously is displayed. |
| ④ | Automatic Cancellation Time |
The reservation will be automatically canceled if you do not check in before the automatic cancellation time. |
| ⑤ | Reservable Time Period |
The number of days in advance for which reservations can be made. |
Click [RESERVE].
Enter the reservation details and click [CREATE].
⚠︎ ATTENTION
Fields marked with (*) are required.
| Item Name | Description |
| Title |
Title of the reservation The title can be left blank for reservation. |
| Date(*) |
Date of the reservation Reservations can not be made for over the days or repeatedly. |
| Start time(*) |
Start time of the reservation Initial start time is set based on Work Plan settings / reservable time of the spot / current time. For details, please refer to "Work Plan". |
| End time(*) |
End time of the reservation Start time of the reservation Initial end time is set based on Work Plan settings / reservable time of the spot / current time. For details, please refer to "Work Plan". |
| user(*) | User of the spot |
| Description |
Description of the reservation Please use this when multiple people are using the spot for a meeting, or when you want to share the purpose of use. |
When you complete the reservation, the [SUCCESS] pop-up will be displayed.
An error message will be displayed when your reservation can not be made for some reasons, such as duplicate reservations or an excess capacity.
Created reservations are synchronized in real time to the the spot reservation screen and following applications and screens.
PC:Acall Portal
iPad:Signage / Spot check-in kiosk
Smartphone:Acall Mobile
Receive spot reservation notification
If you have reserved a spot in advance, you can receive a notification on the day you use the spot to remind, etc.
For more information, please refer to "Receive spot reservation notifications".
Reserve multiple spots at once
You can reserve multiple spots at once on the floor map.
For example, you can use the following cases
- A representative collectively reserves seats for 4 members for a team meeting
- Reserve all seating in the area to be occupied by the event organizer for an event.
To reserve multiple spots at once, holding down the Shift key and click on spots on the map.
The number of spots selected is displayed on the right side.
Select users and click the [CREATE] button.
To make multiple spots reservation, the number of capacity for a spot must be set to 1.
💡 Note
The number of spots selected must match the number of users.
If they do not match, an error message will be displayed and the [CREATE] button cannot be clicked.
When spots are reserved, the icon of the person who made the reservation is displayed.
When a user checks in, the icon changes to the icon of the person who checked in.
If you have selected a spot that cannot be reserved with other spots, you will not be able to click the [BOOK IN BULK] button.
To select multiple spots in a room/area at once, hold down the Shift key and click on the room/area.
Edit your reservation
On the spot's reservation screen, select the date, floor, and time slot with the reservation you want to edit.
Click on the spot and the reservation details will be displayed on the right side of the screen.
Click [Edit] icon of the reservation you want to edit.
Edit screen for the reservation will be displayed.
Edit the reservation and click [UPDATE].
Delete your reservation
On the spot reservation screen, select the date, floor, and time slot with the reservation you want to delete.
Click on the spot, and the reservation details will be displayed on the right side of the screen.
Click [Edit] icon of the reservation you want to delete.
Edit screen for the reservation will be displayed.
Click [DELETE].
Note
If multiple spots are reserved at once, clicking [DELETE] will delete all the reserved spots.
If you wish to delete only some spots, deselect the "Spot" and "User" fields in the Edit screen.
 icon is a floor.


Comments
0 comments
Article is closed for comments.